


EN
DE ES IT FR PT NL RU FI SV NO DA PL CS SK SL HR HU RO BG EL AR TR HE LT LV ET
English (Original Instructions)
3
Replacing the Sanding Sheet (see figure B-C)
To remove the sanding sheet 10, lift it from the side and
pull it off of the sanding plate 6.
When attaching a new sanding sheet, remove any dust or
debris from the sanding plate 6, e. g., with a brush.
The surface of the sanding plate 6 is fitted with Velcro
backing for quick and easy fastening of sanding sheets
with Velcro adhesion.
Press the sanding sheet 10 firmly against the bottom side
of the sanding plate 6.
To ensure optimum dust extraction, pay attention that the
punched holes in the sanding sheet match with the holes
in the sanding plate.
The dust box (alignment aid) 11 can be used for alignment
of the sanding sheet 10 on the sanding plate 6. Place
the sanding sheet with the Velcro facing upward on the
alignment aid. Press the cams of the alignment aid into
two holes of the sanding plate and roll off the sanding
sheet from the alignment aid. Press the sanding sheet
firmly against the sanding plate.
Note: A correctly positioned sanding sheet is required to
ensure low vibration of the power tool during operation.
Selection of the Sanding Plate
Depending on the application, the machine can be
equipped with sanding plates of different hardness:
– Sanding plate, medium (black): Suitable for all
sanding work; universally usable.
– Sanding plate, soft (grey, accessory): Suitable for
intermediate and fine sanding, incl. on convex
surfaces.
Replacing the Sanding Plate (see figures D–E)
Note: Replace a damaged sanding plate 6 immediately.
Pull off the sanding sheet or the polishing accessory.
Unscrew the four screws 12 completely and remove the
sanding plate 6.
Clean the upper side of the new sanding plate 6. Apply a
thin coat of synthetic grease to the outer ring hatched grey
in the figure.
Attach the new sanding plate 6 and tighten the four
screws again.
Note: A damaged sanding-plate base 13 may be changed
only by an authorised after-sales service agent for power
tools.
Dust/Chip Extraction
■
Dust from materials such as lead-containing coatings,
some wood types, minerals and metal can be harmful
to one’s health. Touching or breathing-in the dust can
cause allergic reactions and/or lead to respiratory
infections of the user or bystanders.
Certain dust, such as oak or beech dust, is considered
carcinogenic, especially in connection with wood-
treatment additives (chromate, wood preservative).
Materials containing asbestos may only be worked by
specialists.
– As far as possible, use a dust extraction system
suitable for the material.
– Provide for good ventilation of the working place.
–
It is recommended to wear a P2 filter-class
respirator.
Observe the relevant regulations in your country for
the materials to be worked.
■
Prevent dust accumulation at the workplace. Dust can
easily ignite.
Integrated Dust Extraction with Dust Box(see
figures F-G)
To empty the dust box assembly 5, pull dust box 11 off
the power tool by squeezing both sides of dust box 11.
Empty the dust box 11and clean the dust box 11 with a
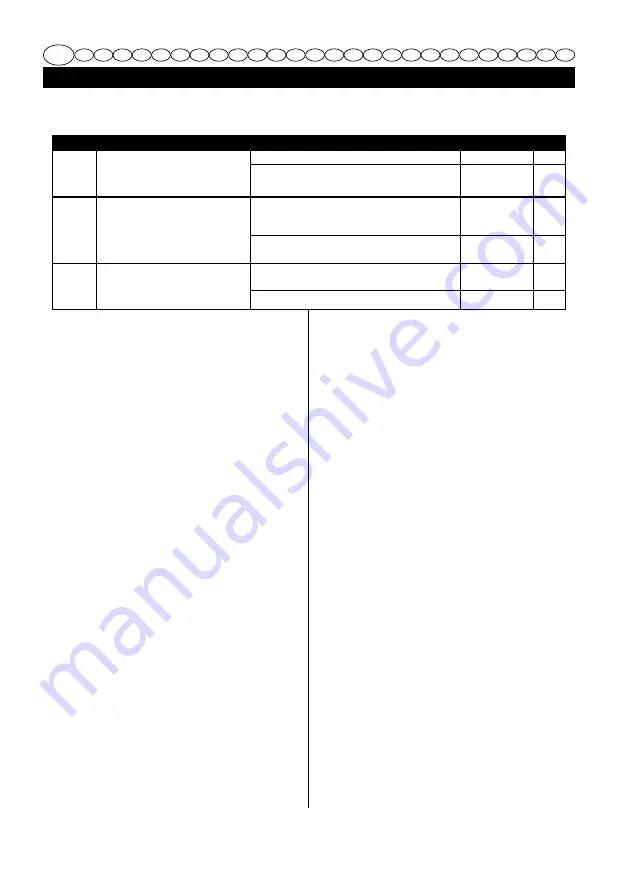
Selecting the Sanding Sheet
Select a sanding sheet with the appropriate grain as required for the desired surface removal rate. Greenworks sanding
sheets are suitable for paint, wood and metal.
Operational area
Application
Grain size
Removal (coarse sanding)
−
Coarse sanding down
material removal
−
Removal of old paint
− Sanding old paint, varnish and filler
extra coarse
40
−
Removal of thin coats
−
Pre-sanding rough, unplaned surfaces
coarse
60
Preparation (intermediate sanding)
−
Light sanding down
−
Light sanding of surfaces for
continued processing
−
Face sanding and planing of irregularities
−
Removing score marks from coarse-
sanding
medium
80
−
Evening out/touching up before applying
paint/varnish
fine
120
Fine Sanding
−
Intermediate varnish sanding
−
Light sanding of coating defects
− Removal of fibres from surfaces
−
Fine sanding before staining or glazing
very fine
180
−
Light sanding of primer prior to coating
extra fine
240


