background image

5

 If the power supply cord is damaged, it must be replaced only by the manufacturer or by an 

authorized service center to avoid risk.

 Do not point the string trimmer in the direction of people or pets.

 When not in use, string trimmer should be stored indoors in a dry, locked up place—out of the 

reach of children.

 Maintain tool with care. Keep fan area clean for best and safest performance. follow 

unplugging it.

 To reduce the risk of electrical shock, do not expose to rain, do not use on wet surfaces. Store 

indoors.

 S

To reduce risk of injury to persons, remove battery pack when not in use.

Stay Alert-Watch what you are doing. Use common sense. Do not operate appliance when
you are tired.

ave these instructions. Refer to them frequently and use them to instruct others who may 

use this power tool. If you loan someone this power tool, loan them these instructions also.

W A R N I N G   (PROPOSITION 65)

Some dust created by power sanding, sawing, grinding, drilling, and other construction activities 
contains  chemicals  known  to  cause  cancer,  birth  defects  or  other  reproductive  harm.  Some 
examples of these chemicals are: 

 Lead from lead-based paints

 Crystalline silica from bricks and cement and other masonry products, and

 Arsenic and chromium from chemically treated lumber.

Your  risk  of  exposure  to  these  chemicals  varies  depending  on  how  often  you  do  this  type  of 
work. To reduce your exposure to these chemicals, work in a well-ventilated area, and work with 

particles.

CHILD SAFETY

Tragic accidents can occur if the operator is not aware of the presence of children.

 Keep children out of the working area and under the watchful care of a responsible adult.

 Do not allow children under the age of 14 to operate this trimmer. Children who are 14 

years of age and older must read and understand the operating instructions and safety 
rules in this manual and must be trained and supervised by a parent.

 Stay alert, and turn the trimmer off if a child or any other person enters the working area.

 Look behind and down for small children before and while cutting backwards.

 Use extreme care when approaching blind corners, doorways, shrubs, trees, or other 

objects that may obscure your view of a child who may run into the path of the trimmer.

IMPORTANT SAFETY INSTRUCTIONS

Summary of Contents for 2100000

Page 1: ...Owner s Manual TOLL FREE HELPLINE 1 888 90WORKS 888 909 6757 40V BRUSHLESS Cutter String Trimmer Read all safety rules and instructions carefully before operating this tool 2100000 60 2332...

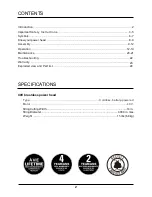
Page 2: ...e Troubleshooting Warranty Exploded view and Part list SPECIFICATIONS 40V brushless power head Weight 15 lbs 6 8kg CONTENTS Type Cordless battery powered Motor 40 V Introduction 2 Important Safety Ins...

Page 3: ...in moving parts Use extra care when cleaning on stairs Do not expose to rain store indoors Do not operate in poor lighting Keep all parts of your body away from any moving part Wear heavy long pants b...

Page 4: ...osive and may cause damage to the eyes or skin It may be toxic if swallowed explosion and possibly injury Batteries can explode in the presence of a source of ignition such as a pilot light To reduce...

Page 5: ...cer birth defects or other reproductive harm Some examples of these chemicals are Lead from lead based paints Crystalline silica from bricks and cement and other masonry products and Arsenic and chrom...

Page 6: ...user must read and understand operator s manual before using this product Eye Protection Wear eye protection when operating this equipment Wear era protection when operating this equipment Safety Ale...

Page 7: ...on Safety Mask for use over eyeglasses or standard safety glasses with side shields Always use eye protection that is marked to comply with ANSI Z87 1 W A R N I N G The operation of any power tool can...

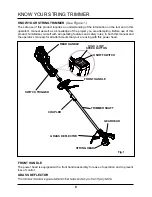
Page 8: ...oduct familiarize yourself with all operating features and safety rules in both this manual and the operator s manuals for all attachments that your are using with this power head FRONT HANDLE The pow...

Page 9: ...by the manufacturer and require customer installation Use of a product that may have been improperly assembled could result in serious personal injury W A R N I N G If any parts are damaged or missing...

Page 10: ...ents use only 080 in diameter line The attachment connects to the power head by means of a coupler device Loosen the knob on the coupler and remove the hanger cap from the attachment Push in the butto...

Page 11: ...left while holding unit as if in use Place clamp C on to the back side of A on to shaft Take 2 bolts provided and secure bolts to clamp with philips screw driver not provided REMOVING THE ATTACHMENT...

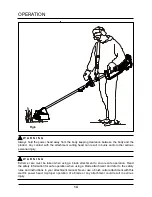
Page 12: ...ay also be required depending on the type of attachment used and as prescribed in the attachment s Operator s Manual Failure to do so could result in objects being thrown into your eyes and other poss...

Page 13: ...arm hand or any 13 depending on attachment used during trimmer operation with all body parts clear of motor housing or as shown in the applicable attachment Operator s Manual Extended contact with the...

Page 14: ...ersonal injury W A R N I N G Extreme care must be taken when using a blade attachment to ensure safe operation Read the safety information for safe operation when using a blade attachment and refer to...

Page 15: ...t Remove screw driver and rotate the trimer head to make sure it is secure Remove currently installed string head Place the washer 2 on the end of the drive shaft make sure hole A and B are aligned In...

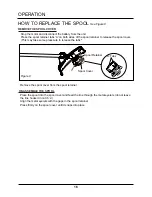
Page 16: ...sides of the spool retainer to release the spool cover This may take some presssure to release the tabs Remove the spool cover from the spool retainer RE ASSEMBLE THE SPOOL Place the spool into the s...

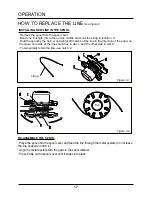
Page 17: ...d both halves of the line in the direction of the arrow on the spool One side of the line should lay in slot c and the other side in slot b To temporarily retain the line use notch e RE ASSEMBLE THE S...

Page 18: ...o holes 3 Place the Brush cutter Blade B on top of the spacer A ensuring it is centered 4 Place washer C on top of the Brush cutter Blade B 5 Place cover D over washer C 6 Using a 19mm or 3 4 wrench t...

Page 19: ...rimmer tilted toward the area being cut this is the best cutting area 6 The trimmer cuts when passing the unit from right to left This will avoid throwing debris at the Use the tip of string to do the...

Page 20: ...an dirt and debris from the power head using a damp cloth with a mild detergent W A R N I N G When servicing use only identical replacement parts Use of any other parts may create a hazard or cause pr...

Page 21: ...ct Store it in a well ventilated place that is inaccessible to children Keep away from corrosive agents such as garden chemicals and de icing salts TROUBLESHOOTING PROBLEM CAUSE SOLUTION Motor fails t...

Page 22: ...at has become inoperative due to misuse commercial use abuse neglect accident improper maintenance or alteration or 2 The unit if it has not been operated and or maintained in accordance with the owne...

Page 23: ...23 EXPLODED VIEW 1 2 3 4 5 6 7 8 9...

Page 24: ...DESCRIPTION QTY 1 31102975 311202836 31121836 31112836 34107511 3 33307825 31108836 31114836 31102980 Battery Upper shaft Front handle Lower shaft Knob Guard connecter Trimmer head Guard Charger 1 2 1...

Page 25: ...Printed in China on 100 Recycled Paper Rev 01 01 28 14 TOLL FREE HELPLINE 1 888 90WORKS 888 909 6757...

Reviews: