background image

16

BATTERY CHARGER

Fig. 7

W A R N I N G  

If the battery is inserted into the charger when warm or hot, the CHARGING LED indicator light on 

the charger may switch on and illuminate RED. If this occurs allow the battery to cool inside of the 

charger for up to 30 minutes. Charging should automatically start once battery has cooled.


CHARGER MOUNTING

1. This charger can be installed hanging on a wall using two #8 screws (not included ).
2. Locate the placement for the charger to be wall mounted.
3. If fastening to wood studs use 2 wood screws  (not included ).
4. Drill two holes on center 4.5 in. apart ensuring that they are vertically aligned.
5. If fastening to drywall use wall anchors (not included) and screws to secure the charger to the wall.

If the battery pack does not charge properly:

• 

Check the current at the power outlet with another tool . Make sure that the outlet is not turned 

off.

• 

Check that the charger contacts have not been shorted by debris or foreign material.

•  If the air temperature is above 104ºF or below


45ºF, 

move the charger and battery pack to a room 

temperature location. 

CHECKING THE CHARGE

Note: If the battery and the charger won’t be used for a long time, remove the battery from the 

charger and pull out the AC power plug. 

 (See Figure 7.)

Summary of Contents for 2200702

Page 1: ...Read all safety rules and instructions carefully before operating this tool Owner s Manual TOLL FREE HELPLINE 1 855 345 3934 www GreenWorksTools com 80V LITHIUM ION CORDLESS HEDGE TRIMMER 2200702...

Page 2: ...14 Battery charger 15 16 Maintenance 17 Environmentally safe battery disposal 18 Troubleshooting 19 Warranty 20 Exploded View 21 Parts List 22 SPECIFICATIONS 80V LITHIUM ION 24 CORDLESS HEDGE TRIMMER...

Page 3: ...g and gloves away from moving parts Loose clothes jewelry and long hair can be caught in moving parts Avoid accidental start ups Make sure the switch is in the locked or off position before inserting...

Page 4: ...viced before using Many accidents are caused by poorly maintained tools Use only accessories that are recommended by the manufacturer for your tool Accessories that may be suitable for one tool may cr...

Page 5: ...ou are tired or your visibility is limited Do not use the trimmer at night or in reduced light Keep cable away from cutting area During operation the cable may be hidden in shrubs and can be accidenta...

Page 6: ...at normal room temperature Do not try to connect two chargers together The battery pack cells may develop a small leak under extreme usage or temperature conditions If the outer seal is broken and the...

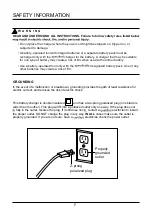
Page 7: ...eate a risk of GROUNDING In the event of a malfunction or breakdown grounding provides the path of least resistance for electric current and reduces the risk of electric shock This battery charger is...

Page 8: ...he Operator s Manual To reduce the risk of injury user must read and understand operator s manual before using this product Safety Alert Precautions that involve your safety Keep Bystanders Away Keep...

Page 9: ...avoided will result in death or serious injury WARNING Indicates a potentially hazardous situation which if not avoided could result in death or serious injury CAUTION Indicates a potentially hazardou...

Page 10: ...ety rules GUARD The guard helps to chips or other debris away from the operator s hands and eyes TRIGGER SWITCH The lock out button must be depressed before the trigger switch is depressed Once the tr...

Page 11: ...ed and the switch is in the OFF position before inspecting adjusting or performing maintenance on any part of the hedger Read understand and follow the instructions contained in the section entitled C...

Page 12: ...duct If any parts are damaged or missing please call 1 855 345 3934 for assistance PACKING LIST Cordless hedge trimmer Operator s manual W A R N I N G To avoid personal injury Handle the blade with ca...

Page 13: ...hedge trimmer will turn ON 4 Release the lock out button The hedge trimmer will stay on as long as the trigger switch 5 The hedge trimmer will stop if you release the trigger handle IMPORTANT If the...

Page 14: ...until it clicks into place and the lever locks in 4 To turn the handle back to center pull the rotation lever again turn the handle slightly release the rotation lever and continue turning the handle...

Page 15: ...arger A fully discharged battery pack will require the allotted time as stated in the battery manual Plug the charger into an AC power outlet False defect note When the battery is inserted into the ch...

Page 16: ...od screws not included 4 Drill two holes on center 4 5 in apart ensuring that they are vertically aligned 5 If fastening to drywall use wall anchors not included and screws to secure the charger to th...

Page 17: ...from the charger Do not store the battery pack on the tool After charging the battery pack may be stored in the charger as long as the charger is not plugged in Charger Maintenance Keep the charger c...

Page 18: ...battery pack cracks or breaks with or without leaks do not recharge it and do not use Dis pose of it and replace with a new battery pack DO NOT ATTEMPT TO REPAIR IT To avoid injury and risk of fire ex...

Page 19: ...blades do not move Hedger damaged Do not use hedge trimmer Debris or other may be jamming the blades Call for technical service Remove battery clear debris blockage from blades Battery is not secure...

Page 20: ...y part that has become inoperative due to misuse abuse neglect accident improper maintenance or alteration or 2 The unit if it has not been operated and or maintained in accordance with the owner s ma...

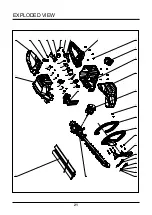
Page 21: ...21 EXPLODED VIEW...

Page 22: ...119897 34112897 Spring Insert seat Left housing 18 1 19 1 20 1 34103897 36101897 Top cover Brushless DC motor 21 1 22 1 23 2 3220511D Screw M4 12 24 1 34109897 34117897 3220163 Auxiliary handle upper...

Page 23: ...TOLL FREE HELPLINE 1 855 345 3934 Rev 02 07 03 12 Printed in China on 100 Recycled Paper...

Reviews: