background image

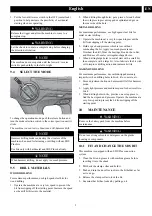
3. Put the forward/reverse siwtch in the OFF (center lock)

position to help decrease the possibility of accidental
starting when not operating.


WARNING

Release the trigger and allow the machine to come to a
complete stop.


WARNING

Let the chuck to come to a complete stop before changing
the direction of rotation.


NOTE

The machine does not operate until the forward / reverse
switch is pushed fully to the left or right.
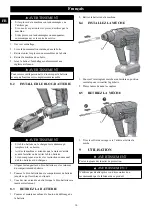
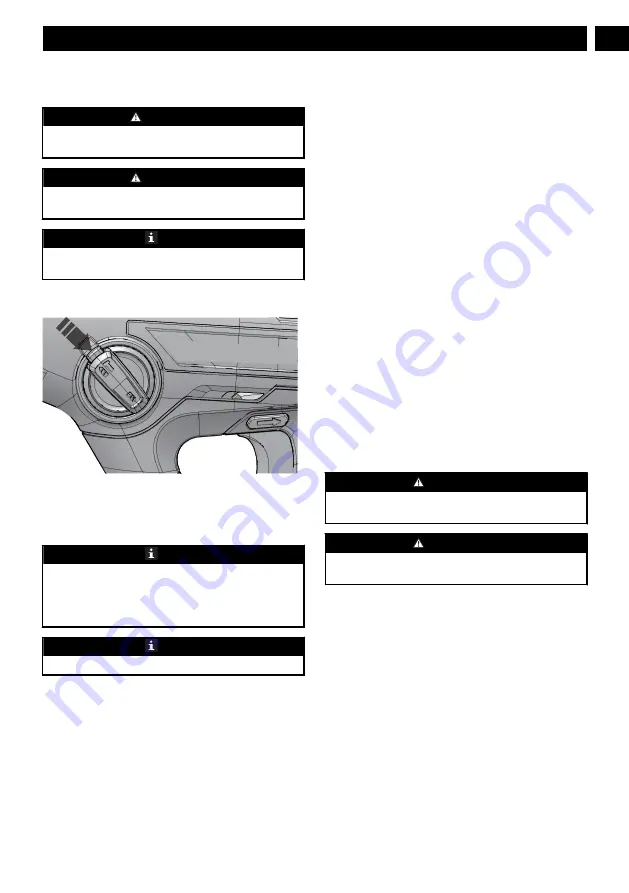
9.4

SELECT THE MODE

To change the operation mode, push the release button and
turn the mode selection switch to the correct position until it
clicks.

The machine is used for two functions: drill, hammer drill


NOTE

Hammer drilling mode can destroy the structure of the
machine when used for fastening or drilling without SDS
Plus bits.

Use bits only with hard metal and SDS Plus shaft only.


NOTE

When hammer drilling, do not apply too much pressure.

9.5

DRILL MATERIALS

WOOD DRILLING

For maximum performance, use high speed steel bits for
wood drilling.
1. Operate the machine at a very low speed to prevent the

bit from slipping off the starting point. Increase the speed
as the drill bit bites into the material.

2. When drilling through holes, put a piece of wood behind

the workpiece to prevent ragged or splintered edges on
the rear side of the hole.

METAL DRILLING

For maximum performance, use high speed steel bits for
metal or steel drilling.

1. Operate the machine at a very low speed to prevent the

bit from slipping off the starting point.

2. Hold a speed and pressure which let cut without

overheating the bit. Apply too much pressure can:
Overheat the drill; Wear the bearings; Bend or burn bits;
and Produce off-center or irregular-shaped holes.

3. When drilling large holes in metal, start with a small bit,

then complete with a large bit. Also, lubricate the bit with
oil to improve drilling action and increase bit life.

MASONRY DRLLING

For maximum performance, use carbide-tipped masonry
impact bits when drilling holes in brick, tile, concrete, etc..

1. Move adjustment button on hammer drill left for hammer

mode.

2. Apply light pressure and medium speed for best results in

brick.

3. When drilling holes in tile, practice on a scrap piece to

find the best speed and pressure. Operate the machine at a
very low speed to prevent the bit from slipping off the
starting point.

10

MAINTENANCE


WARNING

Remove the battery pack from the machine before
maintenance.


WARNING

Do not use strong solvents or detergents on the plastic
housing or components.

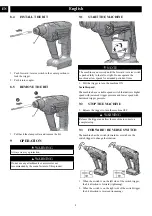
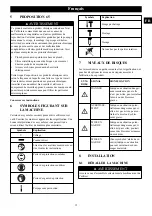
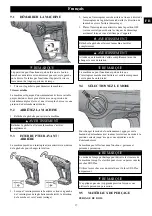
10.1 FIT AND CHANGE THE SDS BIT

This machine is equipped with an SDS Plus connection
system.
1. Clean the bit and grease it with machine grease before

inserting it into the chuck.

2. Pull back the clamp collar and hold it.
3. Push and turn the dust-free tool into the bit holder as far

as it can go.

4. Release the clamp collar to lock the bit.
5. Examine that bit has locked by pulling on it.

9

English

EN

Summary of Contents for HMG405

Page 1: ...HMG405 EN OPERATOR MANUAL FR MANUEL D OP RATEUR SDS ROTARY HAMMER MARTEAU PERFORATEUR SDS ES MANUAL DEL OPERADOR MARTILLO GIRATORIO SDS www greenworkstools com www shopgreenworksgear com Rev B...

Page 2: ......

Page 3: ...nstruction 5 5 Proposition 65 6 6 Symbols on the product 6 7 Risk levels 7 8 Installation 7 8 1 Unpack the machine 7 8 2 Install the battery pack 7 8 3 Remove the battery pack 7 8 4 Install the bit 8...

Page 4: ...radiators ranges and refrigerators There is an increased risk of electric shock if your body is earthed or grounded Do not expose power tools to rain or wet conditions Water entering a power tool wil...

Page 5: ...keys nails screws or other small metal objects that can make a connection from one terminal to another Shorting the battery terminals together may cause burns or fire Under abusive conditions liquid m...

Page 6: ...asure prevents the battery against dangerous overload Charge the battery pack only with the recommended charger The batttery has some power Fully charge the battery when you use it for the first time...

Page 7: ...ts do not operate the machine If parts are damaged or missing contact the service center 1 Open the package 2 Read the documentation provided in the box 3 Remove all the unassembled parts from the box...

Page 8: ...extended periods of time 1 Pull the trigger to turn the machine ON Variable speed The machine has a variable speed switch that delivers higher speed with increased trigger pressure and lower speed wi...

Page 9: ...bits for metal or steel drilling 1 Operate the machine at a very low speed to prevent the bit from slipping off the starting point 2 Hold a speed and pressure which let cut without overheating the bit...

Page 10: ...rs against defects in materials parts or workmanship Greenworks at its own discretion will repair or replace any and all parts found to be defective through normal use free of charge to the customer T...

Page 11: ...s de s curit et d utilisation suppl mentaires 14 5 Proposition 65 15 6 Symboles figurant sur la machine 15 7 Niveaux de risques 15 8 Installation 15 8 1 D baller la machine 15 8 2 Installer le bloc ba...

Page 12: ...ler les enfants pour s assurer qu ils ne jouent pas avec la machine 2 2 S CURIT LECTRIQUE Les prises de l outil lectrique doivent tre compatibles avec la prise de courant Ne modifiez jamais la prise d...

Page 13: ...is s hors de port e des enfants et ne laissez pas des personnes qui ne se sont pas familiaris es avec l outil lectrique ou ces instructions l utiliser Les outils lectriques sont dangereux entre les ma...

Page 14: ...oussi re emp che en grande partie la p n tration de poussi re de per age dans le porte outil pendant son utilisation Lors de l insertion de l outil veillez ce que le capuchon de protection contre la p...

Page 15: ...cet outil Veuillez les tudier et apprendre leur signification Une bonne interpr tation de ces symboles vous permettra de mieux utiliser l outil et de mani re plus s curitaire Symbole Explication V Vol...

Page 16: ...ou de retirer le bloc batterie Lisez comprenez et suivez les instructions du manuel du bloc batterie et du chargeur 1 Alignez les languettes du bloc batterie avec les rainures du compartiment de batt...

Page 17: ...rupteur de la g chette marche arr t la direction de la m che est vers l arri re desserrage 3 Placez l interrupteur avant arri re dans la position OFF verrou central pour r duire les risques de d marra...

Page 18: ...e pour viter que la m che ne glisse du point de d part 10 ENTRETIEN AVERTISSEMENT Retirez le bloc batterie de la machine avant l entretien AVERTISSEMENT N utilisez pas de solvants ou de d tergents pui...

Page 19: ...e en raison d une mauvaise utilisation d une utilisation commerciale d un abus d une n gligence d un accident d un entretien inappropri ou d une modification ou 2 L appareil s il n a pas t utilis et o...

Page 20: ...cional e instrucciones de trabajo 23 5 Propuesta 65 24 6 S mbolos en el producto 24 7 Niveles de riesgo 24 8 Instalaci n 24 8 1 Desembalaje de la m quina 24 8 2 Instalaci n de la bater a 25 8 3 Retira...

Page 21: ...cciones sobre el uso del aparato por parte de una persona responsable de su seguridad Los ni os deben estar bajo vigilancia para asegurarse de que no juegan con el aparato 2 2 SEGURIDAD EL CTRICA Los...

Page 22: ...el ctrica se arranque accidentalmente Almacene las herramientas el ctricas inactivas fuera del alcance de los ni os y no permita que personas que no est n familiarizadas con la herramienta el ctrica...

Page 23: ...una tapa de protecci n antipolvo da ada La tapa de protecci n antipolvo evita en gran medida la penetraci n del polvo de perforaci n en el portabrocas durante el funcionamiento Al insertar la herrami...

Page 24: ...rramienta mejor y de manera m s segura S mbolo Explicaci n V Tensi n Corriente continua Lea todas las advertencias de seguri dad y todas las instrucciones Lleve protecci n ocular Lleve protecci n audi...

Page 25: ...elevaci n de la bater a con las ranuras del compartimento de la bater a 2 Introduzca la bater a en el compartimento de la bater a hasta que encaje en su posici n 3 Cuando escuche un clic la bater a es...

Page 26: ...el gatillo interruptor la direcci n de la punta se invierte afloje 3 Sit e el interruptor de avance retroceso en la posici n de apagado bloqueo central para ayudar a disminuir la posibilidad de una pu...

Page 27: ...y baja para evitar que la broca se deslice del punto de inicio 10 MANTENIMIENTO AVISO Retire la bater a de la m quina antes de realizar tareas de mantenimiento AVISO No utilice disolventes o detergent...

Page 28: ...lquier pieza que no funcione debido a mal uso uso comercial abuso negligencia accidente mantenimiento inadecuado o alteraci n o 2 La unidad si no ha sido utilizada o mantenida de acuerdo con el manual...

Reviews: