background image

BATTERY AND BATTERY CHARGER

16

SPECIFICATIONS

40V charger: 29482
Input: 100-240V AC 50/60Hz, 1.5A Max
Output: 40V DC 2A

CHARGING PROCEDURE 

(See Figure 5.)

NOTE:

 The battery is not shipped fully charged. It is recommended to fully charge before first 

use to ensure that maximum run time can be achieved. This lithium-ion battery will not develop a 

memory and may be charged at any time.

1. Plug the charger into an AC power outlet.
2. Insert the battery pack (1) into the charger (2).

This is a diagnostic charger. The Charger LED Lights (3) will illuminate in specific order to 

communicate the current battery status. They are as follows:

CHARGING PROCEDURE (LED INDICATOR)

BATTERY IS CHARGING:
fULLY CHARGED:
BATTERY IS TOO WARM:

(REMOVE fOR APPROx. 30 

MINUTES TO ALLOW TO COOL)

DEfECTIVE BATTERY:

(REMOVE AND REPLACE WITH 

NEW BATTERY If THIS OCCURS)

NO BATTERY PRESENT

RED

GREEN

ORANGE

Off

RED

RED

RED

RED

BLINKING

RED

BLINKING

3

1

2

Fig. 5

RED

false Defect Note:
When the battery is inserted into the charger, and the 

status LED flashes, remove the battery from the charger 

for 1 minute, then reinsert. If the status LED indicates 

normal than the battery pack is good. If the status LED 

is still blinking, remove the battery pack and unplug the 

charger. Wait 1 minute and plug the charger back in and 

reinsert the battery pack. If the status LED indicates 

normal than the battery pack is good. If the status LED is 

still blinking then the battery pack is defective and needs 

to be replaced.

Summary of Contents for HT40L00

Page 1: ...40V BRUSHLESS HEDGE TRIMMER Read all safety rules and instructions carefully before operating this tool Owner s Manual TOLL FREE HELPLINE 1 888 90WORKS 1 888 909 6757 www GreenWorksTools com HT40L00...

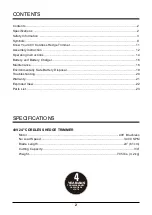
Page 2: ...ns 14 Battery and Battery Charger 16 Maintenance 18 Environmentally Safe Battery Disposal 19 Troubleshooting 20 Warranty 21 Exploded View 22 Parts List 23 Specifications 40V 24 CORDLESS HEDGE TRIMMER...

Page 3: ...with specified battery pack Use of any other batteries may create a risk of fire Do not expose power tools to rain or wet conditions If operating a power tool in a damp location is unavoidable use a...

Page 4: ...making any adjustments changing accessories or storing the tool Such preventive safety measures reduce the risk of starting the tool accidentally Store idle tools out of reach of children and other u...

Page 5: ...rious personal injury 2 Recharge only with the charger specified by the manufacturer A charger that is suitable for one type of battery pack may create a risk of fire when used with another battery pa...

Page 6: ...ger in water or other liquid SAFETY INFORMATION DO NOT probe the charger with conductive materials The charging terminals hold 120V If the battery pack case is cracked or damaged DO NOT insert into th...

Page 7: ...risk of exposure to these chemicals varies depending on how often you do this type of work To reduce your exposure to these chemicals work in a well ventilated area and work with approved safety equip...

Page 8: ...oper outlet DO NOT change the plug in any way IN ALL cases make sure the outlet is properly grounded If you are not sure have a certified electrician check the power outlet SAFETY INFORMATION Do not p...

Page 9: ...nual To reduce the risk of injury user must read and understand operator s manual before using this product Safety Alert Precautions that involve your safety Keep Bystanders Away Keep all bystanders a...

Page 10: ...death or serious injury WARNING Indicates a potentially hazardous situation which if not avoided could result in death or serious injury CAUTION Indicates a potentially hazardous situation which if no...

Page 11: ...dle and the lock off button located behind the auxiliary handle must be depressed simultaneously to allow blade rotation 2 ROTATING HANDLE RELEASE By pulling the rotating handle release the rear handl...

Page 12: ...on the battery pack down and hold 2 Grasp the rear handle 2 firmly Pull the battery pack out of the handle IMPORTANT DO NOT remove the blade assembly unless it needs sharpening straightening or replac...

Page 13: ...ny parts are damaged or missing please call 1 888 909 6757 for assistance packing list Cordless hedge trimmer Operator s manual W A R N I N G To avoid personal injury Handle the blade with care Do not...

Page 14: ...the lock out button 1 2 While holding the lock out button squeeze the trigger switch 2 and the hedge trimmer will turn ON Note Once the hedge trimmer is turned ON there is no need to hold the lock ou...

Page 15: ...the rotation lever and begin turning the rear handle Release the rotation lever and turn the handle 90 degrees to either side until it clicks into place and the lever locks into place 4 To turn the h...

Page 16: ...PROCEDURE LED INDICATOR BATTERY IS CHARGING fULLY CHARGED BATTERY IS TOO WARM REMOVE fOR APPROx 30 MINUTES TO ALLOW TO COOL DEfECTIVE BATTERY REMOVE AND REPLACE WITH NEW BATTERY If THIS OCCURS NO BAT...

Page 17: ...on the charger may switch on and illuminate RED If this occurs allow the battery to cool inside of the charger for up to 30 minutes Charging should automatically start once battery has cooled CHARGER...

Page 18: ...arger Maintenance Keep the charger clean and clear of debris Do not allow foreign material to get into the recessed cavity or onto the contacts Wipe the charger clean with a dry cloth Do not use solve...

Page 19: ...battery pack cracks or breaks with or without leaks do not recharge it and do not use Dispose of it and replace with a new battery pack DO NOT ATTEMPT TO REPAIR IT To avoid injury and risk of fire ex...

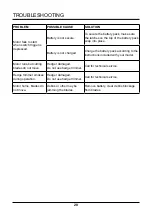
Page 20: ...is not charged Charge the battery pack according to the instructions included with your model Motor runs but cutting blades do not move Hedger damaged Do not use hedge trimmer Call for technical serv...

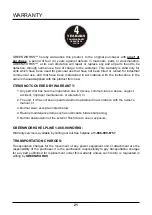
Page 21: ...tive due to misuse commercial use abuse neglect accident improper maintenance or alteration or 2 The unit if it has not been operated and or maintained in accordance with the owner s manual or 3 Norma...

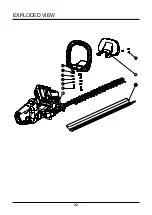
Page 22: ...22 EXPLODED VIEW...

Page 23: ...11646 40V Brushless HT40L00 tool only 1 2 32203659 Bolt 2 3 34901897 Washer 2 4 34206897 Shock pad 2 5 33309897 Shock pad 2 6 34205897 Shock pad 2 7 311021646 Auxiliary handle assembly 1 8 32217217 Sc...

Page 24: ...TOLL FREE HELPLINE 1 888 909 6757 Rev 00 01 12 16 Printed in China on 100 Recycled Paper Greenworks Tools P O Box 3130 Mooresville North Carolina 28117...

Reviews: