background image

• Check damaged parts before using the appliance, a

guard or other part that is damaged should be

carefully checked to determine that it will operate

properly and perform its intended function. Check

for alignment of moving parts, binding of moving

parts, breakage of parts, damaged mountings, and

any other condition that may affect its operation. A

guard or other part that is damaged should be

properly repaired or replaced by an authorized

service center unless indicated elsewhere in this

manual.

• Do not charge appliance in rain, or in wet locations.
• Remove or disconnect battery before servicing,

cleaning or removing material from the gardening

appliance.

• Use appliances only with specifically designated

battery packs. Use of any other battery packs may

create a risk of injury and fire.

• Recharge only with the charger specified by the

manufacturer. A charger that is suitable for one type

of battery pack may create a risk of fire when used

with another battery pack.

• When battery pack is not in use, keep it away from

other metal objects, like paper clips, coins, keys,

nails, screws or other small metal objects, that can

make a connection from one terminal to another.

Shorting the battery terminals together may cause a

fire.

• Under abusive conditions, liquid may be ejected

from the battery; avoid contact. If contact

accidentally occurs, flush with water. If liquid

contacts eyes, additionally seek medical help. Liquid

ejected from the battery may cause irritation or

burns.

• Do not use a battery pack or appliance that is

damaged or modified. Damaged or modified

batteries may exhibit unpredictable behavior

resulting in fire, explosion or risk of injury.

• Do not expose a battery pack or appliance to fire or

excessive temperature. Exposure to fire or

temperature above 265 °F (130 °C) may cause an

explosion.

• Do not dispose of the batteries in a fire. The cells

may explode. Check with local codes for possible

special disposal instructions.

• Do not open or mutilate the batteries. Released

electrolyte is corrosive and may cause damage to

the eyes or skin. It may be toxic if swallowed.

• Exercise care in handling batteries in order not to

short the battery with conducting materials such as

rings, bracelets, and keys. The battery or conductor

may overheat and cause burns.

• Follow all charging instructions and do not charge

the battery pack or appliance outside of the

temperature range specified in the instructions.

Charging improperly or at temperatures outside of

the specified range may damage the battery and

increase the risk of fire.

• Have servicing performed by a qualified repair

person using only identical replacement parts. This

will ensure that the safety of the product is

maintained.

• Keep guards in place and in working order.
• Keep hands and feet away from cutting area.
• Disconnect the battery pack from the appliance

before making any adjustments, changing

accessories, or storing appliance. Such preventive

safety measures reduce the risk of starting the

appliance accidentally.

• Use only with the nylon cutting line of 0.08" (2 mm)

diameter. Do not use heavier lines than

recommended by the manufacturer and line

materials of other types – for example, metal wire,

rope, and the like.

SAVE THESE INSTRUCTIONS

3

PROPOSITION 65


WARNING

This product contains a chemical known to the state of

California to cause cancer, birth defects or other

reproductive harm. Some dust created by power

sanding, sawing, grinding, drilling, and other

construction activities contains chemicals known to

cause cancer, birth defects or other reproductive

harm. Some examples of these chemicals are:
• Lead from lead-based paints;
• Crystalline silica from bricks and cement and other

masonry products;

• Arsenic and chromium from chemically treated

lumber.

Your risk of exposure to these chemicals varies

depending on how often you do this type of work. To

reduce your exposure to these chemicals, work in a

well-ventilated area, and work with approved safety

equipment, such as dust masks that are specially

designed to filter out microscopic particles.

Save these instructions.

4

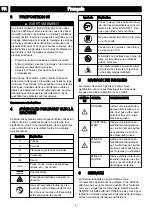
SYMBOLS ON THE MACHINE

Some of the following symbols can be used on this

machine. Please study them and learn their definition.

Proper interpretation of these symbols will let you

operate the tool better and safer.

Symbol

Explanation

V

Voltage

A

Current

Hz

Frequency (cycles per second)

W

Power

3

English

EN

Summary of Contents for STE456

Page 1: ...1 2 3 4 5 6 7 C B A 8 9 STE456...

Page 2: ...10 11 12 13 14 15 16 17 18 19 20 21 STE456...

Page 3: ...STE456 EN OPERATOR MANUAL FR MANUEL D OP RATEUR STRING TRIMMER COUPE BORDURE FILAIRE ES MANUAL DEL OPERADOR CORTABORDES...

Page 4: ......

Page 5: ...battery pack 5 9 Operation 5 9 1 Start the machine 5 9 2 Stop the machine 5 9 3 Operation tips 5 9 4 Cutting tips 6 9 5 Adjust the length of the cutting line 6 9 6 Adjust the cutting diameter 6 10 Mai...

Page 6: ...ions Water entering a power tool will increase the risk of electric shock Don t use in rain Keep all bystanders children and pets at least 50 ft away Dress Properly Do not wear loose clothing or jewel...

Page 7: ...d Exercise care in handling batteries in order not to short the battery with conducting materials such as rings bracelets and keys The battery or conductor may overheat and cause burns Follow all char...

Page 8: ...service we suggest you return the machine to your nearest AUTHORIZED SERVICE CENTER for repair Use only identical manufacturer s replacement parts and accessories 7 ENVIRONMENTALLY SAFE BATTERY DISPO...

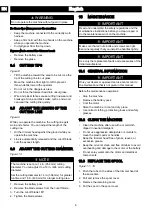
Page 9: ...rewdriver not provided 2 Attach the auxiliary handle and lower clamp on the shaft 3 Set the auxiliary handle in the comfortable position 4 Tighten the screws 8 5 INSTALL THE BATTERY PACK Figure 5 WARN...

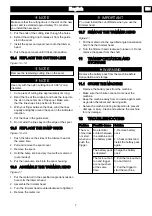
Page 10: ...d 16 in 406 mm for a larger cutting area 1 Remove the battery pack 2 Remove the blade screws from the cut off blade 3 Turn the cut off blade 180 4 Tighten the blade screws 10 MAINTENANCE IMPORTANT Rea...

Page 11: ...housing 10 6 ASSEMBLE THE TRIMMER HEAD Figure 21 1 Put the metal rod in the specified angle transmission hole to fix the trimmer head 2 Assemble the trimmer head 3 Turn the trimmer head counterclockwi...

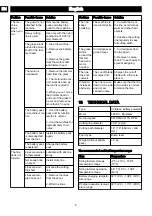
Page 12: ...ng line Lines are tan gled on spool 1 Remove the lines from the spool 2 Wind the lines Problem Possible Cause Solution The line keeps breaking The machine is used incorrectly 1 Cut with the tip of the...

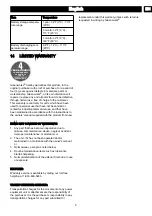
Page 13: ...ained in accordance with the instructions in the owners manual supplied with the product from new ITEMS NOT COVERED BY WARRANTY 1 Any part that has become inoperative due to misuse commercial use abus...

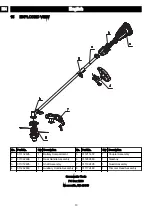
Page 14: ...mpartment 5 311211437 1 Coupler Assembly 2 311022496 1 Rear Handle Assembly 6 311282460 1 Gearbox 3 311012495 1 Shaft Assembly 7 311162495 1 Guard Assembly 4 311262460 1 Auxiliary Handle Assembly 8 31...

Page 15: ...rez le bloc batterie 6 9 Utilisation 6 9 1 D marrez la machine 6 9 2 Arr tez la machine 6 9 3 Conseils sur l utilisation 6 9 4 Conseils de coupe 6 9 5 R glez la longueur de la ligne de coupe 6 9 6 R g...

Page 16: ...sont PAS des lunettes de s curit Le respect de cette r gle r duira le risque de blessures aux yeux Utilisez un masque facial si vous travaillez dans des endroits poussi reux vitez les endroits dangere...

Page 17: ...erie vitez tout contact En cas de contact accidentel rincez avec de l eau En cas de contact avec les yeux consultez galement un m decin Le liquide s chappant des batteries peut causer des irritations...

Page 18: ...cautions destin es assurer la s curit Lisez et comprenez toutes les ins tructions avant d utiliser cette machi ne et suivez tous les avertissements et les consignes de s curit Symbole Explication Port...

Page 19: ...teries usag es dans votre poubelle ordures m nag res NE PAS incin rer NE LES Mettez PAS dans un endroit o ils feront partie d un site d enfouissement de d chets ou d un flux de d chets solides municip...

Page 20: ...en position 1 pour la vitesse lente ou en position 2 pour la vitesse lev e 9 2 ARR TEZ LA MACHINE Figure 6 1 L chez la g chette pour arr ter la machine 9 3 CONSEILS SUR L UTILISATION Figure 7 AVERTIS...

Page 21: ...agressifs pour nettoyer les pi ces en plastique ou les poign es Gardez la t te de coupe exempte d herbe de feuilles ou de graisse excessive Gardez les vents d a ration propres et exempts de d bris pou...

Page 22: ...t te de coupe dans le sens des aiguilles d une montre pour la desserrer Ne retirez pas l entretoise de l arbre 11 TRANSPORT ET ENTREPOSAGE AVERTISSEMENT Retirez le bloc batterie de la machine avant d...

Page 23: ...n avance pas Les lignes sont soud es entre elles Lubrifiez avec du silico ne en vaporisateur Pas assez de li gnes sur la bobi ne Installez plus de lignes Les lignes sont devenues trop courtes Avancez...

Page 24: ...alable que pour les appareils qui ont t utilis s des fins personnelles qui n ont pas t lou s des fins industrielles ou commerciales et qui ont t entretenus conform ment aux instructions du manuel du p...

Page 25: ...du coupleur 2 311022496 1 Assemblage de la poign e arri re 6 311282460 1 Bo te de vitesses 3 311012495 1 Ensemble de l arbre 7 311162495 1 Ensemble de la garde pro tectrice 4 311262460 1 Assemblage d...

Page 26: ......

Page 27: ...iento 6 9 1 Puesta en marcha de la m quina 6 9 2 Detenci n de la m quina 6 9 3 Consejos de funcionamiento 6 9 4 Consejos de corte 6 9 5 Ajuste de la longitud del hilo de corte 6 9 6 Ajuste del di metr...

Page 28: ...riesgo de lesiones oculares Utilice m scara facial si trabaja en espacios de trabajo con polvo Evite los entornos peligrosos No exponga las herramientas el ctricas a condiciones de humedad Si penetra...

Page 29: ...entra en contacto con los ojos acuda tambi n al m dico El l quido despedido de la bater a puede provocar irritaci n o quemaduras No utilice una bater a o un aparato que haya sufrido da os o modificaci...

Page 30: ...iente continua Precauciones que afectan a su segu ridad Debe leer y entender todas las ins trucciones antes de manejar la m quina as como seguir todas las ad vertencias e instrucciones de seguri dad S...

Page 31: ...formar n parte de vertederos de residuos o flujos de residuos s lidos urbanos Ll velas a un centro de reciclaje o eliminaci n certificado 8 INSTALACI N 8 1 DESEMBALAJE DE LA M QUINA AVISO Aseg rese de...

Page 32: ...illo para detener la m quina 9 3 CONSEJOS DE FUNCIONAMIENTO Figura 7 AVISO Mantenga un espacio entre el cuerpo y la m quina AVISO No utilice la m quina sin la protecci n en su posici n Le sugerimos lo...

Page 33: ...a limpiar las piezas de pl stico o las asas Mantenga el cabezal de corte libre de hierba hojas o grasa excesiva Mantenga los respiraderos limpios y libres de residuos para evitar el sobrecalentamiento...

Page 34: ...de corte 2 Gire el cabezal de corte en sentido horario para aflojarlo No retire el espaciador del eje 11 TRANSPORTE Y ALMACENAMIENTO AVISO Retire la bater a de la m quina antes del transporte y el al...

Page 35: ...se han quedado solda dos Lubrique con espray de silicona No ha suficiente hilo en el carre te Instale m s hilo Los hilos se des gastan y son de masiado cortos Avance el hilo de corte Los hilos est n...

Page 36: ...te para unidades que se hayan utilizado para uso personal que no han sido arrendadas o alquiladas para uso industrial comercial y cuyo mantenimiento se ha realizado de acuerdo con las instrucciones de...

Page 37: ...1211437 1 Conjunto del acoplamiento 2 311022496 1 Conjunto de asa posterior 6 311282460 1 Caja de engranajes 3 311012495 1 Conjunto del eje 7 311162495 1 Conjunto de protecci n 4 311262460 1 Conjunto...

Page 38: ......
Reviews: