background image


Page 27 

DLT 2.0 Differential Level Transmitter 

PRODUCT RETURN PROCEDURE 


Instruments may be returned to Greyline for service or warranty repair.  

1)

 Obtain an RMA Number from Greyline - 

Before shipping a product to the factory please contact Greyline by telephone, fax or email to obtain an 
RMA number (Returned Merchandise Authorization). This ensures fast service and correct billing or 
credit. 
 

When you contact Greyline please have the following information available: 


1.  Model number / Software Version 


2.  Serial number 


3.  Date of Purchase 


4.  Reason for return (description of fault or modification required) 


5.  Your name, company name, address and phone number 


2)

 Clean the Sensor/Product - 

Important: unclean products will not be serviced and will be returned to the sender at their expense. 

1. Rinse sensor and cable to remove debris. 

2. If the sensor has been exposed to sewage, immerse both sensor and cable in a solution of 1 part 
household bleach (Javex, Clorox etc.) to 20 parts water for 5 minutes. Important: do not immerse open 
end of sensor cable. 

3. Dry with paper towels and pack sensor and cable in a sealed plastic bag. 

4. Wipe the outside of the enclosure to remove dirt or deposits. 

5. Return to Greyline for service. 

3)

 Ship to Greyline - 

After obtaining an RMA number please ship the product to the appropriate address below: 


Canadian and International  

USA 

 Customers: 

Customers: 


Greyline Instruments Inc. 

Greyline Instruments Inc. 


16456 Sixsmith Drive 

204 150th Avenue 


Long Sault, Ont.  K0C 1P0 

Madeira Beach, FL 33708 


 RMA# 

RMA# 

Summary of Contents for DLT 2.0

Page 1: ...www greyline com USER S GUIDE Installation Operation Instructions Differential Level Transmitter Model DLT 2 0 Manual Series A 1 3 ...

Page 2: ...Note This page has been left blank intentionally ...

Page 3: ...SENSOR MOUNTING LOCATION 20 APPLICATIONS HOTLINE 26 PRODUCT RETURN PROCEDURE 27 APPENDIX A OPTIONS 29 DATA LOGGING Optional 35 CONVERSION GUIDE 37 SPECIFICATIONS 38 IMPORTANT NOTE This instrument is manufactured and calibrated to meet product specifications Please read this manual carefully before installation and operation Any unauthorized repairs or modifications may result in a suspension of th...

Page 4: ...A UL electrical safety standards AC power input and relay connection wires must have conduit entry to the instrument enclosure Installation requires a switch overcurrent fuse or circuit breaker in the building in close proximity to the equipment that is marked as the disconnect switch Risk of electric shock Loosen cover screw to access connections Only qualified personnel should access connections...

Page 5: ...TER OPTION POWER INPUT AC L N Sens B Sens A 4 20 B Sens 4 20 A Sens NO C NC NO C NC 4 20 Diff RLY2 RLY1 AC GND NC C NO NC C NO NC C NO NC C NO RLY3 RLY4 RLY5 RLY6 EXTRA RELAYS OPTION GND USB HARNESS CONNECTOR DATA LOGGER OPTION CORE WHT SHLD GRN CORE WHT SHLD GRN ...

Page 6: ...stem Arrows show the four directions to leave a menu box Press a key to move to the next item in the direction shown Move the cursor underline under numerals and increase or decrease numerals with the and keys To store calibration values permanently even through power interruptions press ...

Page 7: ... Actual A Level 12 000ft Flow B 0 00USG m Difference 0 00ft Level A 4 20mA 19 99 4 20mA Flow B 4 00 4 20mA Diff 20 00 Relays 1 2 3 4 5 6 Relay Parameters Relay 1 Sensor B Flow Function Mode Pump 10000 USG m On 8000 USG m Off LOE mode Off O Alternate N Data Logging Log Site ID 0 Mode Flow Set Date Sep 22 2009 Set Time 14 24 40 Interval 30sec Log Logging Configuration Utility 1 25 05 Sonar 1 14 24 L...

Page 8: ...aiting Press Ç Data logging off 1 2 Data logging on 1 2 3 4 USB file download File download completed Download Error A sensor reading displayed Echo OK B sensor reading displayed Echo OK Difference reading displayed Echo OK No Echo 1 A 1 B 1 D 2 A 2 B 2 D 3 A 3 B 3 D ...

Page 9: ... displayed Tot Displays the current totalizer reading EC Displays echo confidence Relays Energized relays will display as a white character on a black background 24 HR LOG Data Logging option only Press from the MAIN display to view a formatted flow report from instruments with a built in data logger Press to scroll down one day or repeatedly to scroll to a specific date Press to toggle between Se...

Page 10: ...ssword Factory default password is 0000 and if it has not been changed press to proceed to the Menu Selections screen If a password is required press to place the cursor under the first digit and or to set the number then to the second digit etc Press or to proceed to the Menu Selections screen A new password can be stored by going to Special Functions New Password Password Password 0000 ...

Page 11: ...nel flow through a flume or weir sensor B only Sensor A measures level Volume HRT or Flow gives the additional choice of volumetric units ft3 cubic feet USG US gallons USMG US million gallons FLOW only IG Imperial gallons IMG Imperial million gallons FLOW only m3 cubic meters L liters bbl U S oil barrel Press to store the selection then to the next menu item and to enter Linear press and then or t...

Page 12: ...ommon reference assumed to be a level channel floor Slope Offst Appears when calibrating Sensor B Enter a slope offset value to compensate for a sloped channel floor Offset will be a positive value when Sensor B channel floor is lower than Sensor A channel floor Damping Minimum damping allows fast response to level changes Increasing damping slows the DLT 2 0 s response to level changes and is ide...

Page 13: ... of seconds without receiving an echo before the DLT 2 0 displays ECHO LOSS and Control relays change state as calibrated under Relay Parameters Factory default is 30 seconds and is recommended for most applications Minimum is 1 second and maximum is 99 seconds Press from the Units Mode display to return to Menu Selections ...

Page 14: ...arefully measure distance from sensor to zero level with a tape measure and use this measurement as the Max Range setting MINIMUM RANGE In the CALIBRATION menu Press to get to Min Range Press to move the cursor under the digits Use or to set the minimum range Note Min Range must be at least 12 30 5 cm for PZ32T sensors 16 40 6 cm for PZ52T and PZ34 sensors and 8 for PZ15 sensors For correct tank v...

Page 15: ...E MAX LEVEL must be at least 8 20 3 cm depending on sensor model 2 Check the maximum range with the sensor installed by a When liquid is at zero level press to view the Range reading in the Status menu Use this range measured by the DLT 2 0 as the Max Range setting or b Carefully measure distance from sensor to zero level with a tape measure and use this measurement as the Max Range setting NOTE T...

Page 16: ...Khafagi Height 0 000ft Channel Setup Type RECT Weir w EC Height 0 000ft Channel Setup Type RECT Weir Height 0 000ft Channel Setup Type Trapezoidal Size Extra large 60 Large 60 Small 60 12in 45 SRCRC 2in 45 WSC 8in 60 Channel Setup Type Leopld Lagco Size 36in 30in 24in 18in 12in 10in 8in 6in Channel Setup Type Palmer Bowlus Size 48in 42in 36in 30in 27in 24in 21in 18in 15in 12in 10in 8in 6in 4in Cha...

Page 17: ...s Minimum time between pulses is 2 25 seconds and pulse duration is 350 milliseconds Level Appears in Level Range Volume or HRT modes only Press to R Function and to select Pump LoAlm low alarm or HiAlm high alarm Press to return to Menu Selections LOE Set relay state for echo loss event On Off or Hold Alternate Pumps can be set to alternate when in pump mode DATA LOGGING OPTIONAL Refer to Options...

Page 18: ...ss and select Yes to erase and restart the totalizer at zero Restore Defaults Select Yes and press to erase all user settings and return the instrument to factory default settings New Password Select any number from 0000 to 9999 and press Default setting of 0000 will allow direct access to the calibration menus Setting of any password greater than 0000 will require the password to be entered to ac...

Page 19: ...ess to simulate minimum Flow Ranges or Levels and to output 4mA 0V for each analog channel To simulate measurements between minimum and maximum set Test to Actual and then enter values for the A and B measurement The differential calculation analog outputs and control relays will respond to the simulated values Simulation Test Actual Level A 116 74in Level B 62 11in Difference 54 63in 4 20mA Level...

Page 20: ...ch DLT 2 0 Level Transmitter includes two non contacting ultrasonic sensors The sensors must be installed in a position to obtain unobstructed echoes from the liquid or material being measured Mount the sensor away from pipes ladders or structural members which might cause continuous false echoes BAD GOOD 90 ...

Page 21: ...t the desired height The sensor should be hand tightened like a light bulb by turning the sensor stem only DO NOT use a wrench and do not over tighten DO NOT clamp the sensor below the isolation coupling SENSOR FACE MUST BE HORIZONTAL 1 1 FT 30 cm HORIZONTAL FROM SIDEWALL FOR EVERY 10 3 m VERTICAL NOTE 2 FT 60 cm FOR EVERY 10 3 m DEPTH ON APPLICATIONS WITH ROUGH SIDEWALLS LADDERS REINFORCING RINGS...

Page 22: ...ghest water level 2 PALMER BOWLUS FLUMES Position the sensor at the flume Diameter upstream from the throat of the flume Sensor height must be 8 203 mm or more above the highest water level 3 V NOTCH WEIRS Position the sensor at 3 x maximum Head upstream from the weir plate Sensor height must be 8 20 3 cm or more above the highest water level STILLING WELLS Stilling wells are recommended to reduce...

Page 23: ...osure cover 2 Insert 8 screws supplied through the four enclosure mounting holes to secure the enclosure to the wall or mounting stand Additional conduit holes can be cut in the bottom of the enclosure when required Use a hole saw or Greenlee type hole cutter to cut the required holes DO NOT make conduit wiring entries into the top of the enclosure Note This non metallic enclosure does not automat...

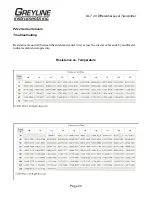
Page 24: ...fferential Level Transmitter PZxx Series Sensors Troubleshooting Resistance measured between the shield and center wire across the coaxial cable ends by mulitmeter indicates ambient temperature Resistance vs Temperature ...

Page 25: ...evel Transmitter FUSE REPLACEMENT 1 Turn OFF power 2 Loosen cover screw and open 3 Remove power module 4 Locate fuse on Power Board 5 Replace fuse with 2 AMP 250V 5 x 20mm fuse 6 Reinstall power module into chassis Fuse POWER MODULE ...

Page 26: ...ur Sales Representative write to Greyline or phone the Applications Hotline below United States Tel 315 788 9500 Fax 315 764 0419 Canada Tel 613 938 8956 Fax 613 938 4857 Toll Free 888 473 9546 Email info greyline com Web Site www greyline com Greyline Instruments Inc Canada USA 16456 Sixsmith Drive 105 Water Street Long Sault Ont K0C 1P0 Massena NY 13662 ...

Page 27: ...lean the Sensor Product Important unclean products will not be serviced and will be returned to the sender at their expense 1 Rinse sensor and cable to remove debris 2 If the sensor has been exposed to sewage immerse both sensor and cable in a solution of 1 part household bleach Javex Clorox etc to 20 parts water for 5 minutes Important do not immerse open end of sensor cable 3 Dry with paper towe...

Page 28: ...along with a copy of your invoice This warranty does not cover damages due to improper installation or handling acts of nature or unauthorized service Modifications to or tampering with any part shall void this warranty This warranty does not cover any equipment used in connection with the product or consequential damages due to a defect in the product All implied warranties are limited to the dur...

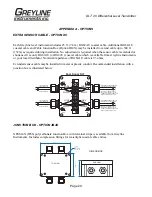
Page 29: ... conduit Recommended installation with a junction box is illustrated below JUNCTION BOX OPTION JB4X NEMA4X IP66 polycarbonate Junction Box with terminal strips is available from Greyline Instruments Includes compression fittings for watertight coaxial cable entries RG62AU COAXIAL TO ULTRASONIC LEVEL SENSOR MAX TOTAL CABLE LENGTH 500 ft 152m RG62AU coaxial CONDUIT RECOMMENDED FOR MECHANICAL PROTECT...

Page 30: ... 2 0 Differential Level Transmitter EXTENDED SENSOR CABLE INSTALLATION IN MANHOLE CONDUIT TO ELECTRONICS MANHOLE COVER ULTRASONIC SENSOR JBX XC EXTENDED SENSOR CABLE UP TO 500 ft 152 m Wetwell Sump or Pump Station ...

Page 31: ...azardous location rated Class I Groups C D Class II Groups E F G Class III The Intrinsic Safety Barrier may be ordered with the Greyline instrument and is supplied mounted in the Greyline instrument enclosure Replacement barrier fuses Part No ISB 011239 may be purchased separately The instrument enclosure containing the ISB Intrinsic Safety Barrier must be installed in a non hazardous location ...

Page 32: ...ns To safely install Greyline transducers certified for use in hazardous locations you must refer to the installation drawings specifications of the certified transducers TRANSDUCER CONNECTIONS STAHL 9001 02 093 390 101 1 2 3 4 STAHL 9001 02 093 390 101 1 2 3 4 BARRIER SPECIFICATIONS 9001 02 093 390 101 STAHL BARRIER 9 6V 27 ohms Um 250V V0C 9 3V ISC 390mA P0 906 8mW Ca 4 1µF La 0 16mH System Para...

Page 33: ...nt instrument electronics in direct sunlight Overheating will reduce the life of electronic components and condensate may form during the heat cool cycles and cause electrical shorts Note Exposure to direct sunlight can cause overheating and moisture condensation which will reduce the operating life of electronics Protect Instruments from direct sunlight with this iridite finished aluminum sun scr...

Page 34: ...to 711 mm away from the end of the sensor Allow a few seconds for the DLT 2 0 to lock onto the target before displaying its distance The DLT 2 0 will now display Range in ft or cm factory calibration CONNECTIONS POWER INPUT Connect 9 32VDC 0 5 Amps to the and terminals The Power Input GND must be connected to the nearest Ground pole A 1 amp fuse in line is recommended DATA LOGGER OPTION Sens B Sen...

Page 35: ...r 2 or 3 channel logging according to the selected mode Flow 3 channels A Level B Flow Differential Level 3 channels A Level B Level Differential Range 2 channels A Range B Range HRT Vol 2 channels A Volume B Volume Set Date Press or to scroll and select Month Day and Year Press to store the setting Set Time Press or to select the current time in Hours Minutes and Seconds Press to store the settin...

Page 36: ...he memory card and then display file download completed icon The USB flash drive may be removed Download file names will appear in this format Tag is set according to the Log Site ID entered in the instrument Data Logging menu Download letter will be A for the first download from an instrument B for the second then C etc At the letter Z a character will appear indicating that the maximum number of...

Page 37: ...RES 3 785 US GALLONS CUBIC METERS 0 003785 LITRES SEC GPM 15 85 LITRES CUBIC METERS 0 001 BARRELS US GALLONS 42 BARRELS IMPERIAL GALS 34 9726 BARRELS LITRES 158 9886 INCHES MM 25 4 DEGREES F DEGREES C F 32 x 0 556 POUNDS KILOGRAMS 0 453 PSI BAR 0 0676 FOOT METER 0 0929 VOLUME CALCULATION FOR ROUND TANKS 3 142 x R x H R TANK RADIUS TANK DIAMETER H TANK HEIGHT ...

Page 38: ...amping adjustable Electrical Surge Protection Sensor 4 20mA output and AC power input Approximate Shipping Weight 10 lbs 4 5 kg Standard Sensor PZ15 Maximum Range 15 ft 4 57 m Minimum Range Deadband 8 203 2 mm Operating Frequency 92 KHz Beam Angle 8 Operating Temperature 40 to 150 40 to 65 C Temperature Compensation Automatic continuous Max Operating Pressure 20 psi 1 35 bar Sensor Face PVC Sensor...

Page 39: ...l PZ34 Maximum Range 32 ft 10 m Minimum Range Deadband 16 406 4 mm Operating Frequency 46 KHz Beam Angle 8º Temperature Compensation Automatic continuous Operating Temperature 40 to 150ºF 40 to 65ºC Maximum Operating Pressure 20 psi 1 35 Bar Exposed Materials PVC Sensor Mounting NPT Maximum Cable Length 500 ft 152 m Optional Hazardous Rating CSA rated Intrinsically Safe Class I Groups C D Class II...

Reviews: