background image

22

occur,clean the egg spill when cook-top has cooled down,do not allow the

egg spill to remain on surface.

GENERAL RECOMMENDATION

1. Plug in the power cord. Make sure the
outlet meets local or national electrical codes .

2. Slide the range into place.

3. Check the gas supply line to make sure it

did not get damaged and it stayed

connected during positioning.
4. Check to make sure the back

leg of the range has slid into the

anti-tip bracket. Carefully tip the range forward to ensure that the anti-tip

bracket engages the back brace and prevents tip-over.

WARNING

Electrical Grounding Instructions

This appliance is equipped with a (three-prong) grounding plug for your

protection against shock hazard and should be plugged directly into a

properly grounded receptacle. Do not cut or remove the grounding prong

from this plug.

Warning

: Disconnect the electrical supply before servicing the appliance.

LEVELING THE RANGE

The range must be level to obtain proper operating. The four screws type leveling
legs located on the corners at the bottom of range should be adjusted by turning
them clockwise to make the range higher or counter-clockwise to lower the range
until the range is level. Use a level on surface units to check the leveling of the
range.

ANTI-TIP BRACKET INSALLATION

To reduce the risk of tipping the range by abnormal usage or improper door
loading, the range must be secured by properly installing the anti-tip device
packed with the appliance.

Place the anti-tip bracket on the floor as shown figure. Anti-tip bracket can
be installed on either right or left side.

Make the locations of 2 holes of ant-tip bracket on the floor.

Summary of Contents for DK213-21AS

Page 1: ...INSTRUCTION MANUAL 21inch Gas Range Models DK213 21AS DK213 21CS GREYSTONE ...

Page 2: ...2 ...

Page 3: ...been properly installed and engaged Engage the range to the anti tip device by wall and cabinet Ensure the anti tip device is re engaged when the range is moved Re engage the anti tip device if the range is moved Do not operate the range without the anti tip device in place and engaged See installation instructions for details Failure to do so can result in death or serious burns to children or ad...

Page 4: ...ING Warning Hazards or unsafe practices COULD result in severe personal injury or death Caution Caution Hazards or unsafe practices COULD result in minor personal injury Read the follow all instructions before using this application to prevent the potential risk of fire electric shock personal injury or damage to the appliance as a result of improper usage of the appliance Use appliance only for i...

Page 5: ...s Safety Precautions 3 Getting Started 6 Safety Instructions 7 Installation 10 Operation 12 Gas range Features 19 Troubleshooting 20 Cleaning and Maintenance 21 Exploded View Drawing 24 Warranty 26 Contact Information 28 ...

Page 6: ...afe use installation and maintenance of the appliance You will want to keep this manual handy for future reference Using the gas range by following the directions in this manual will help ensure safe use and reduce the risk of injury Please pass on this manual to future owners of your gas range The manufacturer accepts no responsibility for any damage caused by not observing these instructions ...

Page 7: ... panels anti tip brackets screws or any other pant of product Children climbing on the gas range to reach items could be seriously injured WARNING NEVER use this appliance as a space heater to warm a room Doing so may result in carbon monoxide poisoning and overheating the appliance NEVER cover rear vent on counter top Never cover an entire rack with materials such as aluminum foil or any other fl...

Page 8: ...se areas until they have sufficient time to cool down Both surface burners may be hot even though flames are not visible and may be hot enough to cause burns Wear proper apparel Loose fitting or hanging clothing should never be worn while using this appliance When heating fat or grease watch it closely Fat and grease may catch fire if allowed to become too hot If there is a grease fire smother the...

Page 9: ...obs has the potential risk during gas range working If you use stove top grill on a sealed gas burner it will cause incomplete combustion and can result in carbon monoxide poisoning Know which knob controls each surface burner Place a pan of food on the burner before turning it on and turn the burner off before removing pan Always turn the knob to the full HI position when igniting top burners and...

Page 10: ...onform with local codes or in the absence of local codes with the National Fuel Gas Code ANSI Z223 1 NFPA 54 or in Canada the Natural Gas and Propane Installation Code CSA B149 1 The appliance when installed must be electrically grounded in accordance with local codes or in the absence of local codes with the National Electrical Code NFPA 70 or the Canadian Electric Code CSA C22 1 02 WARNING Insta...

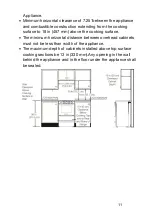
Page 11: ...e to 18 in 457 mm above the cooking surface The minimum horizontal distance between overhead cabinets must not be less than width of the appliance The maximum depth of cabinets installed above top surface cooking sections be 13 in 330 mm Any opening in the wall behind the appliance and in the floor under the appliance shall be sealed ...

Page 12: ... oven main valve 2 Press the oven knob and turn it counterclockwise to start the oven burner Release it when the oven knob back light turns red 3 Press the or button after setting the temperature wait for the LED to flash for 5 seconds the oven will enter the baking working status 4 Temperature control range 122 F 490 F Press the or button adjustable temperature value Long press can quickly adjust...

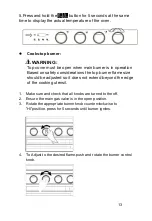
Page 13: ...iderations the top burner flame size should be adjusted so it does not extend beyond the edge of the cooking utensil 1 Make sure and check that all knobs are turned to the off 2 Ensure the main gas valve is in the open position 3 Rotate the appropriate burner knob counterclockwise to HI position press for 5 seconds until burner ignites 4 To Adjust to the desired flame push and rotate the burner co...

Page 14: ...the light changes to red and when the valve body is turned to the closed state the backlight is blue If you do not press the Stove button before turning the stove body anticlockwise the color of the backlight will still turn red but the backlight will not light when the valve body turns to the closed state Timer setting 1 Oven time setting Press button oven lit icon blinking set the working time o...

Page 15: ...ing knob and turn it anticlockwise to complete the ignition Turning the gas range flame OFF 1 To turn the oven or burner flame off push and turn the control knob clockwise until the knob is in the OFF position 2 If you travel and need to refuel your gas tank ALWAYS turn the tank valve off ...

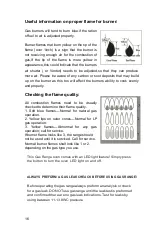
Page 16: ...l combustion flames need to be visually checked to determine their flame quality 1 Soft blue flames Normal for natural gas operation 2 Yellow tips on outer cones Normal for LP gas operation 3 Yellow flames Abnormal for any gas operation call for service If burner flame looks like 3 the range should not be used until it is serviced Call for service Normal burner flames shall look like 1 or 2 depend...

Page 17: ... any slots holes or passages in the oven bottom or cover an entire rack with materials such as aluminum foil Doing so blocks aireflow through the oven and may cause carbon monoxide poisoning Aluminum foil linings may also trap heat causing a fire hazard Top burner flame size should be adjusted so it does not extend beyond the edge of the cooking utensil This instruction is based on safety consider...

Page 18: ...jor cooktop maximum pan size 10 inches DO NOT USE any cooking pan griddle or any cooking instrument that covers more than one burner at any time Maximum pan size is a 10 inch skillet Any cooking instrument larger than 10 inches is strictly prohibited If this instruction is not followed results may cause large amounts of heat that could result in the liquefying of the item or could result in damage...

Page 19: ...e Cooking Gas Appliances ANSI Z21 57a 2012 Addenda to Recreational Vehicle Cooking Gas Appliances CAN1 1 16 M79 reaffirmed 2016 Propane Cooking Appliance For Recreational Vehicles 1 Top Glass Cover 2 Grate 3 The LED Panel 4 Drawer 5 Oven Door 6 TOP Burner Control Knob 7 Oven Control Knob 8 Burner ...

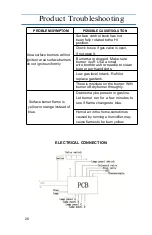
Page 20: ...d Make sure burner is off Use a small wire toothbrush or needle to clean burner portsandslots Low gas level in tank Refill or replace gastank There is moisture on the burner With burner off dry burner throughly Surface burner flame is yellow or orange instead of blue Debris may be present in gas line Let burner run for a few minutes to see if flame changes to blue Humid air in the home sometimes c...

Page 21: ...an also burn flesh The best way to clean the cook top porcelain surfaces stainless steel surfaces painted Surfaces burner grates plastic items or any other items relating to the gas range is to use mild soapy water solution THE DO NOT s OFSANITATIONAND UPKEEP DO NOT USE oven cleaners on any surface other than the oven DO NOT USE bleach DO NOT USE rust removers DONOT USE steel wool only use non abr...

Page 22: ...ed directly into a properly grounded receptacle Do not cut or remove the grounding prong from this plug Warning Disconnect the electrical supply before servicing the appliance LEVELING THE RANGE The range must be level to obtain proper operating The four screws type leveling legs located on the corners at the bottom of range should be adjusted by turning them clockwise to make the range higher or ...

Page 23: ... 5 16 masonry drill bit and insert plastic anchor Secure bracket to floor using screws supplied Slide appliance into position NOTE If range is relocated the bracket must be removed and installed in new location ...

Page 24: ...24 Exploded view Drawing ...

Page 25: ...25 ...

Page 26: ...A or Canada 3 Rust on the interior or exterior of the unit 4 Products that have been purchased secondhand 5 Commercial use of product 6 Service calls which do not involve malfunction or defects in materials or workmanship or for appliances not in ordinary household use or used other than in accordance with the provided instructions 7 Service calls to correct the installation of your appliance or t...

Page 27: ...nties including warranties of merchantability or fitness for particular purpose are limited to one year or the shortest period allowed by law but not less than one year GREYSTONE shall not be liable for consequential or incidental damages such as property damage and incidental expenses resulting from any breach of this written limited warranty or any implied warranties so these limitations or excl...

Page 28: ... please contact Way Interglobal Network LLC 3002 Coast Ct Elkhart IN 46514 574 971 4490 Hours Monday Friday 7 30 a m 4 p m Eastern Time Closed Saturday Sunday GREYSTONE is a registered Trademark of Way Interglobal Network LLC ...

Reviews: