Page 14
Shuttle Brewers & Airpot/Shuttle Brewers
Service
The rest of this manual contains information to aid the service person who is working on this equipment. This page
has information on performing
common service tasks
. Following this is the
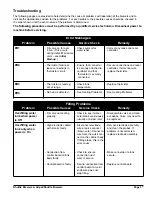
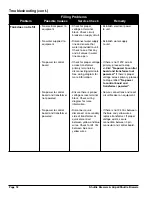
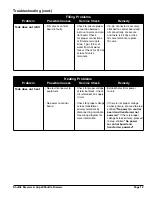
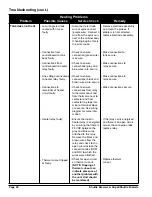
Troubleshooting
section which can help
diagnose problems which are divided into three basic systems: filling, heating, and brewing.
Next is an
illustrated parts breakdown
which will help in the selection of repair parts. If further assistance is needed,
call our Technical Service Department at
800-695-4500
(USA & Canada only) or (502) 425-4776 Monday – Friday
between 8:00 am and 6:00 pm Eastern time.
Wiring diagrams
are also provided. Locate the basic diagram for the model you are working with. If there are any
options, see Diagram #091-548 (page 31 of this manual) which shows the wiring alterations for options.
Drain Water Tank
Always empty the tank before shipping.
WARNING
Draining of tank should be performed by a qualified service technician. The tank contains very hot
water. May cause severe burns.
Note:
Brewer may contain over 5 gallons (19.0L) of hot water.
1) Prepare a heat resistant container to drain tank water into.
2) Disconnect power to the brewer.
3) Remove the front access panel.
4) Pinch or clamp the silicone hose connected to fill valve.
5) Disconnect hose from outlet barb on fill valve.
6) Place hose over drain and release clamp.
7) Allow the tank to drain completely.
NOTE:
It may be necessary to pinch the hose and stop the water before container is full. Carefully reinstall hose
over fill valve outlet, then empty container. Repeat steps 4-7 completely to drain tank.
Remove Brew Valve
1) Disconnect power to machine.
2) Remove top cover and remove wires and small tube from valve.
3) Tilt inlet of valve down and pull sideways out of spray tee.
4) Clamp rubber tubing and disconnect valve from tubing.
Remove Heater
1) Disconnect power and remove top cover of brewer.
2) Disconnect wire leads to heater.
3) Remove tank cover by loosening retaining screw(s). Cover is lifted up with heater attached. Heater is then
removed.
4) Replace heater with sealing washers in same configuration. When tightening nuts, hold element so it does
not twist.
5) Replace tank cover ensuring gasket seal is good.
6) Replace heater wires. Be sure all electrical connections are secure.


