Crathco
®
5512 Manual
Page 15
Sanitizing and Refilling
1. Prepare a minimum of 3-1/2 gallons (13 liters) of sanitizing solution (Divorsol CX or equivalent) following the
manufacturer's instructions.
NOTE:
Add sanitizer to 3-1/2 gallons of water (warm) to achieve a concentration of 200 parts per million.
2. Pour sanitizing solution into the mix storage hopper and allow the solution to fill freezing cylinder. Use a brush to
clean the hopper sides and bottom. (Repeat steps 1 & 2 for opposite side.)
3. Turn panel switch to "CLEAN" and allow freezer to run for 5 minutes.
4. Open dispensing valve and drain solution. Turn freezer to "CLEAN" for a few seconds to allow the auger to
push remaining sanitizer out of the freezing cylinder.
5. If you are using a concentrated product, mix the product according to the manufacturer's instructions.
6. Open dispensing valve. Pour product into the hopper and allow this product to chase out any remaining sanitizer.
Watch the product flowing out of the dispensing valve and close the valve when the new mix has purged the san-
itizer remaining in the cylinder.
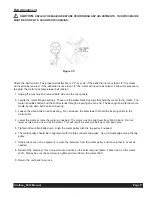
7. Sanitize and install the carburetor. (Figure R). Refill mix hopper.
8. Turn front panel switch to "ON". Allow approximately 20 to 30 minutes for the freezer to reach proper
consistency. Repeat on other side.
Maintenance
WARNING!
Disconnect power for maintenance. Do not attempt to perform maintenance on the freezer
until electrical power has been disconnected.
Suggested Weekly Maintenance
1. Clean, lubricate and sanitize the freezer following guidelines in Care and Cleaning on page 11.
2. Clean the exterior of the freezer using a soft wet cloth.
Suggested Monthly Maintenance
How to Clean Exposed Filter:
1. Slide exposed filter out of the rails by pulling forward on the filter. It is recommended to remove the filter by using
the palm of your hand and applying even pressure to the face of the filter.
2. Clean filter with liquid soap and water.
3. Soak filter for 15 minutes.
4. Rinse filter with heavy stream of water, opposite the direction of air flow. Allow filter to dry.
5. Slide the filter into the rails until the filter contacts the stop on the top rail.
!
Summary of Contents for Crathco 5512
Page 2: ......
Page 33: ...Crathco 5512 Manual Page 33 Model 5512 Electrical Components Front Electrical Box ...
Page 34: ...Page 34 Crathco 5512 Manual Model 5512 E Electrical Components Front Electrical Box ...
Page 38: ...Page 38 Crathco 5512 Manual Model 5512 Ladder Diagram ...
Page 39: ...Crathco 5512 Manual Page 39 Model 5512 E Ladder Diagram ...
Page 42: ...Page 42 Crathco 5512 Manual Models 5512 5512 E Refrigeration Schematic ...
Page 43: ......


