2.3. Attaching the Fork
Video instructions are available online at
https://www.gogrit.us/freedom-chair-support#forkinstall
To attach the fork, you will need the 5mm Allen key provided with your Freedom Chair.
Call us at (617) 356-8106 or email us at support@gogrit.us with any questions about the following
steps. Text instructions immediately below, but refer to the following two pages for photos
that will help!
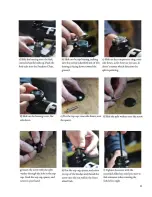
1. Remove the front wheel components from their plastic baggie and match them to
the photo on the following page (for easy identification, place the parts right onto
the photo).
2. Slide one of the two bearings onto the fork, curved (chamfer) side up.
3. Insert the fork through the headset tube at the front of the chair.
4. Slide the second bearing, curved (chamfer) side down, over the fork tube.
5. Slide the compression ring, cone side down, over the fork tube and push it down
until it contacts the bearing.
6. Slide the bearing cover, flat side down, over the fork tube.
7. Separately, on a flat surface, put the top cap (cone side down) on top of the
spacer.
8. Put the split washer (either side up) into the hole in the top cap.
9. Insert the screw through the top cap and the split washer. Grab this whole
assembly and put it over the fork. Thread the screw into the fork.
10.Tighten the screw until you start to feel some resistance when rotating the fork.
The fork should rotate 360 degrees without much resistance. The screw should be
flush with the top cap.
9
Summary of Contents for FREEEDOM
Page 1: ...Assembly Guide User Manual GRIT Freedom Chair Support 617 356 8106 support gogrit us...
Page 4: ...3...
Page 7: ...6...
Page 11: ...Note Components of the fork assembly shown individually for identification purposes 10...
Page 12: ...11...
Page 13: ...12...
Page 23: ...22...
Page 27: ...26...
Page 31: ...30...
Page 39: ...38...
Page 45: ...44...
Page 48: ...47...
Page 51: ...50...
Page 54: ...53...


