background image


30 

Summary of Contents for FREEEDOM

Page 1: ...Assembly Guide User Manual GRIT Freedom Chair Support 617 356 8106 support gogrit us...

Page 2: ...ear Wheels 14 3 3 Attaching the Seatback 16 3 4 Attaching the Footrest 17 3 5 Fit and Seating 19 4 Disassembly 22 4 1 Removing the Rear Wheels 23 4 2 Removing the Seatback 24 4 3 Transporting the Free...

Page 3: ...45 8 3 Curbs 46 9 Maintenance 47 9 1 Caring For Your Freedom Chair 48 9 2 Handy Tools 48 10 Common Adjustments 50 10 1 Inflating the Wheels 51 10 2 Chain Tension Adjustment 51 10 3 Parking Brake Adjus...

Page 4: ...3...

Page 5: ...dom Chair requires some practice It will likely take a few rides before you feel comfortable with the motions After that you ll be able to work on more technical terrains and maneuvers build up your s...

Page 6: ...edom Chair 1 3 Intended Operator In order to safely operate the Freedom Chair independently certain levels of upper body strength and control are required Grip strength is required for braking and tur...

Page 7: ...6...

Page 8: ...se parts 1 Freedom Chair Frame Seatpan 2 Seatback 3 Footplate 4 Fork Front Wheel 5 Seat Cushion 6 Rear Wheels Axles 7 Freedom Chair Levers 8 Any Requested Accessories Depending on the model you have y...

Page 9: ...ootplate clamp which will be securing one of the cardboard inserts Remove the clamp by loosening the clamp and pulling it away from the chair try twisting it to free it Remove the cardboard insert and...

Page 10: ...fork curved chamfer side up 3 Insert the fork through the headset tube at the front of the chair 4 Slide the second bearing curved chamfer side down over the fork tube 5 Slide the compression ring co...

Page 11: ...Note Components of the fork assembly shown individually for identification purposes 10...

Page 12: ...11...

Page 13: ...12...

Page 14: ...ages show proper black caps The coupling can be seen in the lower images Once you confirm the black caps are secure insert the axles into the rear wheels First slide the axle into the hub from the sid...

Page 15: ...s below Note The side of the wheel with the wide silver ring coupling connects to the chair a Press the quick release button on the axle inward b Align the axles with the axle receiver c Align the gro...

Page 16: ...ll and may result in serious injury or death Note If the push button is depressed and the coupling does not reach the freewheel the chair is not safe to ride Note By design the spacing will be slightl...

Page 17: ...inserting and locking the seatback could cause damage to the seat and may cause risk of injury a Slide the seatback into the receiving sockets on the back of the seat Keep the seatback level while you...

Page 18: ...rt gogrit us immediately Note Keep your seatback tubes lubricated so they slide easily into the seat We recommend using a Teflon based lubricant like Tri Flow 3 4 Attaching the Footrest The footrest a...

Page 19: ...or the footrest to slide in easily c Slide the footrest tube into the frame until it is at an appropriate height b Insert the footrest tube with the footrest facing forward d Lock the clamp in place b...

Page 20: ...holes These holes may be used to add additional straps A Note On Cushions The Freedom Chair ships with a wheelchair style comfort cushion The cushion is not a pressure relief cushion Some riders choo...

Page 21: ...r occupational therapist to make sure your Freedom Chair cushion is right for you Always wear closed toed shoes when riding the Freedom Chair CAUTION If using the footplate make sure your feet do not...

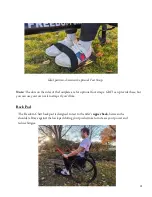
Page 22: ...optional foot straps GRIT can provide these but you can use your own velcro straps if you d like Back Pad The Freedom Chair back pad is designed to rest in the rider s upper back between the shoulder...

Page 23: ...22...

Page 24: ...wheels of the Freedom Chair can be easily removed with their quick release push button axles a Grab the wheel near the hub and push the axle button inward b Pull the wheel straight away from the chai...

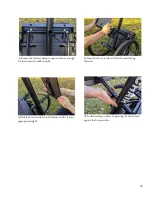
Page 25: ...to pull both sides of the seatback at the same time to prevent the seatback from getting stuck a Simultaneously push in the buttons on both sides of the seatback b Hold both buttons in while pulling u...

Page 26: ...hair into the trunk first It is the heaviest part so avoid placing it on top of the other parts Place the frame flat to avoid bending the side of the seat Most folks will leave the footrest on their c...

Page 27: ...26...

Page 28: ...oss of control injury and even death Make sure the rider can use the brakes before going downhill CAUTION YOU CANNOT MOVE BACKWARD WITH THE LEVERS INSERTED The Freedom Chair is designed to prevent you...

Page 29: ...e Freedom Chair in a safe area Be careful when descending hills Be careful when climbing hills to ensure you do not tip backward We recommend climbing hills with a spotter behind the chair Alternate l...

Page 30: ...and a reflective flag when night riding Riding in Wet Conditions Riding in wet weather impacts the braking performance The stopping distance is increased in wet conditions so use extreme caution on w...

Page 31: ...30...

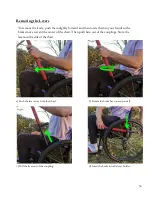
Page 32: ...itions on the sides of the chair Lift the levers from the front and the back If both hands cannot be used lift the lever from the center Then insert the end of the lever into the hole in the lever cou...

Page 33: ...le is inaccessible rotate the coupling Note Rotate the coupling toward the back of the chair by pushing down on the back of the coupling with your hand or the lever Spin it all the way around so the h...

Page 34: ...he brake is over the wheel and that it doesn t rotate when the lever is pulled back WARNING TEST THE BRAKES BEFORE RIDING Make sure the levers are fully inserted and the brakes engage the wheels befor...

Page 35: ...ur hands so the brakes move toward the center of the chair Then pull them out of the couplings Store the levers on the side of the chair a Push the lever away from the wheel b Rotate the brake bar tow...

Page 36: ...IS POSSIBLE This is especially true when going uphill One way to prevent this is to ALTERNATE lever strokes left right left etc during ascents rather than engaging both levers simultaneously On severe...

Page 37: ...esigned to allow riders to vary their mechanical advantage based on where they grab the lever Grabbing the top of the lever provides more torque for climbing hills and rough terrain think of this as l...

Page 38: ...ke low gear and is good for hills and tough terrains Use many small alternating lever strokes to climb hills b Grabbing the bottom of the levers is like high gear and is good for smooth ground Push th...

Page 39: ...38...

Page 40: ...dded braking force pull backward from the top of the levers This provides more leverage and much better brake performance You can also hug the levers by putting them in the crooks of your arms and pul...

Page 41: ...Note The brakes engage by coming into contact with the tire Note Pulling backward on the top of the levers provides more braking force which is especially useful when the wheels are wet 40...

Page 42: ...her lever Example To turn right apply the right brake and push on the left lever To turn left apply the left brake and push on the right lever The harder you pull against either lever the sharper you...

Page 43: ...orward When the levers are removed you can put your hands on the wheels and use the Freedom Chair just as you would a regular wheelchair 7 4 Parking Brakes CAUTION You ll have to adjust the parking br...

Page 44: ...ansferring into the chair many prefer to transfer into the seat before swinging one leg over the main tube of the Freedom Chair When transferring out of the chair many prefer to swing both legs over t...

Page 45: ...44...

Page 46: ...s backward more than a couple of feet depending on the lever position Use this to rest your arms between push strokes but do not allow the chair to build up backward momentum WARNING THE FREEDOM CHAIR...

Page 47: ...It is possible to ride the Freedom Chair down curbs as long as the chair is ridden straight off the curb and not at an angle Here are some tips Ride straight off of the curb not at an angle Make sure...

Page 48: ...47...

Page 49: ...inscribed on the sidewalls of each tire Every Month Make sure the chains are greased tighten them if necessary Engage the wheels and drivetrain to confirm everything is moving smoothly After a Beach T...

Page 50: ...ISO 559 Pro 26 x 2 0 Front tire 2 80 2 50 4 Note Tire levers can help make tire removal and tube change even easier and patches can help if you don t have a tube Electrical tape If your levers are wr...

Page 51: ...50...

Page 52: ...es per year often after heavy use Your chain is too loose if you can squeeze it together more than half of an inch or if you re experiencing a delay in your lever engagement The video on this page sho...

Page 53: ...make the Freedom Chair faster but harder to push swap the chainring with a larger one or swap the freewheel with a smaller one Both of these adjustments may require you to add or remove links to the c...

Page 54: ...53...

Page 55: ...manufactured by GRIT subject to the terms below Wear parts such as tires tubes brakes and bearings are not covered 11 2 GRIT Limited Warranty Every GRIT Freedom Chair is hand assembled and certified...

Reviews: