background image

103

GB

-  If petrol is spilled, do not attempt to 

start the engine. Instead, remove 

the equipment from the surface on 

which the petrol has been spilled. 

Avoid any ignition attempt until the 

petrol fumes have evaporated;

-  For reasons of safety, replace petrol - 

and other filler caps in the event of 

damage.

•  Replace defective silencers.

•  Before use, always carry out a visual 

inspection to check whether the cut-

ting tools, mounting bolts and entire 

cutting unit are worn or damaged. To 

avoid imbalance, only replace worn or 

damaged tools and bolts in sets.

•  Take care with equipment that has 

several cutting tools, as the move-

ment of one blade may result in rota-

tion of other blades.

•  Use only replacement parts and ac-

cessories supplied and recommended 

by the manufacturer. The use of parts 

from other manufacturers may result 

in injuries and will result in immediate 

invalidation of the guarantee.

Handling:

•  Do not run the combustion engine in 

enclosed spaces, in which dangerous 

carbon monoxide can collect.

•  Mow only in daylight or with good 

artificial lighting. An unlit working area 

can result in accidents.

•  If possible, avoid using the equipment 

on wet grass.

•  Always ensure secure positioning, 

particularly on hillsides, landfills, 

ditches or dykes. This will give you 

better control of the equipment in un-

expected situations.

-  Always work across the slope, 

never upwards or downwards.

-  Take particular care when changing 

the direction of travel on the slope.

-  Do not mow on excessively steep 

slopes (max. 10°).

•  Run the equipment only at walking 

speed.

•  Take particular care when turning the 

equipment around or pulling it towards 

you.

•  Stop the cutting tool if the equipment 

has to be tipped up for transportation 

over a surface other than grass and 

when moving the equipment from and 

to the surface to be mown.

•  Do not use the equipment with dam-

aged safety equipment or guards or 

with no safety equipment attached, 

e.g. impact protection and/or grass 

catchers. This ensures that the equip-

ment remains safe.

•  Do not change the engine regulator 

setting and do not over-rev it. This 

may damage the equipment.

•  Before starting, the engine, disengage 

all cutting tools and drives.

•  Start or operate the start switch with 

care and in accordance with the 

manufacturer’s instructions. Ensure 

sufficient space between feet and the 

cutting tool. Risk of injury.

•  When starting or activating the en-

gine, do not tip the equipment unless 

the equipment has to be lifted for 

this procedure. In this case, tip the 

equipment only as far as is absolutely 

necessary and lift only the side that is 

away from the user.

•  Do not start the engine when standing 

in front of the ejection channel.

•  Switch on the engine in accordance 

with the instructions and only if your 

feet are a safe distance away from the 

cutting tools.

•  Do not place hands or feet under ro-

tating parts. Always keep away from 

Summary of Contents for BRM 46-150 BSA InStart

Page 1: ...a a benzina Originalbetriebsanleitung Traduction de la notice d utilisation originale Tłumaczenie oryginalnej instrukcji obsługi Vertaling van de originele gebruiksaanwijzing Translation of the original instructions for use Preklad originálneho návodu na obsluhu Překlad originálního návodu k obsluze Originalios eksploatavimo instrukcijos vertimas Traduzione delle istruzioni per l uso in originale ...

Page 2: ...2 1 3 2 4 4 7 10 11 12 13 29 30 31 14 15 16 16a 17 18 20 21 19 22 23 19 5 22 8 9 5 6 1 1 4 5 24 6 7 27 24 27 28 26 25 ...

Page 3: ...3 32 D 29 16 16a 30 26 23 23 25 34 33 18 33 33 18 20 35 36 31 8 37 37 38 38 ...

Page 4: ...4 8 37 37 40 39 2 1 3 28 11 12 13 10 41 42 43 44 45 ...

Page 5: ... 54 Vertaling van de originele gebruiksaanwijzing 77 Translation of the original instructions for use 100 Preklad originálneho návodu na obsluhu 121 Překlad originálního návodu k obsluze 143 Originalios eksploatavimo instrukcijos vertimas 165 Traduzione delle istruzioni per l uso in originale 187 DE NL FR PL GB SK CZ LT IT ...

Page 6: ...6 ...

Page 7: ...20 Motor starten und stoppen 20 Mähen 21 Arbeitshinweise 21 Reinigung und Wartung 21 Reinigung und allgemeine Wartungsarbeiten 22 Luftfilter austauschen 22 Zündkerze wechseln einstellen 22 Motoröl wechseln 23 Bowdenzug einstellen 23 Messer austauschen schleifen 23 Vergaser einstellen 24 Lagerung 24 Allgemeine Lagerungshinweise 24 Lagerung während längerer Betriebspausen 24 Entsorgung Umweltschutz ...

Page 8: ...zugelassen wird kann zu Schäden am Gerät führen und eine ernsthafte Gefahr für den Benut zer darstellen Das Gerät ist zum Gebrauch durch Erwachsene bestimmt Kinder sowie Personen die mit dieser Anleitung nicht vertraut sind dürfen das Gerät nicht be nutzen Der Bediener oder Nutzer ist für Unfälle oder Schäden an anderen Menschen oder deren Eigentum verantwortlich Der Hersteller haftet nicht für Sc...

Page 9: ... sind Bei Ablenkung können Sie die Kontrolle über das Gerät ver lieren Denken Sie daran dass der Benutzer für Unfälle mit anderen Personen oder deren Eigentum verantwortlich ist Beachten Sie den Lärmschutz und örtliche Vorschriften Vorbereitende Maßnahmen Während des Mähens sind immer rutschfestes Schuhwerk und lange Hosen zu tragen Mähen Sie nicht Bildzeichen über Öleinfülldeckel Hinweis auf Ölei...

Page 10: ...ch Sichtkontrolle zu prüfen ob die Schneidwerkzeuge Befestigungsbol zen und die gesamte Schneideinheit abgenutzt oder beschädigt sind Zur Vermeidung einer Unwucht dürfen abgenutzte oder beschädigte Werk zeuge und Bolzen nur satzweise aus getauscht werden Seien Sie vorsichtig bei Geräten mit mehreren Schneidwerkzeugen da die Bewegung eines Messers zur Rotati on der übrigen Messer führen kann Benutz...

Page 11: ...ugen sind Führen Sie niemals Hände oder Füße an oder unter sich drehende Teile Halten Sie sich immer entfernt von der Auswurföffnung Ein Moment der Unachtsamkeit bei Benutzung des Gerätes kann zu schweren Verletzungen führen Heben oder tragen Sie niemals das Gerät mit laufendem Motor Stellen Sie den Motor ab ziehen Sie den Zündkerzenstecker ab und verge wissern Sie sich dass alle beweglichen Teile...

Page 12: ...dieser Anleitung angegeben werden dürfen nur von von uns ermächtigten Kundendienst stellen ausgeführt werden Bewahren Sie das Gerät an einem trockenen Ort und außerhalb der Reichweite von Kindern auf Maschi nen sind gefährlich wenn sie von un erfahrenen Personen benutzt werden Sorgfältiger Umgang mit und Gebrauch von Akkuwerkzeugen a Laden Sie die Akkus nur in Ladegeräten auf die vom Hersteller em...

Page 13: ...t wiederaufladbaren Batterien Das Gerät könnte beschädigt werden Richtiger Umgang mit dem Akkuladegerät Dieses Gerät kann von Kindern ab 8 Jahren und darüber sowie von Personen mit verringerten physischen sensorischen oder mentalen Fähigkeiten oder Mangel an Erfahrung und Wis sen benutzt werden wenn sie beaufsichtigt oder bezüglich des sicheren Gebrauchs des Gerätes unterwiesen wurden und die dara...

Page 14: ... den Akku etwa 1 Stunde aufzula den Stecken Sie den Akku in den Sockel ein und schließen Sie das Ladegerät ans Strom netz an Ziehen Sie den Netzstecker wenn der Akku voll aufgeladen ist und trennen Sie das Lade gerät vom Gerät Die Ladezeit beträgt etwa 1 Stunde Lassen Sie Ihren Akku nicht kontinuierlich aufladen Stän diges Nachladen kleiner Ka pazitäten kann die Akkuzellen beschädigen Laden Sie in...

Page 15: ...2 Kreuzschlitzschraube Tragegriff 33 Kunststofflasche Grasfangkorb 34 Aufhängung Grasfangkorb 35 Ladezustandsanzeige Akku 36 Taste Ladezustandsanzeige 37 Entriegelungstaste Akku 38 Ladezustandsanzeige Ladegerät 39 Steckverbindung E Start 40 Steckverbindung Akku 41 Feststellmutter Bowdenzug 42 Einstellmutter Bowdenzug 43 Messer 44 Messerschraube 45 Spannscheibe Schutzeinrichtungen 2 Sicherheitsbüge...

Page 16: ...quetscht werden Unteren Holm montieren 1 Entfernen Sie die Hutmuttern und Beilagscheiben 22 vom Gerätegehäuse 19 2 Setzen Sie die beiden Enden des unteren Holmes 5 an das Gerätegehäuse 19 an 3 Schrauben Sie den unteren Holm 5 mit den beiliegenden Schrauben Unterlegscheiben und den Hutmuttern 22 rechts und links an der Halterung am Gerätegehäuse 19 fest Oberen Griffholm montieren 4 Schrauben Sie de...

Page 17: ... Oben auf dem Grasfangkorb 23 ist eine Füllstandsanzeige 25 angebracht Die aerodynamische Luftführung der Klappe sorgt zusätzlich für die optimale Füllung Füllstandsanzeige geöffnet Grasfangkorb leer Füllstandsanzeige geschlos sen Grasfangkorb gefüllt Mulchkit Vor der Nutzung des Mulchkits muss der Seitenauswurfkanal ent fernt sein siehe Mulchkit anbringen 1 Entfernen Sie den Fangkorb 23 falls ein...

Page 18: ...nken nur im Freien und niemals bei laufendem Motor oder heißer Maschine Tankdeckel vorsichtig öffnen damit sich Überdruck abbauen kann beim Tanken nicht rauchen Hautkontakt und das Einatmen der Dämpfe vermeiden verschüttetes Benzin entfernen Benzin von Funken offenen Flam men und anderen Zündquellen fern halten Verwenden Sie kein Benzin Öl Gemisch Verwenden Sie bleifreies Nor mal oder Superbenzin ...

Page 19: ...nterbrochen aufgela den wird Der Akku und das Gerät könnten beschädigt werden und bei längerer Ladezeit verbrauchen Sie unnötig Energie Bei Über ladung erlischt der Garantiean spruch Laden Sie den Akku vor dem ersten Gebrauch auf Den Akku nicht mehr mals hintereinander kurz aufladen Eine wesentlich verkürzte Betriebszeit trotz Aufladung zeigt an dass der Akku verbraucht ist und ersetzt wer den mus...

Page 20: ...gültigen Sicherheitshinweise so wie Bestimmungen und Hinweise zum Umweltschutz siehe Entsorgung Umweltschutz Bedienung Beachten Sie den Lärmschutz und örtliche Vorschriften Motor starten und stoppen Warnung Benzin ist entflammbar Starten Sie den Motor mindestens 3 m vom Befüllungsort entfernt Starten Sie das Gerät auf festem ebenem Boden möglichst nicht in hohem Gras Vergewissern Sie sich dass das...

Page 21: ...llten sich die Bahnen immer um wenige Zentimeter überlappen Bewegen Sie sich nicht rückwärts Arbeiten Sie an Hängen immer quer zum Hang Sollten die Messer mit einem Fremdkör per in Berührung kommen stellen Sie den Motor sofort ab Warten Sie den Stillstand des Messers ab und prüfen Sie das Gerät auf Beschädigungen Nehmen Sie die Arbeit nur bei einem unbeschädigten Gerät wieder auf Schalten Sie in A...

Page 22: ...Betreiben Sie das Gerät nie ohne Luftfilter Staub und Schmutz ge langen sonst in den Motor und füh ren zu Schäden an der Maschine 1 Lösen Sie die Luftfilterabde ckung 10 und klappen Sie die Abdeckung auf 2 Nehmen Sie den Luftfilter 11 heraus 3 Tauschen Sie den Luftfilter ge gen einen neuen Filter aus sie he Ersatzteile 4 Zur Montage setzen Sie den neuen Luftfilter 11 in die Luftfil terabdeckung 10...

Page 23: ...ter 42 im Uhrzeigersinn Bowdenzug verlängert sich Messer austauschen schleifen Tragen Sie beim Umgang mit dem Messer Handschuhe Eine unsachgemäße Montage kann zu schweren Verletzungen führen Schalten Sie vor allen Wartungs und Reinigungsarbeiten das Gerät aus ziehen Sie den Zündkerzen stecker 12 und warten Sie den Stillstand des Messers ab Es besteth Verletzungsgefahr Prüfen Sie das Messer auf Abn...

Page 24: ...n Griffholm zusammen damit das Gerät weniger Platz beansprucht Die Bowdenzüge dürfen dabei nicht einge klemmt werden Umhüllen Sie das Gerät nicht mit Ny lonsäcken da sich Feuchtigkeit und Schimmel bilden könnte Lagerung während längerer Betriebspausen Ein Nichtbeachten der Lagerungs hinweise kann durch Kraftstoffreste im Vergaser zu Startproblemen oder permanenten Schäden führen Entleeren Sie den ...

Page 25: ...schnittenes Gras nicht in die Mülltonne sondern führen Sie es der Kompostierung zu oder ver teilen Sie es als Mulchschicht unter Sträuchern und Bäumen Ersatzteile Zubehör Ersatzteile und Zubehör erhalten Sie in dem Markt in dem Sie den Benzin Rasenmäher gekauft haben oder unter www grizzly shop de oder www grizzly service eu Sollten Sie kein Internet haben so wenden Sie sich bitte telefonisch an d...

Page 26: ...che und optische Veränderungen können im Zuge der Weiterentwicklung ohne Ankündigung vorgenommen wer den Alle Maße Hinweise und Angaben dieser Betriebsanleitung sind deshalb ohne Ge währ Rechtsansprüche die aufgrund der Betriebsanleitung gestellt werden können daher nicht geltend gemacht werden Der angegebene Schwingungsemissions wert ist nach einem genormten Prüfver fahren gemessen worden und kan...

Page 27: ...äden von der Garantie ausgeschlossen die auf grund falschen Kraftstoffes oder eines falschen Mischungsverhältnisses ent standen sind und sämtliche Schäden an der Maschine die auf unzureichen de Schmierung zurückzuführen sind Folgende Teile unterliegen einem nor malen Verschleiß und fallen deshalb nicht unter die Garantie Schneidein richtung Zündkerzen Kraftstofffilter Luftfilter Starterseil Fangko...

Page 28: ...ar tung Vor Nach nach ersten 5 Std nach 8 Std nach 50 Std jähr lich der Arbeit Schrauben Muttern Bolzen prüfen und anziehen Motorölstand Benzinstand kon trollieren und bei Bedarf Motor öl Benzin nachfüllen Bedienungselemente Bereich um Schalldämpfer reinigen Motoröl wechseln Luftfilter austauschena Zündkerze reinigen einstellen austauschen Schalldämpfer und Funkenfän ger prüfenb Luftkühlungssystem...

Page 29: ...nstellen lassen Verrußte Zündkerze 13 Zündkerzen reinigen einstellen oder ersetzen siehe Reinigung und Wartung Motor wird über hitzt Lüftungsschlitze verstopft Lüftungsschlitze reinigen Falsche Zündkerze 13 Zündkerze wechseln Zu wenig Motoröl im Motor Motoröl einfüllen siehe Inbetrieb nahme Antrieb schaltet nicht ein Bowdenzüge 7 verstellt Bowdenzug einstellen oder von ei ner Fachwerkstatt einstel...

Page 30: ...rêter le moteur 44 Tondre 44 Instructions de travail 44 Nettoyage et entretien 45 Nettoyage et tâches d entretien générales 45 Échanger les filtres à air 46 Entretien des bougies d allumage 46 Changer l huile du moteur 46 Régler le câble Bowden 47 Aiguiser échanger les lames 47 Régler le carburateur 47 Rangement 48 Conseils généraux de rangement 48 Rangement et stockage pour de longues périodes sa...

Page 31: ...on qui n est pas expli citement autorisée dans cette notice peut conduire à des dégâts sur l appareil et constituer un danger grave pour l utilisateur Cet appareil est conçu pour être utilisé par des adultes Les enfants ainsi que les personnes qui ne sont pas familières avec cette notice ne doivent pas utiliser cet ap pareil L utilisateur est responsable des accidents ou des dégâts provoqués sur d...

Page 32: ... ou par une autre per sonne n ayant pas pris connaissance de la notice La législation locale permet de déterminer l âge minimum de l utilisateur Ne passez jamais la tondeuse alors que des personnes en particulier des enfants ou des animaux se trouvent à proximité Une distraction peut vous faire perdre le contrôle de l appareil N oubliez pas que l utilisateur est res ponsable de tout accident impli...

Page 33: ...es bouchons du réservoir et du réservoir d essence s ils sont abîmés Remplacez l isolation sonore si celle ci est endommagée Avant l utilisation il faut toujours ef fectuer un contrôle visuel pour vérifier que les outils de découpe les boulons de fixation et l ensemble de l unité de coupe ne sont pas usés ni abîmés Remplacez les lames et les boulons de fixation endommagés par lots complets afin de...

Page 34: ...côté opposé à l utilisateur Ne démarrez pas le moteur si vous vous tenez devant le canal d expulsion Allumez le moteur conformément aux instructions et seulement si vos pieds sont à une distance sûre des outils de découpe N approchez jamais les pièces en ro tation avec vos mains ou vos pieds Tenez vous toujours à distance de l ou verture d expulsion Un moment d inat tention lors de l utilisation d...

Page 35: ... soin de votre appareil Aiguisez et nettoyez les outils pour mieux tra vailler et en toute sécurité Respectez les instructions d entretien N essayez pas de réparer l appareil vous même sauf si vous avez suivi la formation correspondante Tous les travaux qui ne sont pas indiqués dans cette notice ne doivent être effectués que par des services clientèles que nous avons habilités Rangez l appareil da...

Page 36: ...à l accumulateur Il existe un risque de court cir cuit de plus il peut y avoir une émanation de vapeurs qui irritent les voies respiratoires Ventilez le local et en cas de troubles consultez un méde cin g N utilisez aucune batterie non rechargeable Manipulation conforme de l appareil sur accus Cet appareil n est pas prévu pour être utilisé par des personnes y compris les enfants dont les capacités...

Page 37: ...r un danger L accumulateur de votre appareil est livré seulement partiellement chargé et doit être chargé correc tement avant d être d utilisé pour la première fois Pour la première charge il est recommandé de charger la batterie pendant envi ron 5 heure Enfichez la batterie dans le support et connectez le chargeur au réseau électrique Retirez la fiche de secteur lorsque la batterie est complè tem...

Page 38: ...ter de l appareil 20 levier de réglage de la hauteur de coupe 21 2 roues arrière 22 accessoires de montage pour la fixation du guidon sur le support de guidon 23 sac de récupération de l herbe 24 serre câble câble de commande 25 affichage du niveau de remplissage non visible 26 poignée du bac à herbe 27 câble de commande 28 bouton de démarrage 29 kit de paillage 30 conduit d éjection latérale 31 c...

Page 39: ...reil que lorsque les lames sont éteintes et à l arrêt Veuillez également respecter la no tice d utilisation fournie du moteur Briggs Stratton Avant de mettre l appareil en marche il vous faut retirer les chapeaux anti poussière monter le guidon montez le cas échéant le panier de ra massage d herbe le kit de paillage le conduit d éjection latérale remplir l huile du moteur remplir le réservoir d es...

Page 40: ...suspension du bac de ramassage Installer le sac de récupéra tion sur l appareil Avant d utiliser le panier de ra massage il faut avoir retiré le kit de paillage et le conduit d éjection latéral Cf 1 Soulevez la protection anti choc arrière 18 2 Suspendez le sac de récupéra tion 23 aux suspensions pré vues à cet effet 34 situées au dos de l appareil 3 Relâchez la protection anti choc 18 elle mainti...

Page 41: ...l huile dans le réservoir Le réservoir d huile a une contenance de 500 ml Utilisez une huile de marque SAE 30 par exemple 2 Pour contrôler le niveau d huile es suyez la jauge avec un chiffon propre et remettez la entièrement dans le ré servoir 3 Lisez le niveau d huile sur la jauge après l avoir ressortie Le niveau d huile doit se situer entre les deux marques minimum et maximum 4 Essuyez les éven...

Page 42: ...er le bouton de démarrage la bat terie et le moteur électrique 1 Raccordez le connecteur noir du bouton de démarrage élec tronique 39 2 Raccordez le connecteur blanc de la batterie 40 Opération de chargement N exposez pas l accumulateur à des conditions extrêmes telles que chaleur et chocs Il existe un risque de blessure par échappement de la solution d électrolyte En cas de contact avec la peau o...

Page 43: ...atterie 8 dans le chargeur faites glisser la bat terie le long du rail de guidage dans l appareil Un déclic audible indique que la batterie est bien installée 3 Pour enlever la batterie de l appareil appuyez sur les bou tons de déverrouillage 37 au niveau de la batterie 8 et reti rez la batterie Retirer installer la batterie 1 Le cas échéant retirez la batte rie 8 du chargeur 2 Pour insérer la bat...

Page 44: ...et arrêter le moteur 2 Entraînement des roues allumé tirez sur la barre d en traînement 3 en direction du guidon la tondeuse avance éteint relâchez la barre d en traînement 3 L appareil stoppe Instructions de travail Une tonte régulière stimule la formation de feuilles au niveau de l herbe mais permet en même temps d éliminer les mauvaises herbes Le gazon s étoffe ainsi après chaque tonte ce qui p...

Page 45: ...sques de brûlures Portez des gants lorsque vous ma nipulez les lames Veuillez vous conformer à la notice d utilisation de Briggs Stratton fournie pour les travaux de net toyage et d entretien Nettoyage et tâches d entretien générales Ne penchez pas l appareil sur le côté ou vers l avant Des liquides de service peuvent s écouler et le moteur peut être endommagé Veillez à toujours maintenir l appare...

Page 46: ...spécialisé L intervalle d allumage doit être de 0 5 mm 4 Ajustez l intervalle le cas échéant en pliant prudemment l élec trode de masse de la bougie 5 Nettoyez la bougie avec une brosse métallique 6 Remettez les bougies nettoyées et ajustées en place ou rem placez les bougies abîmées serrage de couple recommandé 20 Nm voir Pièces de re change Changer l huile du moteur Faites basculer l appareil ve...

Page 47: ...ours aiguiser une lame émoussée par un garage spécialisé étant donné que celui ci peut effectuer un contrôle de balourd Faites toujours aiguisé une lame ou remplacer une lame avec balourd par un spécialiste Un montage non conforme peut provoquer de graves blessures 1 Montez l appareil voir Stockage Veillez à ce que la tondeuse à gazon repose de façon stable 2 Utilisez des gants solides et rete nez...

Page 48: ...isissures pour raient alors y apparaître Rangement et stockage pour de longues périodes sans uti lisation Le non respect des instructions de rangement peut conduire à des problèmes de démarrage dus à des restes d essence dans le car burateur ou à des dégâts définitifs Videz le réservoir d essence dans un endroit bien aéré Pour vider le carburateur démarrez le moteur et laissez le tourner jusqu à c...

Page 49: ...on des ap pareils hors d usage que vous nous avez renvoyés gratuitement Ne jetez pas l herbe coupée dans une benne à ordures mais utilisez la pour faire du compost ou répartissez la comme mulch sous les buissons et les arbres Pièces de rechange Ac cessoires Vous obtiendrez des pièces de rechange et des accessoires à l adresse www grizzly service eu Si vous ne disposez d aucun accès Inter net veuil...

Page 50: ...a déclaration de conformité Des modifications techniques et optiques en vue d un perfectionnement sont possibles sans notification préalable C est pourquoi toutes les dimensions infor mations remarques et déclarations men tionnées dans ce manuel sont sans enga gement de notre part Par conséquent des prétentions à des revendications juridiques qui se basent sur le manuel d instructions d emploi ser...

Page 51: ...tions techniques ont déjà été entreprises Sont également exclus de la garan tie les endommagements du moteur survenus à cause d un carburant non approprié ou d une mauvaise proportion des mélanges ainsi que tous les dom mages sur la machine à une lubrifica tion insuffisante Les pièces suivantes sont sujet à une usure normale et ne sont donc pas concernées par la garantie barre de coupe bougies d a...

Page 52: ...ut de 50 heures une fois par an la tonte contrôler et resserrez les écrous les boulons et les vis Contrôler le niveau d huile d essence et remplir au be soin d huile d essence Nettoyer les éléments de commande la zone autour de l isolation sonore nettoyer la protection des doigts Changer l huile du moteur Échanger les filtres à aira Nettoyer ajuster remplacer les bougies d allumage Contrôler l iso...

Page 53: ...sont pleines de suie nettoyer ajuster ou remplacer les bou gies voir Nettoyage et entretien le moteur sur chauffe les ouvertures d aération sont bouchées nettoyer les ouvertures d aération on utilise les mauvaises bou gies 13 échanger les bougies pas assez d huile dans le mo teur remplir d huile de moteur voir Mise en service l entraînement ne se met pas en marche le câble Bowden 7 d em brayage es...

Page 54: ... dotyczące pracy z urządzeniem 68 Czyszczenie i konserwacja 68 Czyszczenie i ogólne prace z zakresu konserwacji 68 Wymiana filtra powietrza 69 Wymiana i regulacja świecy zapłonowej 69 Wymiana oleju silnikowego 69 Regulacja linki napędu 70 Ostrzenie wymiana noża 70 Regulacja gaźnika 71 Przechowywanie 71 Ogólne zasady przechowywania 71 Przechowywanie podczas dłuższych przerw w pracy 71 Utylizacja i ...

Page 55: ...ania urządzenia który nie jest jednoznacznie określony jako dozwolony w niniejszej instrukcji obsługi może spowodować uszkodzenie urządze nia i stanowić poważne zagrożenie dla użytkownika Urządzenie może być używane tylko przez osoby dorosłe Dzieci i osoby nie znające instrukcji obsługi nie mogą używać urządze nia Osoba obsługująca urządzenie lub jego użytkownik odpowiada za wszelkie wypadki lub s...

Page 56: ...ć gdy w pobliżu znajdują się inne osoby szczególnie dzieci lub zwierzęta Chwila nieuwagi może spowodować utratę kontroli nad urządzeniem Proszę pamiętać że użytkownik ponosi odpowiedzialność za wypadki z udzia łem innych osób lub ich własności Proszę przestrzegać zasad ochrony przez hałasem i lokalnych przepisów prawa Czynności przygotowawcze Podczas koszenia nosić zawsze obu Piktogramy na pokrywi...

Page 57: ...żenia zużyte lub uszkodzone narzę dzia i trzpienie można wymieniać tylko w komplecie Zachowuj ostrożność przy obsłudze urządzeń wyposażonych w więcej niż jedno narzędzie tnące ruch jednego z noży może powodować obrót innych noży Używaj tylko dostarczonych i zale canych przez producenta części za miennych i akcesoriów Stosowanie części innych producentów prowadzi do natychmiastowej utraty uprawnień...

Page 58: ...eniem kanału wyrzutowe go przed sprawdzeniem i oczyszcze niem urządzenia lub wykonaniem przy nim jakichkolwiek czynności jeżeli urządzenie trafiło na ciało obce Sprawdź czy urządzenie nie wykazuje uszkodzeń i wykonaj ko nieczne naprawy przed ponownym uruchomieniem urządzenia i rozpo częciem pracy jeżeli urządzenie zaczyna silnie wi brować konieczne jest jego natych miastowe sprawdzenie Wyłącz siln...

Page 59: ...go typu grozi pożarem b Stosuj w urządzeniach elek trycznych tylko przystoso wane do nich akumulatory Używanie innych akumulato rów może prowadzić do zra nień i pożaru c Trzymaj nieużywane akumu latory z daleka od spinaczy biurowych monet kluczy gwoździ śrub i innych drob nych przedmiotów metalo wych które mogłyby spowo dować połączenie biegunów Zwarcie między biegunami akumulatora może spowodo wa...

Page 60: ... istniejących zagrożeń Dzieciom nie wolno bawić się urządzeniem Dzieciom nie wolno bez nadzoru wykonywać czyszczenia i konserwacji Dzieci należy nadzorować aby wykluczyć zabawę urządzeniem Do ładowania akumulatorów używaj wyłącznie dostarczo nej ładowarki Niebezpieczeń stwo pożaru i wybuchu Przed każdym użycie spraw dzaj ładowarkę jej kabel i wtyczkę naprawy zlecaj tyl ko wykwalifikowanemu per son...

Page 61: ...aduj akumu latory w ładowarce Urządzenie mogłoby ulec uszkodzeniu Opis ogólny Rysunki znajdziesz na stronach 2 4 Opis działania Spalinowa kosiarka do trawy posiada nóż obracający się równolegle do płaszczyzny koszenia Urządzenie jest napędzane mocnym silnikiem 4 suwowym Briggs Stratton 675 IS Obsługę urządzenia uła twiają funkcja Easy Start napęd na tylne koła i funkcja hamowania noża Kosiarka pos...

Page 62: ...owe rozrusznik elektryczny 40 złącze wtykowe akumulator 41 nakrętka ustalająca cięgna Bowdena 42 nakrętka regulacji cięgna Bow dena 43 nóż 44 śruba mocująca nóż 45 tarcza zaciskowa Elementy ochronne 2 Pałąk zabezpieczający Jego puszczenie zatrzymuje urządzenie 18 Zderzak chroni osobę obsługującą urządzenie przed odrzucanymi częściami i przypadkowym do tknięciem noża podczas pracy bez kosza na traw...

Page 63: ...ub podkła dek i nakrętek kołpakowych 22 po prawej i lewej stronie uchwytu na obudowie urządzenia 19 Montaż górnego trzonka rączki 4 Przykręcić mocno górny trzonek rączki 1 za pomocą dołączo nych szybkozamykaczy pod kładek i nakrętek 4 z prawej i lewej strony na dolnym trzonku rączki 5 5 Odchyl górny uchwyt prowadzący 1 mały rysunek i naciśnij dźwi gnię 4 w kierunku uchwytu 6 Zamocować obydwa cięgn...

Page 64: ...a należy zdjąć boczny kanał wyrzutowy patrz Zakładanie zestawu do mul czowania 1 Zdjąć kosz na trawę 23 jeśli jest założony 2 Podnieść osłonę 18 3 Założyć zestaw do mulczowania 29 Czerwona gałka zabezpie czająca zatrzaskuje się Demontaż zestawu do mul czowania 4 Podnieść osłonę 18 5 Przesunąć czerwoną gałkę zabezpieczającą na dół i zdjąć zestaw do mulczowania 29 Boczny kanał wyrzutowy Przed użycie...

Page 65: ... płomienia i innych źródeł zapłonu Nie używaj mieszanki benzyno wo olejowej Używaj bezołowiowej benzyny normalnej lub Super Używaj tylko czystej świeżej benzyny Nie przechowuj benzyny przez okres dłuższy niż miesiąc ponie waż powoduje to pogorszenie jej jakości 1 Odkręć korek wlewu zbiornika 9 i wlej benzynę do poziomu dolnej kra wędzi króćca wlewowego Nie napełniaj zbiornika do końca aby benzyna ...

Page 66: ...e krótszy czas pracy mimo pełnego naładowania świadczy o zu życiu akumulatora i konieczności jego wymiany Stosować tylko oryginalny akumulator zamienny można go nabyć za pośrednictwem naszego serwisu Należy zawsze przestrzegać obowią zujących wskazówek bezpieczeństwa przepisów i wskazówek dotyczących ochrony środowiska Uszkodzenia wynikłe z nieprawidłowego użytkowania nie są objęte gwarancją Wskaź...

Page 67: ...i przepisów lokalnych Uruchamianie i zatrzymywanie silnika Ostrzeżenie Benzyna jest bardzo łatwopalna Uruchamiaj silnik w odległości co najmniej 3 metrów od miejsca wlewania paliwa Uruchamiaj urządzenie na stabil nym równym podłożu w miarę możliwości nie w wysokiej trawie Upewnij się że mechanizm tnący nie dotyka żadnych przedmiotów ani podłoża Regularnie sprawdzaj poziom ben zyny i oleju patrz Ur...

Page 68: ...rzemieszczaj się do tyłu Na wzniesieniach zawsze pracuj w po przek wzniesienia Jeżeli noże zetkną się z ciałem obcym natychmiast wyłącz silnik Zaczekaj na zatrzymanie noża i sprawdź czy urządzenie nie jest uszkodzone Kontynuuj pracę tylko jeżeli urządzenie nie jest uszkodzone W czasie przerw w pracy i na czas transportu wyłącz urządzenie i zacze kaj na zatrzymanie noża Po każdym użyciu oczyszczaj ...

Page 69: ...do przeniknięcia pyłu i za nieczyszczeń do silnika a przez to do uszkodzenia maszyny Utrzymuj filtr powietrza w czystości 1 Poluzuj śrubę w pokrywie filtra powietrza 10 i otwórz pokrywę 2 Wyjmij filtr powietrza 11 3 W razie potrzeby wymień filtr powietrza na nowy zobacz roz dział Części zamienne 4 Aby założyć filtr włóż oczysz czony lub nowy filtr 11 do po krywy filtra powietrza 10 5 Zamknąć pokry...

Page 70: ...skazó wek zegara linka wydłuży się Ostrzenie wymiana noża W trakcie kontaktu z nożem nosić rękawice Nieprawidłowy montaż może być przyczyną ciężkich obrażeń ciała Przed czyszczeniem lub wykona niem wszelkich prac konserwacy jnych wyłączyć urządzenie zdjąć końcówkę kabla świecy zapłono wej 12 i odczekać do zatrzy mania się noża Niebezpieczeństwo zranienia Sprawdzić noże pod kątem zużycia oraz uszko...

Page 71: ... motylkowe i złóż uchwyt prowadzący Nie wolno przy tym zakleszczyć cięgien Nie zawijaj urządzenia w worki nylo nowe może w nich powstawać wilgoć i grzyb Przechowywanie podczas dłuższych przerw w pracy Nieprzestrzeganie zasad prze chowywania urządzenia może wywołać problemy z rozruchem lub trwałe uszkodzenia gaźnika przez resztki paliwa Opróżnij zbiornik paliwa w dobrze przewietrzanym miejscu Opróż...

Page 72: ...przeprowadzamy bezpłatnie Nie wyrzucaj ściętej trawy do konte nera na śmieci zakompostuj ją albo rozprowadź jako warstwę użyźniającą pod krzewami i drzewami Części zamienne Akcesoria Części zamienne i akcesoria można zakupić na www grizzly service eu Jeżeli nie masz dostępu do Internetu skontaktuj się z Centrum Serwisowym patrz Grizzly Service Center Miej pod ręką wymienione poniżej numery katalog...

Page 73: ...wyjściowe 12 45 V 2 A Klasa zabezpieczenia II Typ zabezpieczenia IPX0 Parametry akustyki i wibracji zostały okre ślone zgodnie z normami wymienionymi w Deklaracji Producenta Zmiany techniczne i optyczne mogą być wprowadzane bez zapowiedzi w trakcie procesu dalszego rozwoju urządzenia Wszelkie wymiary wskazówki i dane po dane w niniejszej instrukcji obsługi są w związku z tym podawane w sposób niew...

Page 74: ...ezachowania interwałów czyszcze nia Urządzenia w które dokonywano ingerencji technicznych Z zakresu gwarancji wyklucza się także uszkodzenia silnika spowodowane stosowaniem nieprawidło wego paliwa lub nieprawidłowego stosunku miesza nia oraz wszelkie uszkodzenia maszyny które zostały wywołane nieprawidłowym smarowaniem Następujące części ulegają normalne mu zużyciu i nie są objęte gwarancją mechan...

Page 75: ... szych 5 godz po 8 godz po 50 godz co rok pracą pracy Kontrola i dokręcenie śrub nakrętek sworzni Kontrola poziomu oleju ben zyny w razie potrzeby uzupeł nienie oleju benzyny Oczyszczenie elementów ob sługowych i okolicy tłumika Oczyszczenie osłony palców Wymiana oleju silnikowego Wymiana filtra powietrza Oczyszczenie regulacja wy miana świecy zapłonowej Kontrola tłumika i wychwytu iskier Oczyszcz...

Page 76: ...a mie szanka w gaźniku Zleć wyregulowanie gaźnika specja listycznemu warsztatowi Świeca pokryta sadzą 13 Oczyść wyreguluj lub wymień świe ce zapłonowe patrz Czyszczenie i konserwacja Silnik przegrzewa się Zatkane szczeliny wentylacyjne Oczyść szczeliny wentylacyjne Nieprawidłowa świeca zapłonowa 13 Wymień świecę zapłonową Za mało oleju w silniku Uzupełnij olej patrz Uruchamianie Napęd nie włącza s...

Page 77: ...erkinstructies 90 Reiniging en onderhoud 91 Reiniging en algemene onderhoudswerkzaamheden 91 Luchtfilter uitwisselen 91 Bougie wisselen instellen 92 Motorolie verversen 92 Bowdenkabel instellen 92 Mes slijpen uitwisselen 92 Carburateur instellen 93 Opslag 93 Algemene opslaginstructies 93 Opslag tijdens langere bedrijfsonderbrekingen 94 Afvalverwijdering milieubescherming 94 Vervangstukken Accessoi...

Page 78: ...kelijk toegestaan wordt kan tot beschadigingen aan het ap paraat leiden en een ernstig gevaar voor de gebruiker vormen Het apparaat is voor het gebruik door volwas senen bestemd Kinderen en ook personen die met deze handleiding niet vertrouwd zijn mogen het apparaat niet gebruiken De bediener of gebruiker van het apparaat is verantwoordelijk voor ongelukken of scha des aan andere personen of hun e...

Page 79: ...e personen of hun eigendom Houd rekening met geluidsoverlast en plaatselijke verordeningen Voorbereidende maatregelen Tijdens het maaien dient er altijd vast schoeisel en dienen er altijd lange broeken gedragen te worden Maai niet op blote voeten of in lichte san dalen Loszittende kledij sieraden of lang haar kunnen door bewegende onderdelen vastgegrepen worden Het dragen van geschikte kledij doet...

Page 80: ...en bouten slechts per paar uitgewisseld worden Wees voorzichtig bij apparaten met verschillend snoeigereedschap omdat de beweging van een mes tot rotatie van de overige messen kan leiden Gebruik uitsluitend reserveonderdelen en aan slijtage onderhevige toebeho ren die door de fabrikant geleverd en aanbevolen worden Het gebruik van vreemde onderdelen kan tot verwon dingen leiden en heeft een onmidd...

Page 81: ...e verwon dingen leiden Het apparaat nooit met een draaiende motor optillen of dragen Zet de motor uit trek de bougiedop af en vergewis u dat alle beweegbare onderdelen stilstaan voordat u blokkeringen lost of ver stoppingen in het uitwerpkanaal ver helpt voordat u het apparaat controleert reinigt of eraan werkt wanneer een vreemd voorwerp geraakt werd Zoek naar beschadi gingen aan het apparaat en ...

Page 82: ... accu s in de elek trowerktuigen Het gebruik van andere accu s kan tot verwondin gen en brandgevaar leiden c Houd de niet gebruikte accu uit de buurt van paperclips munten sleutels nagels schroeven of andere kleine metalen voorwerpen die een overbrugging van de contac ten zouden kunnen veroorza ken Een kortsluiting tussen de accucontacten kan tot brandwon den of brand leiden d Bij verkeerd gebruik...

Page 83: ...er niet en open deze niet zelf Daardoor wordt gegarandeerd dat de veiligheid van het toestel behouden blijft Let erop dat de netspanning overeenstemt met de gege vens van het typeplaatje op de acculader Er bestaat gevaar voor een elektrische schok Scheid de acculader van het net vooraleer verbindingen met de accu het elektrowerk tuig het toestel gesloten of geopend worden Houd de acculader zuiver ...

Page 84: ...zing een stootbescherming en een gras vangkorf met vulpeilindicator Het apparaat is ook 10 keer in de hoogte verstelbaar en heeft soepel lopende wielen De gebruiker heeft keuze tussen drie bewerkingswijzes Maaien met grasvangkorf mulchmaaien of maaien met zijdelings uitwerpen van gras Bovendien kan de grasmaaier door een speciale stand van de grijpstang plaatsbe sparend opgeslagen worden Overzicht...

Page 85: ... verhindert het zijdelingse weg slingeren van gemaaid gras en vaste delen en rijgt het gemaai de gras zijdelings aanee Omvang van de levering Pak het apparaat uit en controleer of de inhoud volledig is Benzinegrasmaaier Bovenste hoofdligger van de handgreep Grasvangmand Mulchkit Zijdelings uitwerpkanaal Kabelklem Montagetoebehoren voor de beves tiging van de hoofdliggers aan de dwarsbalkopname Bat...

Page 86: ...er ste stang 5 Grasvangmand monteren ledigen Opgelet apparaat niet zonder volledig aangebrachte gras vangmand of zonder stootbe scherming bedienen Gevaar voor verwondingen Vangmand monteren 1 Draai de kruisgleufschroef 32 aan het transporthandvat 26 los 2 Plaats het transporthandvat 26 op de bovenzijde van de gras vangkorf 23 en schroef het langs onder met de kruisgleuf schroef 32 vast 3 Klem de r...

Page 87: ...ndel 16a naar boven te trekken en de zi jdelingse botsbescherming 16 te openen 2 Haak het zijdelingse uitwerp kanaal 30 vast en leg de zij delingse stootbescherming 16 neer Deze houdt het zijdelingse uitwerpkanaal 30 in positie Motorolie ingieten en oliepeil controleren Zet het apparaat op een effen vloer 1 Draai de olietankdop met meetstaaf 17 los en giet olie in de tank De olietank bevat 0 5 l o...

Page 88: ...i ten en verschuif deze tot in de gewenste positie 2 Duw de hefboom weer naar binnen De correcte snoeihoogte bedraagt bij een siergazon ongeveer 30 45 mm bij een nuttig gazon ongeveer 40 65 mm Om voor de eerste keer in het sei zoen te snoeien dient een hoge snoeihoogte gekozen te worden Verbindingskabel insteken Vooraleer u het apparaat start moet u de insteekverbindingen tussen startknop accu en ...

Page 89: ... op een volle accu 1 licht wijst erop dat de accu moet worden geladen Accu opladen Laat een accu die nog maar net leeg is 8 gedurende ca 15 minu ten afkoelen alvorens hem in de lader 31 te plaatsen 1 Neem desgevallend de accu 8 uit het apparaat 2 Om de accu 8 in de lader te plaatsen schuift u de accu langs de geleidingsrail in het apparaat Hij klikt hoorbaar vast 3 Om de accu uit het apparaat te v...

Page 90: ...ien 1 Start de motor zie Starten en stoppen van de motor 2 Wielaandrijving Aan trek de aandrijfbeugel 3 n de richting van de hoofdligger van de handgreep de maaier beweegt voorwaarts Uit laat de aandrijfbeugel 3 los Het apparaat blijft stilstaan Werkinstructies Regelmatig maaien stimuleert de gras planten tot versterkte bladvorming en laat tegelijkertijd onkruid afsterven Daardoor krijgt het gazon...

Page 91: ...heden ook de meegeleverde gebruiksaanwijzing van Briggs Stratton in acht Reiniging en algemene onder houdswerkzaamheden Kantel het apparaat niet opzij of voorwaarts Bedrijfsvloeistoffen kunnen uitlopen en de motor kan beschadigd worden Houd het apparaat steeds netjes Gebruik om te reinigen een borstel of een doek maar geen bijtende reini gings of oplosmiddelen Gebruik om te reinigen van de motor g...

Page 92: ...eschadigde bougie door een nieuwe aanbevolen aan zetmoment 20 Nm met draai momentsleutel vastgesteld zie Reserveonderdelen Motorolie verversen Leg het apparaat niet op de zijkant opdat er geen bedrijfsvloeistoffen kunnen uitlopen Ververs de motorolie voor de eerste keer na ongeveer 5 be drijfsuren daarna telkens na 50 bedrijfsuren of jaarlijks Ververs de motorolie wanneer de motor warm is Voer de ...

Page 93: ...annen is Zodra u de mesbout 44 een keer losgedraaid heeft moet de spanf lens 45 worden vervangen Carburateur instellen De carburateur werd in de fabriek vooraf op een optimaal vermogen ingesteld Indien instellingen achteraf noodzakelijk zijn laat u de instellingen op een service werkplaats doorvoeren Opslag Algemene opslaginstructies Bewaar het apparaat niet met een gevulde vangmand Bij heet weer ...

Page 94: ...oef de bougie weer vast Voer oude olie en benzineresten op milieuvriendelijke wijze af zie Afval verwijdering milieubescherming De benzinetank moet niet geledigd worden wanneer u aan de benzine een brandstofstabilisator toevoegt Afvalverwijdering milieu bescherming Breng het apparaat de toebehoren en de verpakking naar een geschikt recy clagepunt Ledig de benzine en olietank zorg vuldig en geef uw...

Page 95: ...0 BSA InStart Vermogen P 2 2 kW Motor Briggs Stratton 575 IS Series Motorslagvolume V 150 cm3 Toerental van de messen n0 2800 min 1 Aanzetmoment messen 45 Nm Wielaandrijving ca 3 km h Volume benzinetank 0 8 l Octaangetal 95 98 Volume motorolietank 470 ml Motorolie HD SAE 30 of 10W 30 Bougie Champion XC92YC Snoeicirkel 460 mm Snoeihoogte 10 traps 25 75 mm Volume grasvangmand 60 l Gewicht m 31 1 kg ...

Page 96: ...op basis van deze gebruiksaanwijzing gemaakt worden kan men daarom niet doen gelden Garantie De garantieperiode voor dit apparaat bedraagt 2 jaar vanaf aankoopdatum en geldt uitsluitend voor de eerste ko per Dit apparaat is niet geschikt voor commercieel gebruik Bij commercieel gebruik vervalt de garantie Let op mogelijk andere garantie voorwaarden voor de motor en lees daartoe aandachtig de bijge...

Page 97: ... geval leeg Alle materiële scha de die hier het gevolg van is uitlopen de olie benzine als het apparaat op zijn kant of op de kop wordt gelegd c q brandschade tijdens het transport valt ten laste van de afzender De reparatie of de uitwisseling van het apparaat leidt noch tot een ver lenging van de garantieperiode noch wordt door deze voor het apparaat te leveren prestatie of voor eventueel ingebou...

Page 98: ... eerste 5 uren Na 8 uren Na 50 uren Jaar lijks het werk Schroeven moeren bouten nakijken en aandraaien Motoroliepeil benzinestand controleren en zo nodig motorolie benzine bijvullen Bedieningselementen bereik en ge luiddempers reinigen Vingerbescherming reinigenb Motorolie verversen Luchtfilter uitwisselena Bougie reinigen instellen uitwisselen Geluiddempers en vonkenvangers nakijkenb Luchtkoeling...

Page 99: ...ervicewerk plaats laten instellen Vol roet gekomen bougie 13 Bougies reinigen instellen of vervan gen zie Reiniging en onderhoud Motor wordt over verhit Ventilatiesleuven verstopt Ventilatiesleuven reinigen Verkeerde bougie 13 Bougie wisselen Te weinig motorolie in de motor Motorolie ingieten zie Ingebruik name Aandrijving scha kelt niet in Bowdenkabels 7 versteld Bowdenkabels instellen of door ee...

Page 100: ...Mowing 112 Working Instructions 112 Cleaning and Maintenance 113 Cleaning and General Maintenance Work 113 Replacing the Air Filter 113 Change adjust spark plug 114 Changing the Engine Oil 114 Adjusting the Bowden Cable 114 Sharpening Replacing the Blade 114 Adjusting the Carburettor 115 Storage 115 General Storage Instructions 115 Storage During Longer Breaks from Operation 115 Disposal Environme...

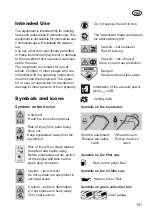
Page 101: ...by adults Children or other people who are unfamiliar with the operating instructions must not use the equipment The opera tor or user is responsible for accidents or damage to other persons or their property Symbols and icons Symbols on the device Attention Read the instruction manual Risk of injury from parts being flung out Keep bystanders away from the equipment Risk of injury from sharp blade...

Page 102: ...losions can result in seri ous burns Keep petrol only in containers in tended for this purpose Only refuel outdoors and do not smoke whilst refuelling Fill with petrol before starting the engine Do not open the filler cap or refill with petrol whilst the engine is running or the equipment is hot Symbols on the battery Attention Read the instruction manual Electrical machines do not belong with dom...

Page 103: ...ys work across the slope never upwards or downwards Take particular care when changing the direction of travel on the slope Do not mow on excessively steep slopes max 10 Run the equipment only at walking speed Take particular care when turning the equipment around or pulling it towards you Stop the cutting tool if the equipment has to be tipped up for transportation over a surface other than grass...

Page 104: ...e equip ment is in safe working condition Many accidents are caused by poorly maintained equipment Do not keep the equipment with petrol in the tank inside a building in which petrol fumes could potentially come into contact with open fire or sparks Allow the engine to cool before plac ing the equipment in enclosed spaces Risk of fire To avoid the risk of fire keep the en gine exhaust and area aro...

Page 105: ...rong sunlight over long periods and do not leave it on a heater Heat damages the battery and there is a risk of explosion e Allow a hot battery to cool before charging f Do not open up the battery and avoid mechanical dam age to the battery Risk of short circuit and fumes may be emitted that irritate the respira tory tract Ensure fresh air and seek medical assistance in the event of discomfort g D...

Page 106: ...o not use the charger to charge non rechargeable bat teries The device could be come damaged General Description The illustration of the principal functioning parts can be found on pages 2 4 Functional Description The petrol lawn mower has a cutting tool rotating parallel to the cutting plane The machine is powered by a powerful 4 stroke motor Briggs Stratton 675 IS The easy start function the rea...

Page 107: ...nection 41 Bowden cable locking nut 42 Bowden cable adjusting nut 43 Blade 44 Blade bolt 45 Conical spring washer Safety Equipment 2 Safety catch The equipment stops when the safety catch is released 18 Impact protection protect the operator from parts that are flung out and from ac cidentally touching the blades when mowing with no grass col lection box 15 Exhaust guard prevents hands or combusti...

Page 108: ... of the appliance housing 19 using the screws washers and cap nuts 22 pro vided Mounting the upper grip 4 Screw the upper grip 1 to the right and left of the lower han dlebar 5 using the included quick release levers shims and nuts 4 5 Unfold upper handlebar 1 small picture and push locking lever 4 toward bar 6 Attach the two Bowden cables 7 and the machine cable 27 to the lower handlebar 5 using ...

Page 109: ...taching mulch kit 1 Remove the collection box 23 if used 2 Lift the impact protection 18 3 Insert the mulch kit 29 The red locking button clicks into place Remove mulch kit 4 Lift the impact protection 18 5 Insert the red locking button downwards and remove the mulch kit 29 Lateral grass ejection Before using the lateral grass ejection the mulch kit 29 has to be inserted and the grass collection b...

Page 110: ... and pour in the petrol to the lower edge of the filler Do not fill the tank entirely to allow the petrol room to expand 2 Wipe away petrol residues around the filler cap and close the filler cap Setting the Cutting Height The equipment has 10 positions for set ting the cutting heigh 25 75 mm 1 Pull the lever 20 outwards and push it to the desired position 2 Push the lever back in The correct cutt...

Page 111: ...35 by pressing the button 36 The number of illuminated LED lights shows the charge level of the battery 4 lights means battery is fully char ged 1 light means battery must be charged Charging the battery Allow a freshly dis charged battery 8 to cool down for approx 15 minutes before inserting it into the battery charger 31 1 If necessary remove the battery 8 from the machine 2 To insert the batter...

Page 112: ...op ping device Release the safety loop 2 The motor switches off and the knife is braked The knife must stop within 7 seconds Mowing 1 Start the engine see Starting and Stopping the Engine 2 Wheel drive On Pull the drive catch 3 to wards the handle bar The mower moves forwards Off Release the drive catch 3 The equipment stops Working Instructions Regular mowing stimulates the grass to an increased ...

Page 113: ...work and also the de livered operating instructions from Briggs Stratton Cleaning and General Maintenance Work Do not tilt the equipment sideways or forwards Operating fluids could leak out and the engine could be damaged Always keep the equipment clean To clean use a toothbrush or cloth but no corrosive cleaning agents or solvents Do not use water to clean the engine as it could contaminate the f...

Page 114: ... ward with handlebar Do not place equipment on side to prevent oper ating liquids from leaking Change the engine oil for the first time after around 5 operat ing hours then every 50 operat ing hours or annually Change the engine oil when the engine is warm Dispose of the used oil in an ecofriendly manner see dis posal environmental protec tion 1 Remove the spark plug terminal 12 2 Open the oil tan...

Page 115: ...workshop Storage General Storage Instructions Do not store the equipment with a full collection box In hot weather the grass begins to fer ment when heat is generated Risk of fire Clean and service the equipment be fore storage Allow the engine to cool before storing the equipment in enclosed areas Use suitable and authorised contain ers for storing fuel Keep the equipment in a dry place that is p...

Page 116: ...y cling centre The plastic and metal parts that are used can be separated by type and thus recycled Take used oil and petrol residues to a disposal point and do not pour them into the sewer system or down the drain Please contact your Grizzly dealer Defective units returned to us will be disposed of for free Do not throw cut grass in the dustbin but rather compost it or spread it under bushes and ...

Page 117: ...ccording to the standards and stipulations mentioned in the declaration of conformity Technical and optical changes can be car ried out in the course of further develop ment without notice All dimensions refer ences and information of this instruction manual are therefore without guarantee Legal claims which are made on the ba sis of the instruction manual cannot thus be considered as valid The st...

Page 118: ...served Equipment on which technical inter ventions have been undertaken Other damages excluded from the warranty are motor damages caused by using the wrong fuel or a wrongly mixed fuel as well as all damage to the machine caused by insufficient lubrication The following parts are subject to nor mal wear and therefore not covered by the guarantee cutter spark plugs air filter fuel filter grass col...

Page 119: ...Hrs After 8 Hrs After 50 Hrs Annual Work Check and tighten screws nuts and bolts Check the engine oil level petrol level and refill with en gine oil petrol if required Clean operating elements the area around the silencer Clean the finger protection Change the engine oil Replace the air filtera Clean adjust the spark plug Replace the spark plug Check the silencer and spark catcher Clean the air co...

Page 120: ...cialist workshop Sooted spark plug 13 Clean adjust or replace the spark plugs see cleaning and maintenance Engine overheats Ventilation holes blocked Clean the ventilation slot Incorrect spark plug 13 Change the spark plug Too little engine oil in the engine Fill with engine oil see initial opera tion Drive does not switch on Bowden cables 7 misad justed Adjust the Bowden cables or have them adjus...

Page 121: ...stenie a údržba 134 Čistenie a všeobecné údržbové práce 135 Čistenie vzduchového filtra výmena 135 Výmena nastavenie zapaľovacej sviečky 135 Výmena motorového oleja 136 Nastavenie lankového tiahla 136 Brúsenie výmena noža 136 Nastavenie karburátora 137 Skladovanie 137 Všeobecné pokyny pre skladovanie 137 Skladovanie počas dlhších prevádzkových páuz 137 Likvidácia ochrana životného prostredia 138 N...

Page 122: ...itie ktoré nie je v tomto návode výslovne povolené môže viesť k poškodeniu prístroja a predstavovať váž ne nebezpečenstvo pre používateľa Prístroj je určený len na používanie dospe lými osobami Deti ako aj osoby ktoré nie sú oboznámené s týmto návodom nemôžu prístroj používať Obsluhujúci alebo použí vateľ je zodpovedný za úrazy iných osôb alebo za škody na ich majetku Výrobca ne zodpovedá za škody...

Page 123: ...je zodpovedný používateľ Dodržiavajte ochranu proti hluku a miestne predpisy Prípravné opatrenia Pri kosení noste vždy nešmykľavú obuv a dlhé nohavice Nekoste na boso alebo v ľahkých sandáloch Voľný odev šperky alebo dlhé vlasy môžu byť zachytené pohybujúcimi sa časťami Nosenie vhodného odevu znižuje riziko poranení Značky na kryte nádrže Pokyn na plniace hrdlo na benzín Značky na uzávere olejovej...

Page 124: ...robcom Použitie cudzích dielov môže viesť k poraneniam a má za následok okamžitú stratu nároku na záruku Obsluha Nenechajte bežať spaľovací motor v uzatvorených miestnostiach kde by sa mohol hromadiť nebezpečný oxid uhoľnatý Koste len za denného svetla alebo pri dobrom umelom osvetlení Neosvet lený pracovný priestor môže viesť k úrazom Ak je to možné zabráňte použitiu prí stroja v mokrej tráve Vžd...

Page 125: ...i vypínaní motora je nutné uviesť sýtič do východiskovej polohy Nikdy nenechávajte prístroj na praco visku bez dozoru Nepracujte s poškodeným nekomplet ným prístrojom alebo s prístrojom pre robeným bez súhlasu výrobcu Použitie stroja na iné účely ako bolo určené môže viesť k nebezpečným situáciám So zariadením nepracujte v prípade nebezpečenstva búrky Nebezpečen stvo úrazu elektrickým prúdom Údržb...

Page 126: ...Vyvarujte sa kon taktu s ňou Pri náhodnom kontakte opláchnite vodou Keď sa táto tekutina dostane do očí prídavne vyhľadajte le kársku pomoc Uniknutá tekuti na môže viesť k podráždeniam pokožky alebo k popáleninám ŠPECIÁLNE BEZPEČNOSTNÉ POKYNY PRE AKUMULÁTORO VÉ PRÍSTROJE a Zaistite to že je nástroj vypnutý predtým než doň vložíte akumulátor Vkladanie akumulátora do elektrického nástroja ktorý je z...

Page 127: ...lebo rozpoja spojenia k aku mulátoru elektrickému ná stroju prístroju Udržujte nabíjací prístroj čis tý a vzdialene od vlhkosti a dažďa Nikdy nepoužívajte nabíjací prístroj na voľnom priestranstve Skrz zašpinenie a vniknutie vody sa zvyšuje ri ziko elektrického úderu Tento nabíjací prístroj sa smie prevádzkovať iba s príslušnými originálnymi akumulátormi Nabíjanie iných akumulátorov môže viesť k p...

Page 128: ...sporne uschovať Prehľad 1 Horné držadlo rukoväte 2 Bezpečnostné madlo 3 Madlo pohonu 4 2 rýchloupínače 2 priložené podložky a 2 matice na upevne nie držadla 5 Dolné držadlo rukoväte 6 Svorka na kábe 7 Bowdenové lanká 8 Akumulátor 9 Kryt nádrže 10 Kryt vzduchového filtra 11 Vzduchový filter neviditeľný 12 Zástrčka zapaľovacích sviečok 13 Zapaľovacia sviečka 14 2 predné kolesá 15 Ochrana výfuku 16 B...

Page 129: ...kanál Svorka na kábel Montážne príslušenstvo na upevnenie držadla na uchytení držadla Akumulátor nabíjačka Zapaľovacia sviečka kľúč Návod na obsluhu Návod na obsluhu Briggs Stratton Uvedenie do prevádzky Pozor Nebezpečenstvo porane nia rotujúcim nožom Práce na prístroji vykonávajte len vtedy ak je vypnutý a nôž sa nehýbe Dodržiavajte takisto dodaný návod na obsluhu Briggs Stratton Pred naštartovan...

Page 130: ...gumový okraj záchytnej sieťky koša do pevného obalu zberného koša 23 Uchyťte plastové spony 33 nad rúrko vým skeletom 4 Odoberte prepravné ochranné kry ty zo zavesenia zberného koša Umiestnite zberný kôš na trá vu na prístroj Pred používaním záchytného koša musí sa odobrať mulčovač a bočný odhadzovací kanál viď 1 Nadvihnite zadnú nárazovú ochranu 18 2 Zaveste zberný kôš na trávu 23 do určeného záv...

Page 131: ...iahne 500 ml oleja Použite značkový olej napr SAE 30 2 Na kontrolu stavu oleja utrite odmerku s čistou utierkou a znovu ju založte do nádrže až na doraz 3 Po vytiahnutí odčítajte na odmerke stav oleja Stav oleja sa musí nachádzať v označenom poli medzi značkou minimum a maximum 4 Rozliaty olej utrite a znovu za tvorte klapku olejovej nádrže 17 Stav oleja kontrolujte pred každým kosením a pri dosia...

Page 132: ...láchnite postihnuté miesta vodou alebo neutralizačným prostriedkom a vyhľadajte lekára Akumulátor nabíjajte len v suchých priestoroch Pred zapojením nabíjačky musí byť vonkajšia plocha akumulátora čistá a suchá Hrozí nebezpečenstvo poranenia elektrickým prúdom Nabíjajte len s priloženou originál nou nabíjačkou Dbajte nato aby ste prístroj nenabíjali nepretržite dlhšie ako 1 hodina Akumulátor a prí...

Page 133: ...skrátená prevádzková doba aj napriek nabitia ukazuje že je baté ria opotrebovaná a musí sa vymeniť Používajte iba originálnu náhradnú sadu batérií ktorú si môžete zakúpiť prostredníctvom zákazníckeho servisu Každopádne dodržiavajte platné bez pečnostné pokyny ako aj predpisy a pokyny k ochrane životného prostredia pozri Odstránenie a ochrana životné ho prostredia Obsluha Dbajte na ochranu proti hl...

Page 134: ...vte tak aby ste prí stroj nepreťažovali Prístroj veďte krokom podľa možnosti v rovných pruhoch Pre dokonalé ko senie by sa mali pruhy vždy o niekoľko centimetrov prekrývať Nepohybujte sa smerom dozadu Na svahoch pracujte vždy priečne k svahu Ak nožom zachytíte cudzí predmet ihneď vypnite motor Počkajte kým sa nôž úplne zastaví a skontrolujte či nie je prístroj poškodený Prácu znovu ob novte len ak...

Page 135: ...stanú do motora a spôso bia poškodenie stroja 1 Uvoľnite skrutku na kryte vzdu chového filtra 10 a kryt vyklop te 2 Vyberte vzduchový filter 11 3 Vzduchový filter vymeňte za nový pozri Náhradné diely 4 Pri montáži nasaďte nový vzdu chový filter 11 do krytu vzdu chového filtra 10 5 Zaklapnite kryt vzduchového filtra a pevne ho zaistite Výmena nastavenie zapaľovacej sviečky Opotrebované zapaľovacie ...

Page 136: ...ru čičiek Lankové tiahlo sa skráti Otočte nastavovaciu maticu 42 v smere hodinových ruči čiek Lankové tiahlo sa predĺži Brúsenie výmena noža Pri zaobchádzaní s nožom noste rukavice Neodborná montáž môže spôsobiť ťažké úrazy Pred všetkým údržbárskymi a čistiacimi prácami vypnite zaria denie vytiahnite konektor zapaľo vacej sviečky 12 a čakajte kým sa nôž nezastaví Hrozí nebezpečenstvo úrazu Skontro...

Page 137: ... nesmiete pricviknúť Nezakrývajte prístroj nylonovými vre cami pretože sa môže tvoriť vlhkosť a pleseň Skladovanie počas dlhších pre vádzkových páuz Nedodržanie pokynov skladovania ponechaním zvyškov paliva v kar burátore môže viesť k problémom štartovania alebo k permanentným škodám Na dobre vetranom mieste vyprázd nite benzínovú nádrž Vyprázdnite karburátor K tomu naštartujte motor a nechajte ho...

Page 138: ...ého prístroja vykonáme bezplatne Posekanú trávu nevyhadzujte do domáceho odpadu ale do kompostu alebo ju použite ako mulčovaciu vrstvu pod kríky a stromy Náhradné diely Príslušenstvo Náhradné diely a príslušenstvo nájdete na strane www grizzly service eu Ak nemáte Internet kontaktujte na Servi ce Center viď Grizzly Service Center Dodržiavajte nižšie uvedené objednávacie čísla Originál náhradný nôž...

Page 139: ...ené v súlade s normami a predpismi uvedenými vo vyhlásení o zhode Technické a optické zmeny môžu byť v priebehu ďalšieho vývoja prevedené bez predchádzajúceho ohláse nia Všetky miery pokyny a údaje obsiahnu té v tomto návode na obsluhu sú preto bez záruky Právne nároky vznesené na základe návodu na obsluhu nemožno preto uplatniť Uvedená emisná hodnota vibrácií bola nameraná podľa normovanej skúšob...

Page 140: ...valy čistenia prístroje na ktorých už boli vykona né technické zásahy Zo záruky sú vylúčené aj škody na motore ktoré vznikli z dôvodu ne správneho paliva alebo nesprávneho pomeru zmesi a všetky škody na stroji ktoré vyplývajú z nedostatočného ma zania Nasledujúce diely podliehajú normál nemu opotrebeniu a preto nespadajú do záruky rezacie zariadenie zapaľo vacie sviečky vzduchový filter palivo vý ...

Page 141: ...a dotiahnutie skrutiek matíc svoriek Kontrola stavu motorového oleja benzínu a podľa potreby doplnenie motorového oleja benzínu Čistenie obslužných prvkov priestoru okolo tlmiča hluku Čistenie ochrany prstov Výmena motorového oleja Výmena vzduchového filtraa Čistenie nastavenie výmena zapaľovacej sviečky Kontrola tlmiča zvuku a zachytávača iskier Čistenie systému chladenia vzduchua b a pri zvýšeno...

Page 142: ...staviť karburátor v špecializovanom servise Zanesené zapaľovacie sviečky 13 Vyčistite nastavte alebo vymeňte zapaľovacie sviečky pozri Čiste nie a údržba Motor sa prehrieva Upchaté vetracie otvory Vyčistite vetracie otvory Nesprávne zapaľovacie sviečky 13 Vymeňte zapaľovacie sviečky V motore je málo motorového oleja Doplňte motorový olej pozri Uve denie do prevádzky Pohon sa nezapína Prestavené la...

Page 143: ...Sekání 156 Pracovní pokyny 156 Čištění a údržba 156 Čištění a obecná údržba 157 Výměna vzduchového filtru 157 Výměna Nastavení zapalovací svíčky 157 Výměna motorového oleje 157 Nastavení bovdenu 158 Broušení Výměna nože 158 Nastavení karburátoru 159 Skladování 159 Všeobecné pokyny ke skladování 159 Skladování během delších provozních přestávek 159 Odklízení a ochrana okolí 160 Náhradní díly Příslu...

Page 144: ... pro uživatele Přístroj je určen k použití dospělou oso bou Děti a osoby které nejsou s tímto návodem obeznámeny přístroj nesmějí obsluhovat Obsluhující osoba nebo uži vatel je odpovědný za nehody nebo škody na ostatních osobách nebo jejich majetku Výrobce neručí za škody které byly způ sobeny použitím v rozporu s daným urče ním nebo chybnou obsluhou Symboly a piktogramy Symboly na přístroji Varov...

Page 145: ... nesekejte naboso nebo v lehkých san dálech Volnější oblečení šperky nebo dlouhé vlasy mohou být zachyceny pohyblivými díly Nošení vhodného ob lečení snižuje riziko zranění Zkontrolujte oblast na které se přístroj použije a odstraňte všechny předměty např kameny tyče dráty hračky které by mohly být zachyceny a odhoďte je Varování Benzín je vysoce vznětlivý Oheň nebo exploze mohou vést k těž kým po...

Page 146: ...torách ve kterých se může nashromáždit nebezpečný oxid uhelnatý Sekejte trávu pouze za denního světla při dobrém umělém osvětlení Neo světlená pracovní oblast může způso bit nehody Vyhněte se pokud možno použití pří stroje v případě jestliže je tráva mokrá Dbejte vždy na bezpečnou stabilitu zejména na svazích skládkách příko pech nebo nábřežích To Vám umožní lépe kontrolovat přístroj v neočekáva n...

Page 147: ... škrti cí klapku Přístroj nikdy nenechávejte na pracovi šti bez dozoru Nepracujte s poškozeným neúplným přístrojem nebo přístrojem přestavě ným bez souhlasu výrobce Používání strojů pro jiné účely než je určeno může vést k nebezpečným situ acím Při nebezpečí úderu bleskem s přístro jem nepracujte Nebezpečí úrazu elek trickým proudem Údržba a skladování Zajistěte aby byly všechny matice čepy a šrou...

Page 148: ... očí přídavně vyhledejte lékařskou pomoc Uniknutá tekutina může vést k podrážděním pokožky anebo k popáleninám SPECIÁLNÍ BEZPEČNOSTNÍ PO KYNY PRO AKUMULÁTOROVÉ PŘÍSTROJE a Zajistěte to že je nástroj vy pnutý předtím než do něj vložíte akumulátor Vkládání akumulátoru do elektrického nástroje který je zapnutý může vést k nehodám b Načerpejte energii pouze v interiéru protože nabíječka pouze pro něj ...

Page 149: ...řístroj čistý a vzdáleně od vlhkosti a deště Nikdy nepoužívejte nabíjecí přístroj na volném prostran ství Skrz zašpinění a vniknutí vody se zvyšuje riziko elektrické ho úderu Tento nabíjecí přístroj se smí provozovat pouze s příslušný mi originálními akumulátory Nabíjení jiných akumulátorů může vést k poraněním a k ne bezpečí požáru Vyvarujte se mechanickým po škozením nabíjecího přístroje Tyto mo...

Page 150: ... 1 horní rukojeť 2 bezpečnostní páka 3 páka pojezdu 4 2 rychloupínáky 2 podložky a 2 matice pro montáž držadel 5 dolní rukojeť 6 kabelové svorky 7 bowdeny 8 akumulátor 9 uzávěr palivové nádrže 10 kryt vzduchového filtru 11 vzduchový filtr není vidět 12 koncovka zapalovacího kabelu 13 zapalovací svíčka 14 2 přední kola 15 ochrana výfuku 16 boční výhoz s ochranou proti nárazu 16a zajišťovací páky 17...

Page 151: ...Postranní odhazovací kanál Kabelové svorky montážní příslušenství pro upevnění rukojeti na zařízení pro uchycení ruko jeti akumulátor nabíječka klíč na zapalovací svíčky návod k obsluze návod k obsluze společnosti Briggs Stratton Uvedení do provozu Pozor Rotující nůž Práce na přístroji provádějte pouze při vypnutém motoru a zastaveném noži Postupujte podle pokynů v dodáva ném návodu k obsluze spol...

Page 152: ... záchytného koše na trávu do tuhého krytu 23 zachytá vacího koše na trávu Zatlačte plastové výstupky 33 přes trubkovou konstrukci 4 Odstraňte přepravní ochranné kryty ze zavěšení záchytného koše Připevnění sběrného koše k přístroji Před použitím zachytávacího koše je nutné sejmout mulčova cí sadu a postranní odhazovací kanál viz 1 Nadzvedněte ochranu proti od raženým předmětům 18 2 Zavěste sběrný ...

Page 153: ...te olej do nádrže Nádrž na olej pojme 500 ml oleje Použí vejte značkový olej např SAE 30 2 Pro kontrolu hladiny oleje otřete měrku čistým hadříkem a opět ji zasuňte do nádrže až na doraz 3 Po vytažení měrky na ní zjistěte výšku hladiny oleje Výška hladi ny oleje se musí nacházet v označeném poli mezi značkou minima a maxima 4 Případně rozlitý olej setřete a víčko olejové nádrže 17 opět za vřete Vý...

Page 154: ...or extrém ním podmínkám jako teplu a ná razům Hrozí nebezpečí poranění vytékajícím roztokem elektroly tu Při kontaktu s očima kůží po stižená místa omyjte vodou nebo neutralizačním prostředkem a vyhledejte lékaře Akumulátor nabíjejte jen v suchých prostorech Před připojením nabíječky musí být vnější plocha akumulátoru čistá a suchá Hrozí nebezpečí poranění elek trickým proudem Nabíjejte jen přilož...

Page 155: ...po vodicí liště do zařízení Slyšitelně zaklapne 3 Chcete li akumulátor vyjmout ze zařízení stiskněte odblokovací tlačítka 37 na akumulátoru 8 a akumulátor vytáhněte Opotřebované akumulátory Podstatně kratší doba provozu navzdory nabití indikuje že je aku mulátor opotřebovaný a je nutno jej vyměnit Používejte pouze originální náhradní akupack který můžete se hnat u zákaznického servisu V každém pří...

Page 156: ...va je odhazována bokem a lze ji následně v jedi ném pracovním postupu ručně sesbírat Sekejte pokud možno suchý trávník abyste šetřili drny Hloubku řezu nastavte tak aby nebyl přístroj přetěžován Veďte přístroj rychlostí chůze pokud možno v rovných dráhách Pro sekání bez mezer by se dráhy měly vždy o několik centimetrů překrývat Neposunujte se směrem dozadu Na svazích pracujte vždy šikmo ke sva hu ...

Page 157: ...ez vzduchového filtru Jinak se do mo toru může dostat prach a nečistoty což vede k poškození stroje 1 Povolte šrouby na krytu vzducho vého filtru 10 a kryt odklopte 2 Vyjměte vzduchový filtr 11 3 Vyměňte vzduchový filtr za nová filtr viz Náhradní díly 4 Pro montáž vložte nový vzdu chový filtr 11 do krytu 10 5 Přiklopte kryt vzduchového filtru a pevně jej zacvakněte Výměna Nastavení zapalovací svíč...

Page 158: ... 42 otáčejte ve směru hodinových ručiček Tah bovdenu se prodlouží Broušení Výměna nože Při manipulaci s nožem noste ru kavice Nesprávná montáž může způsobit vážné zranění Před jakoukoliv údržbou a čištěním vypněte zařízení vytáhněte zapa lovací konektor 12 a vyčkejte než se nůž zastaví Hrozí nebezpečí poranění Vytáhněte konektor zapalovací svíčky a zkontrolujte opotřebení a poškození nože Tupý nůž...

Page 159: ...stroj neobalujte do nylonových sáč ků protože se může vytvořit vlhkost a plíseň Skladování během delších pro vozních přestávek Nedodržování pokynů ke skladová ní může vést z důvodu zbytků pa liva v karburátoru k problémům se spuštěním nebo k permanentním škodám Benzínovou nádrž vyprazdňujte na dobře větraném místě Vyprázdnění karburátoru spusťte k tomuto účelu motor a ne chejte jej běžet dokud se ...

Page 160: ...atně Posekanou trávu nevyhazujte do po pelnice ale uložte ji na kompost nebo ji rozdělte jako mulčovací vrstvu pod keře a stromy Náhradní díly Příslušenství Náhradní díly a příslušenství obdržíte na stránkách www grizzly service eu Pokud nemáte internet tak prosím zavolej te na servisní středisko viz Grizzly Servi ce Center Ujistěte se že budete mít po ruce níže uvedená čísla objednávky Náhradní n...

Page 161: ...oty hluku a vibrací byly zjištěny podle norem a ustanovení uvedených v prohlášení o shodě V průběhu dalšího vývoje mohou být bez předchozího upozornění provedeny technické a designové změny Všechny rozměry pokyny a údaje tohoto návodu k obsluze jsou bez záruky Proto nelze uplat ňovat právní nároky kladené na základě návodu k obsluze Uvedená emisní hodnota vibrací byla změ řena podle normovaného zk...

Page 162: ...rých již byly provede ny technické zásahy Ze záruky jsou také vyloučena poško zení motoru která vznikla v důsledku použití nesprávného paliva nebo ne správného poměru množství oleje v benzinu a všechna poškození stroje které lze odvodit z nedostatečného mazání Následující díly podléhají běžnému opotřebení a tudíž nespadají do záru ky řezací zařízení zapalovací svíčky vzduchový filtr palivový filtr...

Page 163: ...Zkontrolujte a utáhněte šrou by matice a čepy Zkontrolujte hladinu motoro vého oleje hladinu benzínu a v případě potřeby motorový olej benzín doplňte Vyčistěte ovládací prvky oblast kolem tlumiče hluku Vyčistěte ochranu prstů Vyměňte motorový olej Vyměňte vzduchový filtra Vyčistěte nastavte vyměňte zapalovací svíčku Zkontrolujte tlumič hluku a la pač jisker Vyčistěte systém chlazení vzduchua a v p...

Page 164: ...it speci alizovanou dílnou Začouzená zapalovací svíčka 13 Zapalovací svíčky vyčistěte seřiďte nebo vyměňte viz Čištění a údržba Motor se přehřívá Větrací štěrbiny jsou ucpané Větrací štěrbiny vyčistěte Nesprávná zapalovací svíčka 13 Vyměňte zapalovací svíčku Příliš málo motorového oleje v motoru Doplňte motorový olej viz Uvedení do provozu Pojezd se neza píná Nesprávně nastavená bovde nová lanka 7...

Page 165: ...177 Valdymas 177 Variklio paleidimas ir sustabdymas 177 Pjovimas vejapjove 178 Darbo nurodymai 178 Valymas ir techninė priežiūra 178 Valymas ir bendrieji techninės priežiūros darbai 179 Oro filtro keitimas 179 Uždegimo žvakės keitimas nustatymas 179 Variklio alyvos keitimas 180 Boudeno lynų nustatymas 180 Peilių galandimas keitimas 180 Karbiuratoriaus nustatymas 181 Laikymas 181 Bendrieji laikymo ...

Page 166: ...ti tik suaugusieji Šio prietaiso negali naudoti vaikai ir asmenys nesusipažinę su šia instrukcija Prietaisą valdantis arba naudojantis as muo yra atsakingas už nelaimingus atsi tikimus arba žmonėms ir jų nuosavybei padarytą žalą Gamintojas neatsako už žalą atsiradusią dėl naudojimo ne pagal paskirtį arba netinkamo valdymo Paveikslėliai simboliai Paveikslėliai ant prietaiso Įspėjimas Perskaityti na...

Page 167: ...y Niekada nepjaukite neapsiavę ar avėdami lengvus sandalus Besisukančios dalys gali sugriebti laisvus drabužius papuošalus arba ilgus plaukus Dėvint tinkamus drabužius sumažėja rizika susižaloti Zkontrolujte oblast na které se přístroj použije a odstraňte všechny předměty např kameny tyče dráty hračky které by mohly být zachyceny a odhoďte je Paveikslėlis ant žolės surinkimo Pripildymo lygio indik...

Page 168: ...odingo anglies monoksido Pjaukite tik dienos šviesoje arba įjun gę tinkamą dirbtinį apšvietimą Dirbant neapšviestoje darbo srityje gali įvykti nelaimingų atsitikimų Jei įmanoma prietaisu nepjaukite drė gnos žolės Dbejte vždy na bezpečnou stabili tu zejména na svazích skládkách příkopech nebo nábřežích To Vám umožní lépe kontrolovat přístroj v neo čekávaných situacích Ant šlaito visada stovėkite ir...

Page 169: ...ms nei numatyta gali susidaryti pavojingų situacijų Při nebezpečí úderu bleskem s přístro jem nepracujte Nebezpečí úrazu elek trickým proudem Techninė priežiūra ir laikymas Pasirūpinkite kad visos veržlės sraig tai ir varžtai būtų tvirtai priveržti ir prie taisas būtų saugios darbinės būklės Daug nelaimingų atsitikimų įvyksta jei netinkamai atliekami prietaisų techni nės priežiūros darbai Prietais...

Page 170: ...nkite kad prietaisas išjungtas Aku muliatoriaus įstatymas į įjungtą elektrinį įrankį gali sukelti nelai mingus atsitikimus b Įkraukite baterijas tik vidaus patalpose kadangi kroviklis yra tik tam skirtas c Kad sumažintumėte elektros smūgio riziką prieš valydami kroviklį ištraukite jo kištuką iš elektros lizdo d Nepalikite akumuliatoriaus ilgą laiką stipriuose saulės spinduliuose ir nedėkite ant ra...

Page 171: ...umpąjį jungimą Kroviklio negalima eksploa tuoti ant degių paviršių pvz popieriaus tekstilės Gre sia gaisro pavojus dėl įšilimo įkrovimo metu Jeigu šio prietaiso maitinimo laidas pažeidžiamas jį kad nekeltų pavojaus reikia pave sti pakeisti gamintojui arba jo klientų aptarnavimo skyriui ar panašiai kvalifikuotam asme niui Akumuliatorius pristatomas tik iš dalies įkrautas todėl prieš naudojant pirmą...

Page 172: ...lyvos bakelio dangtelis su aly vos lygio matuokliu 18 Apsauga nuo smūgių 19 Įrenginio korpusas 20 Pjovimo aukščio nustatymo svirtis 21 2 galiniai ratukai 22 Montavimo priedai lankui tvirtinti 22 2 veržlės su žvaigždės formos galvute 2 poveržlės ir 2 varžtai strypui tvirtinti 23 Žolės surinkimo dėžė 24 kabelių spaustuvai Įrenginio ka belis 25 Pripildymo lygio indikatorius ne matoma 26 Žolės surinki...

Page 173: ...tlikite tik iš jungę variklį ir palaukę kol peiliai sustos Taip pat laikykitės komplektacijoje esančios Briggs Stratton nau dojimo instrukcijos Prieš įjungdami prietaisą turite atlikti šiuos darbus nuimkite apsauginius gaubtelius sumontuokite rankenos lanką prireikus sumontuokite žolės surinki mo dėžę mulčiavimo rinkinį šoninio išmetimo kanalą įpilkite variklio alyvos įpilkite benzino Įkraukite ir...

Page 174: ...išmontuoti mulčia vimo rinkinį ir šoninio išmetimo kanalą žr 1 Pakelkite apsaugą nuo smūgių 18 2 Įkabinkite surinkimo dėžę 23 į jai numatytą pakabą 34 esan čią prietaiso antroje pusėje 3 Nuleiskite apsaugą nuo smūgių 18 ji laikys surinkimo dėžę tin kamoje padėtyje Surinkimo dėžės nuėmimas ištuštinimas 4 Pakelkite apsaugą nuo smūgių 18 ir išimkite surinkimo dėžę 23 5 Ištuštinkite surinkimo dėžę žr ...

Page 175: ...matuoklį nuvalykite švaria šluos te ir vėl jį įstumkite iki galo į bakelį 3 Ištraukę patikrinkite ant alyvos lygio matuoklio nurodytą alyvos lygį Alyvos lygis turi būti tarp nu rodytos žemiausio ir aukščiausio lygio žymos 4 Jei reikia nuvalykite išbėgusią alyvą ir vėl uždarykite alyvos bakelio dangtelį 17 Prieš kiekvieną pjovimo patikrinkite alyvos lygį ir pripilkite jei alyvos lygis nesiekia žemi...

Page 176: ...ite nuo smūgio Gresia pavojus susižeisti ištekančiu elektrolitų tirpalu Patekus į akis arba ant odos plaukite tas vietas van deniu arba neutralizatoriumi ir kreipkitės į gydytoją Akumuliatorių įkraukite tik sausose patalpose Prieš prijungdami kroviklį įsitikinkite kad akumuliatoriaus paviršius yra švarus ir sausas Gresia sužalojimo dėl elektros smūgio pavojus Įkraukite tik pridėtu originaliu krovi...

Page 177: ...ginį Jis girdimai užsifiksuoja 3 Norėdami išimti akumuliatorių iš įrankio paspauskite akumuliato riaus atlaisvinimo mygtukus 37 ir ištraukite akumuliatorių 8 Išeikvoti akumuliatoriai Nepaisant įkrovimo gerokai sutrumpėjęs eksploatavimo lai kas rodo kad akumuliatorius yra išeikvotas ir jį reikia keisti Naudokite tiktai atsarginį akumuliatorių kurį ga lite įsigyti klientų aptarnavimo skyriuje Bet ko...

Page 178: ...olės išmetimo kanalu Nupjauta žolė išmetama per šoną ir po to gali būti su rinkta rankiniu būdu vienu darbo etapu Jei įmanoma pjaukite sausą veją kad būtų tausojama danga Nustatykite tokį pjovimo gylį kad prie taisas nebūtų per daug apkrautas Prietaisą stumkite žingsnio greičiu ir kuo lygesnėmis linijomis Kad nupjau tumėte visą veją juostos turėtų persi dengti kelis centimetrus Nejudėkite atgal Pj...

Page 179: ...sidėvėjo ir nėra pažeistos Patikrinkite ar visos veržlės sraigtai ir varžtai tvirtai priveržti Patikrinkite ar gaubtai ir apsauginiai įrenginiai nepažeisti ir stipriai pritvirtin ti Prireikus juos pakeiskite Oro filtro keitimas Niekada neeksploatuokite prietaiso be oro filtro Dulkės ir nešvarumai patenka į variklį ir gali sugadinti įrenginį 1 Atlaisvinkite oro filtro gaubto 10 varžtą ir atlenkite ...

Page 180: ... 41 2 Nustatymo veržlę 42 atsuki te prieš laikrodžio rodyklę Boudeno lynas sutrumpėja Nustatymo veržlę 42 sukite pagal laikrodžio rodyklę Boudeno lynas pailgėja Peilių galandimas keitimas Imdami už peilio mūvėkite piršti nes Netinkamas montavimas gali su kelti sunkius sužeidimus Prieš atlikdami techninės priežiūros ir valymo darbus iš junkite įrenginį ištraukite uždega mosios žvakės kištuką 12 ir ...

Page 181: ...t appa raat minder plaats in beslag neemt De bowdenkabels mogen daarbij niet gekneld worden Ant prietaiso nedėkite nailoninių mai šų nes gali kauptis drėgmė ir atsirasti pelėsis Laikymas kai prietaisas eksp loatuojamas retai Jei nepaisysite laikymo nurodymų dėl karbiuratoriuje likusių degalų prietaisas gali sunkiai užsivesti arba po tam tikro laiko sugesti Benzino bakelį ištuštinkite gerai vėdi na...

Page 182: ...es jį utilizuosime nemoka mai Nupjautos žolės nemeskite į šiukšlių konteinerius ją nuvežkite į komposta vimo vietą arba kaip trąšas paskirsty kite po krūmais ir medžiais Atsarginės dalys Priedai Atsargines dalis ir priedus galite įsigyti interneto svetainėje www grizzly service eu Jei neturite interneto kreipkitės telefonu į aptarnavimo centrą žr Grizzly Servi ce Center Pasiruoškite žemiau nurody ...

Page 183: ...kšmės buvo ap skaičiuotos remiantis atitikties deklaracijoje nurodytais standartais ir nuostatomis Nuo lat toliau tobulinant gaminius galimi tech niniai ir optiniai pakeitimai apie kuriuos iš anksto neįspėjama Dėl šios priežasties neužtikriname kad atitiks visi šioje eksplo atavimo instrukcijoje pateikti matmenys nurodymai ir duomenys Dėl to mes neprii mame teisinių pretenzijų dėl eksploatavimo in...

Page 184: ... kurie atsiranda dėl eks ploatavimo instrukcijos nepaisymo arba valymo intervalų nesilaikymo jei jau buvo atlikti savavališki prietai so techniniai pakeitimai Garantija taip pat nesuteikiama va riklio pažeidimams jei jie atsiranda naudojant netinkamus degalus ar netinkamą degalų mišinį visiems įrenginio jei jie atsiranda dėl nepakan kamo tepimo Toliau nurodytos dalys dėvisi todėl joms garantija ne...

Page 185: ... prie žiūra Prieš Po Po pir mųjų 5 val Po 8 val Po 50 val Kasmet darbą darbo Patikrinti ir priveržti varžtus veržles sraigtus Patikrinti variklio alyvos lygį benzino lygį ir prireikus papil dyti variklio alyvos benzino Nuvalyti valdymo elementus garso slopintuvo sritį Nuvalyti pirštų apsaugą Pakeisti variklio alyvą Pakeisti oro filtrąa Nuvalyti nustatyti pakeisti uždegimo žvakę Patikrinti garso sl...

Page 186: ...te nustatyti į specializuotas dirbtuves Aprūko uždegimo žvakė 13 Nuvalykite nustatykite arba pakeis kite uždegimo žvakes žr Valymas ir techninė priežiūra Variklis perkaista Užsikišo ventiliacijos anga Išvalykite ventiliacijos angą Netinkama uždegimo žvakė 13 Pakeiskite uždegimo žvakę Variklyje per mažai variklio alyvos Įpilkite variklio alyvos žr Eksploa tavimo pradžia Pavara neįsijun gia Pasikeit...

Page 187: ...o del motore 200 Falciatura 200 Avvertenze per l utilizzo 201 Pulizia e manutenzione 201 Pulizia e lavori di manutenzione generali 201 Sostituzione del filtro aria 202 Manutenzione della candela di accensione 202 Cambio dell olio motore 202 Regolazione del cavo di comando con guaina 203 Molatura sostituzione della lama 203 Regolazione del carburatore 203 Stoccaggio 204 Istruzioni generali per lo s...

Page 188: ...uso da parte di persone adulte Non permettere mai a bambini nonché ad altre persone le quali non conoscono le istruzioni per l uso di usare l apparecchio Simboli e pittogrammi Simboli grafici sull apparecchio Attenzione Leggere le istruzioni per l uso Pericolo di lesioni da corpi estra nei proiettati Tenere lontane dall apparecchio le persone non addette ai lavori Pericolo di lesioni dovuto alle l...

Page 189: ...rispettivi beni Rispettare le normative inerenti alla protezione antirumore e le disposizio ni locali Misure preliminari Per la falciatura indossare sempre calzature antiscivolo e pantaloni lun ghi Non falciare a piedi nudi o con sandali leggeri L abbigliamento lento i gioielli e i capelli lunghi possono incastrarsi nei componenti mobili Simbolo sul cestello raccoglierba Indicatore del livello di ...

Page 190: ...gli utensili e i bulloni usurati o danneg giati vanno sostituiti per set Maneggiare con particolare cautela gli apparecchi con più utensili di taglio poiché il movimento di una lama può portare alla rotazione dell altra lama Utilizzare solo pezzi di ricambio e accessori che sono forniti e consigliati dal produttore L uso di componenti non originali può causare lesioni e comporta l immediata decade...

Page 191: ...Un attimo di disattenzione durante l uso dell apparecchio può causare gravi lesioni Non sollevare o trasportare mai l ap parecchio a motore acceso Fermare il motore estrarre il cappuccio della candela e assicurarsi che tutti i componenti mobili si siano arrestati prima di eliminare le cause di blocco o intasamento del canale di scarico prima di ispezionare l apparecchio pulirlo o effettuarvi degli...

Page 192: ...LI A BATTERIA CON CAUTELA a Caricare le batterie solo nei caricatori consigliati dal produttore Un caricabatterie adatto a un dato tipo di batterie può incendiarsi se viene utiliz zato con altre batterie b Utilizzare solo le batterie ap positamente previste per gli elettroutensili L uso di batte rie diverse provoca il rischio di lesioni e il pericolo di incendio c Tenere le batterie non uti lizzat...

Page 193: ... bambini per accertarsi che non giochino con l apparecchio Per caricare la batteria utiliz zare esclusivamente il cari cabatterie in dotazione Peri colo di incendi ed esplosioni Prima di ogni utilizzo con trollare il caricabatterie il cavo e il connettore e affidarne la riparazione a personale qualificato che utilizzi solo pezzi di ricam bio originali Non utilizzare un caricabatterie difettoso e n...

Page 194: ... pacciamatura e la falcia tura con espulsione laterale dell erba Inoltre il tosaerba può essere stivato in modo poco ingombrante grazie a una posizione speciale delle sbarre dell impu gnatura Panoramica 1 Sbarra impugnatura superiore 2 Staffa di sicurezza 3 Archetto di regolazione della tra zione 4 2 tenditori rapidi 2 rondelle e 2 dadi per il fissaggio della sbarra 5 Sbarra impugnatura inferiore ...

Page 195: ...isce la proiezione laterale dell erba tagliata e di corpi duri e ordina l erba tagliata lateral mente Contenuto della confezione Rimuovere l apparecchio dalla confezione e controllare se è completo Tosaerba a benzina Sbarra impugnatura superiore Cestello raccoglierba Kit di pacciamatura Convogliatore di scarico laterale ermacavo Batteria Caricabatterie Accessori per il fissaggio della sbarra nell ...

Page 196: ...o svuotamento del cestello raccoglierba Attenzione utilizzare l apparec chio solo con il raccoglierba completamente montato e con la protezione antiurto Pericolo di lesioni Assemblaggio del cestello raccoglierba 1 Allentare la vite a croce 32 presente sul manico 26 2 Posizionare il manico 26 sulla parte superiore del cestello raccoglierba 23 e avvitarlo sal damente da sotto con la vite a croce 32 ...

Page 197: ...terale Prima di utilizzare il convogliatore di scarico laterale è necessario inserire il kit di pacciamatura 29 e rimuovere il cestello racco glierba 23 Inserimento convogliatore di scarico laterale 1 Sbloccare la protezione antiurto laterale 16 tirando la leva di bloccaggio 16a verso l alto e aprendo la protezione antiurto laterale 16 2 Inserire il convogliatore di sca rico laterale 25 e rimuover...

Page 198: ...o benzina pulita e nuova Non conservare la benzina per oltre un mese poiché la sua qualità peggiora 1 Svitare il tappo del carburante 9 e rabboccare la benzina fino al bordo in feriore del bocchettone di riempimento Non riempire completamente il ser batoio in modo che la benzina abbia spazio sufficiente per dilatarsi 2 Rimuovere con un panno eventuali residui di benzina intorno al coperchio del se...

Page 199: ...nale che può essere acquistata tramite il servizio clienti Attenersi in ogni caso alle avvertenze di sicurezza nell ultima versione e alle disposizioni e avvertenze in materia di protezione dell ambiente Sono esclusi dalla garanzia i difetti dovuti a uso improprio Indicazione carica Indicatore dello stato di carica della batteria Il livello di carica della batteria può essere letto sull apposito i...

Page 200: ... sull erba alta Sincerarsi che l utensile di taglio non tocchi oggetti né il terreno Controllare regolarmente il livello della benzina e dell olio vedere il capitolo Messa in funzione ed effettuarne il rabbocco in tempo Avviamento del motore 1 Inserire la batteria ricaricata 8 come descritto sotto nel capito lo Estrazione inserimento della batteria 2 Tirare la staffa di sicurezza 2 in direzione de...

Page 201: ... presenza di danni nell apparecchio Proseguire con il lavoro solo se l ap parecchio non risulta danneggiato Durante le pause e per il trasporto disattivare l apparecchio e attendere che la lama si fermi Pulire l apparecchio dopo ogni utilizzo come indicato al capitolo Pulizia e manutenzione Pulizia e manutenzione Per i lavori di riparazione e ma nutenzione non descritti nelle presenti istruzioni r...

Page 202: ... la copertura del filtro aria e farla scattare in sede Manutenzione della candela di accensione Le candele logore o un eccessiva distanza fra gli elettrodi riducono la resa del motore 1 Rimuovere il cappuccio della candela 12 dalla candela tiran dolo e ruotandolo contempora neamente 2 Estrarre la candela svitandola in senso antiorario con la chiave per candele in dotazione 3 Verificare la distanza...

Page 203: ...Pericolo di lesioni Verificare l assenza di usura e danni alla lama Per far molare un eventuale lama non affilata rivolgersi sempre ad un officina qualificata poiché è in grado di effet tuare il controllo dello sbilanciamento Far sostituire sempre le lame danneg giate o che presentano sbilanciamen to presso un officina qualificata Un montaggio non conforme può causare lesioni gravi 1 Posizionare l...

Page 204: ...si umidità e funghi Conservazione nei lunghi periodi di inutilizzo In presenza di residui di carbu rante nel carburatore il mancato rispetto delle istruzioni per la con servazione può rendere difficoltoso l avviamento o causare danni per manenti Svuotare il serbatoio della benzina in un locale ben arieggiato Svuotare il carburatore A tal fine avviare il motore e lasciarlo acceso fino al suo arrest...

Page 205: ...rizzly Ci occupiamo gratuitamente dello smal timento dei vostri apparecchi difettosi Non gettare l erba tagliata nel bidone dei rifiuti bensì utilizzarla per il com postaggio o distribuirla come strato di pacciame sotto cespugli e alberi Pezzi di ricambio accessori Pezzi di ricambio e accessori sono reperibili al sito www grizzly service eu Se si desidera assistenza telefonica contattare il centro...

Page 206: ...ne II Tipo di protezione IPX0 L apparecchio può essere sottoposto a modifiche tecniche ed estetiche nell ambito del perfezionamento senza alcun preavvi so Tutte le misure le avvertenze e i dati riportati nelle presenti istruzioni d uso rap presentano pertanto valori indicativi Di conseguenza non si accettano eventuali rivendicazioni in merito alle istruzioni d uso Il valore sulle vibrazioni emesse...

Page 207: ...tisi a causa di un carburante errato o di un rapporto di miscela non adeguato e tutti i danni alla macchina riconducibili a una lubri ficazione insufficiente I seguenti componenti sono soggetti a una normale usura pertanto non rien trano nella garanzia gruppo di taglio candele filtro del carburante filtro aria cestello raccoglierba Per i casi che rientrano nella garanzia si prega di contattare tel...

Page 208: ...An nual mente il lavoro Controllo e serraggio di viti dadi bullon Controllo del livello di olio motore benzina e se neces sario rabbocco di olio motore benzina Pulizia degli elementi di co mando della zona attorni ai silenziatori Pulizia del proteggidita Cambio dell olio motore Sostituzione del filtro ariaa Pulizia regolazione sostituzi onedella candela Pulizia controllo affilatura della lama Cont...

Page 209: ...da un officina specializzata Candela coperta di fuliggine 13 Pulire regolare o sostituire le candele vedere Pulizia e manutenzione Il motore si surriscalda Bocchette di aerazione intasate Pulire le bocchette di aerazione Candela errata 13 Sostituire la candela Livello di olio motore insufficiente Rabboccare l olio motore vedere Messa in funzione L unità non si accende Cavi Bowden 7 regolati Regola...

Page 210: ...210 ...

Page 211: ...95 1 2013 EN ISO 5395 2 2013 A2 2017 EN ISO 14982 2009 Zusätzlich wird entsprechend der Geräuschemissionsrichtlinie 2000 14 EG bestätigt Schallleistungspegel Garantiert 96 dB A Gemessen 92 4 dB A Angewendetes Konformitätsbewertungsverfahren entsprechend Anh VI 2000 14 EG und 2005 88 EG Benannte Stelle TÜV SÜD Industrie Service GmbH Westendstrasse 199 80686 München Deutschland Notified Body 0036 Di...

Page 212: ...EN ISO 5395 1 2013 EN ISO 5395 2 2013 A2 2017 EN ISO 14982 2009 Nous certifions également conformément à la directive sur les émissions de bruit 2000 14 EC que Niveau de puissance sonore garanti 96 dB A mesuré 92 4 dB A Procédé d évaluation de la conformité appliqué selon l annexe VI 2000 14 EC et 2005 88 EC Bureau declaré TÜV SÜD Industrie Service GmbH Westendstrasse 199 80686 München Deutschland...

Page 213: ... EN ISO 5395 1 2013 EN ISO 5395 2 2013 A2 2017 EN ISO 14982 2009 Ponadto potwierdzono zgodnie z dyrektywą w sprawie emisji hałasu 2000 14 EC poziom mocy akustycznej gwarantowany 96 dB A zmierzony 92 4 dB A Zastosowana procedura oceny zgodności odpowiada załącznikowi VI 2000 14 EC i 2005 88 EC Placówka zgłoszenia TÜV SÜD Industrie Service GmbH Westendstrasse 199 80686 München Deutschland Notified B...

Page 214: ...2013 EN ISO 5395 2 2013 A2 2017 EN ISO 14982 2009 Bovendien wordt in overeenstemming met de geluidsemissierichtlijn 2000 14 EC bevestigd akoestisch niveau Gegarandeerd 96 dB A Gemeten 92 4 dB A Toegepaste conformiteitbeoordelingsprocedure in overeenstemming met Annex VI 2000 14 EC 2005 88 EC Aangemeld bij TÜV SÜD Industrie Service GmbH Westendstrasse 199 80686 München Deutschland Notified Body 003...

Page 215: ... EN ISO 5395 2 2013 A2 2017 EN ISO 14982 2009 The following are also confirmed as complying with Noise Emissions Directive 2000 14 EC Guaranteed sound power level 96 dB A Measured sound power level 92 4 dB A he conformity evaluation procedure employed is compliant with appendix VI 2000 14 EC 2005 88 EC Registered Office TÜV SÜD Industrie Service GmbH Westendstrasse 199 80686 München Deutschland No...

Page 216: ...2 2013 A2 2017 EN ISO 14982 2009 Okrem toho sa v súlade so smernicou o emisiách hluku 2000 14 EC potvrdzuje zaručená hladina akustického výkonu 96 dB A nameraná hladina akustického výkonu 92 4 dB A Použitý postup hodnotenia zhody v súlade s dodatkom VI 2000 14 EC 2005 88 EC Certifikačný orgán TÜV SÜD Industrie Service GmbH Westendstrasse 199 80686 München Deutschland Notified Body 0036 Jediný zodp...

Page 217: ...O 5395 1 2013 EN ISO 5395 2 2013 A2 2017 EN ISO 14982 2009 Navíc se v souhlase se směrnicí pro emisi hluku 2000 14 EC potvrzuje Úroveň akustického výkonu zaručená 96 dB A měřená 92 4 dB A Použitý postup konformitního ohodnocení dle dodatku VI 2000 14 EC 2005 88 EC Místo hlášení TÜV SÜD Industrie Service GmbH Westendstrasse 199 80686 München Deutschland Notified Body 0036 Výhradní odpovědnost za vy...

Page 218: ...4982 2009 Remiantis 2000 14 EB dėl valstybių narių įstatymų reglamentuojančių lauko sąlygomis naudojamos įrangos į aplinką skleidžiamą triukšmą suderinimo papildomai patvirtinama Garso galingumo lygis Numatyta 96 dB A Išmatuota 92 4 dB A Taikytas atitinkamas 2000 14 EB ir 2005 88 EB VI priede nurodytas atitikties įvertinimo metodas Paskelbtoji įtaisas TÜV SÜD Industrie Service GmbH Westendstrasse ...

Page 219: ... EN ISO 5395 2 2013 A2 2017 EN ISO 14982 2009 Si dichiara inoltre in conformità alla direttiva 2000 14 CE sull emissione acustica ambientale Livello di potenza sonora garantita 96 dB A misurata 92 4 dB A Procedura della valutazione della conformità applicata come da allegato V 2000 14 CE 2005 88 EC Autorità registrata TÜV SÜD Industrie Service GmbH Westendstrasse 199 80686 München Deutschland Noti...

Page 220: ......

Page 221: ...ening Vue éclatée Vista esplosa Exploded Drawing Rysunek samorozwijający Výkres náhradných dielov Detalių brėžinys Výkres sestavení informativ informatief informatif informativo informative pouczający informatívny informacijai informační ...

Page 222: ...rebbia PC Tel 0523 764811 Fax 0523 768689 e mail info gardenitalia it LT www grizzlybaltic com PL Krysiak ul Rolna 6 62 081 Baranowo Tel 061 650 75 30 Fax 061 650 75 32 e mail krysiak krysiak pl Homepage www krysiak pl GB Novo CSV Ltd Unit B3 Beldray Park Beldray Road Mount Pleasant Bilston West Midlands WV14 7NH Tel 0845 683 2672 e mail care novoserv co uk FR SAV03 ZA de la verrerie 03210 Souvign...

Page 223: ...B 42179_2018 01 15_ts ...

Page 224: ......

Reviews: