background image

-6-

G0516 Lathe/Mill

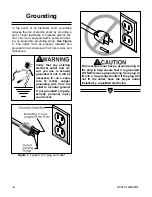
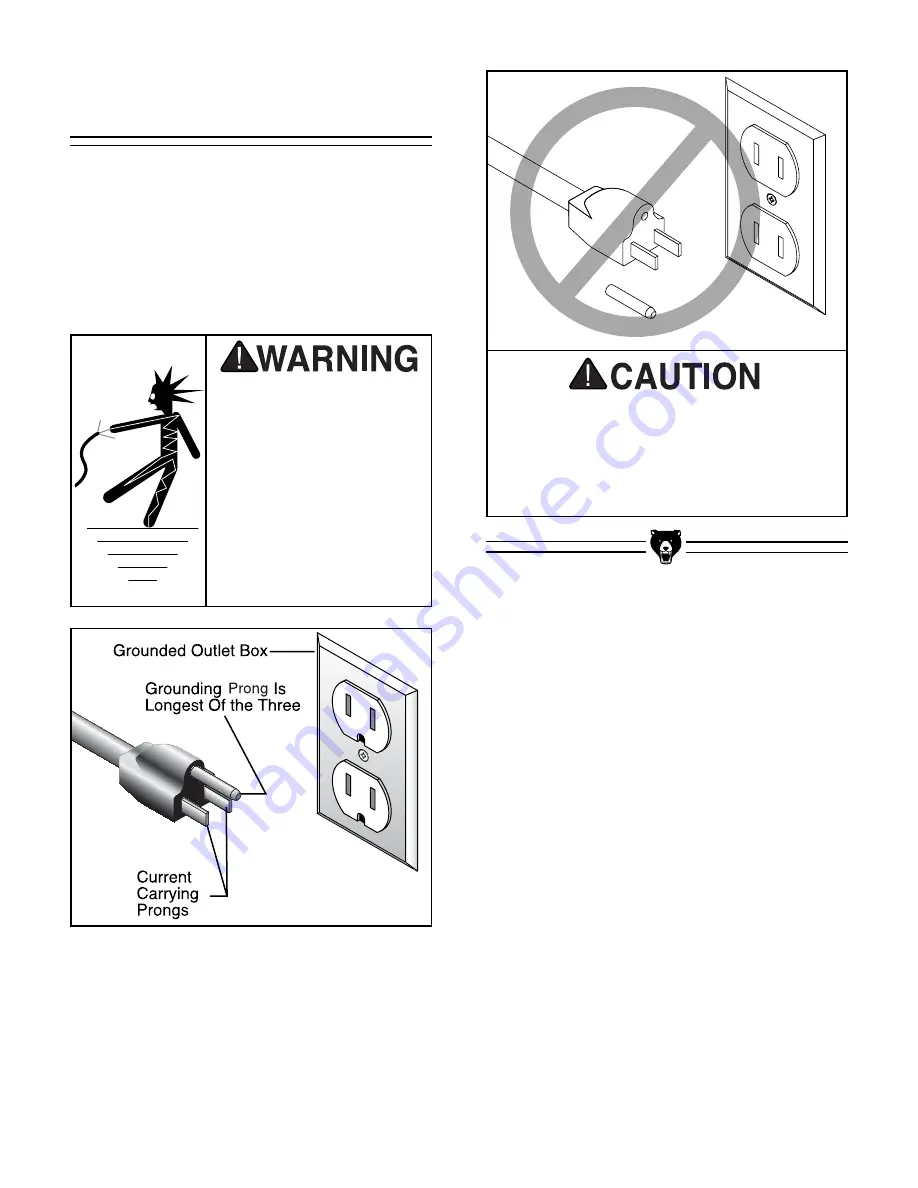
Figure 1. 

Typical 110V plug and outlet.

Grounding

In the event of an electrical short, grounding
reduces the risk of electric shock by providing a
path of least resistance to disperse electric cur-
rent. This tool is equipped with a power cord hav-
ing an equipment-grounding prong.

See Figure

1.

The outlet must be properly installed and

grounded in accordance with all local codes and
ordinances.

This machine must have a ground prong in
the plug to help ensure that it is grounded.
DO NOT remove ground prong from plug to
fit into a two-pronged outlet! If the plug will
not fit the outlet, have the proper outlet
installed by a qualified electrician.

Verify that any existing
electrical outlet and cir-
cuit you use is actually
grounded. If not, it will be
necessary to run a sepa-
rate 12 A.W.G. copper
grounding wire from the
outlet to a known ground.
If not grounded properly,
serious personal injury
could occur.

Summary of Contents for G0516

Page 1: ...HIS MANUAL REPRESENTS THE CONFIGURATION OF THE MACHINE AS IT IS CURRENTLY BEING SHIPPED THE MACHINE CONFIGURATION CAN CHANGE AS PRODUCT IMPROVEMENTS ARE INCORPORATED IF YOU OWN AN EARLIER VERSION OF THE MACHINE THIS MANUAL MAY NOT EXACTLY DEPICT YOUR MACHINE CONTACT CUSTOMER SERVICE IF YOU HAVE ANY QUESTIONS ABOUT DIFFERENCES PREVIOUS VERSIONS ARE NOT AVAILABLE ONLINE COMBINATION LATHE MILL MODEL ...

Page 2: ...als are Lead from lead based paints Crystalline silica from bricks cement and other masonry products Arsenic and chromium from chemically treated lumber Your risk from these exposures varies depending on how often you do this type of work To reduce your exposure to these chemicals work in a well ventilated area and work with approved safety equipment such as those dust masks that are specially des...

Page 3: ...Faceplate 19 Installing Chuck or Faceplate 20 Installing Tailstock Dead Center 20 21 Removing Tailstock Dead Center 21 Adjusting Tailstock Longitude Position 21 Changing Tool Posts 22 Adjusting Cross Slide 23 Adjusting Compound Slide 23 Adjusting Carriage 24 Understanding Gear Charts 25 27 Changing Gears for Carriage Feed Rate 28 30 Reverse Threading 30 31 Changing Speeds 32 7 MILL DRILL OPERATION...

Page 4: ...able or noxious fumes may exist Keep work area well lighted For Your Own Safety Read Instruction Manual Before Operating This Equipment Indicates an imminently hazardous situation which if not avoided WILL result in death or serious injury Indicates a potentially hazardous situation which if not avoided COULD result in death or serious injury Indicates a potentially hazardous situation which if no...

Page 5: ...o Safety Instructions For Power Tools 15 USE RECOMMENDED ACCESSORIES Consult the owner s manual for recom mended accessories The use of improper accessories may cause risk of injury 16 REDUCE THE RISK OF UNINTENTION AL STARTING On machines with magnet ic contact starting switches there is a risk of starting if the machine is bumped or jarred Always disconnect from power source before adjusting or ...

Page 6: ... workpiece or chuck 7 DO NOT LEAVE LATHE MILL RUNNING UNATTENDED for any reason 8 NEVER LEAVE A CHUCK KEY IN THE DRILL CHUCK OR LATHE CHUCK 9 NEVER OPERATE THE LATHE MILL WITH DAMAGED OR WORN PARTS Maintain your lathe mill in proper working condition Perform routine inspections and maintenance promptly when called for Put away adjustment tools after use 10 MAKE SURE LATHE MILL IS TURNED OFF discon...

Page 7: ...uit breaker However if an unusual load does not exist and a power failure still occurs contact a qualified electrician or our ser vice department The Model G0516 is equipped with its own fuses to prevent overload damage When replacing these fuses please replace with the following Lathe 25A Fuse Mill Drill 5A Fuse NOTICE The Model G0516 cannot be rewired for 220V operation Attempting to do this wil...

Page 8: ...d in accordance with all local codes and ordinances This machine must have a ground prong in the plug to help ensure that it is grounded DO NOT remove ground prong from plug to fit into a two pronged outlet If the plug will not fit the outlet have the proper outlet installed by a qualified electrician Verify that any existing electrical outlet and cir cuit you use is actually grounded If not it wi...

Page 9: ...y service questions or parts requests please call or write us at the location listed below Grizzly Industrial Inc 1203 Lycoming Mall Circle Pennsdale PA 17756 Phone 570 546 9663 Fax 800 438 5901 E Mail techsupport grizzly com Web Site http www grizzly com The specifications drawings and photographs illustrated in this manual represent the Model G0516 as supplied when the manual was pre pared Howev...

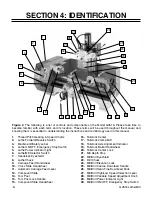
Page 10: ...9 Carriage Feed Handwheel 10 Cross Slide Handwheel 11 Automatic Carriage Feed Lever 12 Compound Slide 13 Tool Post 14 Tool Post Lock Handle 15 Compound Slide Handwheel 16 Tailstock Center 17 Tailstock Clamp Bolt 18 Tailstock Axis Alignment Indicator 19 Tailstock Barrel Handwheel 20 Tailstock Center Lock 21 Mill Depth Stop 22 Mill Drill Eyeshield 23 Drill Chuck 24 Mill Drill Elevation Lock 25 Mill ...

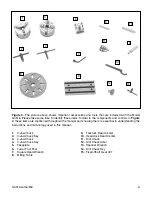
Page 11: ...ioned throughout the manual and knowing them is essential to understanding the instructions and terminology used in this manual 1 2 3 4 5 6 7 9 10 11 13 14 15 12 8 1 3 Jaw Chuck 2 3 Jaw Chuck Key 3 4 Jaw Chuck 4 4 Jaw Chuck Key 5 Faceplate 6 Turret Tool Post 7 Square Head Wrench 8 Milling Table 9 Tailstock Dead Center 10 Headstock Dead Center 11 Drill Chuck 12 Drill Chuck Arbor 13 Spanner Wrench 1...

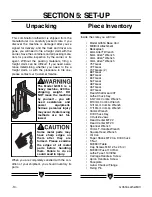
Page 12: ...metal parts before handling them Failure to do so could result in injury Inside the crate you will find Model G0516 Base Unit Mill Drill Attachment Backsplash 6mm Allen Wrench 5mm Allen Wrench 4mm Allen Wrench 3mm Allen Wrench 75T Gear 72T Gear 70T Gears 2 68T Gear 66T Gear 60T Gear 50T Gear 48T Gear 45T Gear 40T Gear Fixed Shaft Gear 40T Lathe Chuck Key 5 5 7mm Combo Wrench 8 10mm Combo Wrench 12...

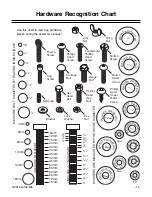
Page 13: ...S ARE 1 16 INCH APART 5 8 W A S H ER DIAM E T E R 9 16 W A S H ER DIA M E T E R 1 2 W A S H ER DIA M E T E R 12mm W A S H ER DIAM E T E R 10mm W A S H ER DIA M E T E R 7 16 W A S H ER DIA M E T E R 8mm W A S H ER DIA M E T E R 3 8 W A S H ER DIA M E T E R 5 16 W A S H E R DIA M E T E R 1 4 W A S H ER DI A M E T E R 10 W A S H ER DI A M E T E R 4mm W A S H ER DI A M E T E R 6mm W A S H E R DIA M E ...

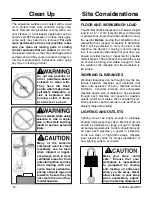
Page 14: ...e bright enough to eliminate shadow and prevent eye strain Electrical circuits should be dedicated or large enough to handle amperage requirements Outlets should be locat ed near each machine so power or extension cords are clear of high traffic areas Observe local electrical codes for proper installation of new lighting outlets or circuits Clean Up The unpainted surfaces are coated with a waxy oi...

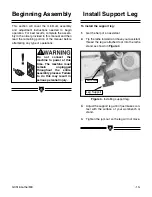
Page 15: ... machine must remain unplugged throughout the entire assembly process Failure to do this may result in serious personal injury Beginning Assembly Install Support Leg Figure 4 Installing support leg To install the support leg 1 Get the help of an assistant 2 Tip the lathe forward and have your assistant thread the leg w attached foot into the lathe stand as shown in Figure 4 3 Adjust the support le...

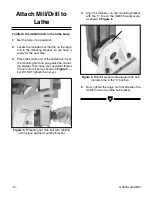
Page 16: ...and up against the mount ing bracket then have your assistant thread the nut onto the bolt as shown in Figure 5 but DO NOT tighten the nut yet Figure 5 Threading nut onto bolt with mill drill unit in place against mounting bracket Figure 6 Mill drill swivel scale aligned with hub indicator line in the 0 position 4 Align the indicator on the mounting bracket with the 0 line on the mill drill swivel...

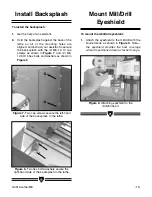
Page 17: ...wn in Figure 7 and 2 M8 1 25 X 15 hex bolts and washers as shown in Figure 8 Figure 7 Two cap screws secure the left hand side of the back splash to the lathe Figure 9 Attaching eyeshield to the mill drill head Figure 8 Two hex bolts washers secure the right hand side of the backsplash to the lathe To mount the mill drill eyeshield 1 Attach the eyeshield to the mill drill with the knurled knob as ...

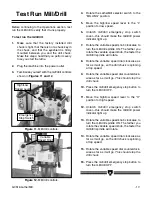
Page 18: ...you start the machine 7 Flip up the emergency stop button to reveal the red and green ON OFF buttons 8 Stand to the side of the lathe chuck line of rotation and press the green button to turn the lathe ON If the carriage starts moving immediately push the STOP button and dis engage the carriage feed lever then restart the lathe 9 Allow the lathe to run for at least two full min utes to make sure i...

Page 19: ...drill spindle ON The farther you rotate the variable speed knob the faster the mill drill spindle will rotate 8 Rotate the variable speed dial clockwise as far as it will go so the drill chuck is spinning at top speed 9 Rotate the variable speed dial counterclock wise as far as it will go This should stop the drill chuck 10 Press the mill drill emergency stop button to turn the mill drill OFF 11 M...

Page 20: ...t is not in use If the machine is accidental ly started the chuck key can become a pro jectile and cause serious personal injury Operating this equipment has the potential for flying debris to cause eye injury Always wear safety glasses or goggles when oper ating equipment Everyday glasses or read ing glasses only have impact resistant lens es they are not safety glasses Be certain the safety glas...

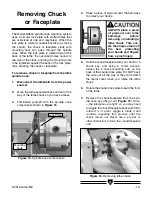
Page 21: ...e 15 Figure 15 Spindle nose components 4 Place a piece of plywood over the bed ways to protect your hands ALWAYS place a piece of plywood over lathe bed ways before removing or installing a lathe chuck This cov ers the sharp corners of the bed protecting your hands and fingers from a pinch injury Lock Plate Mounting Nuts Figure 16 Removing lathe chuck 5 Hold the chuck faceplate with your hand or a...

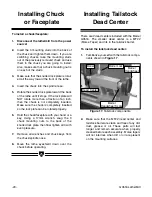
Page 22: ...m down If you are switching chucks take the mounting studs out of the previously removed chuck and use them in the chuck you are going to install Also make sure that a chuck mounting nut is on each of the studs 3 Make sure that the knurled lock plate is rotat ed all the way toward the front of the lathe 4 Insert the chuck into the spindle nose 5 Rotate the knurled lock plate toward the back of the...

Page 23: ...k clamp bolt Removing Tailstock Dead Center Adjusting Tailstock Longitude Position To remove the tailstock dead center 1 Use the barrel handwheel to move the tail stock barrel all the way back into the tailstock until the handwheel will no longer turn 2 Pull the dead center out of the tailstock bar rel The tailstock on the Model G0516 clamps to the bed with the nut shown in Figure 19 This nut allo...

Page 24: ...e removed and replaced in the same manner To change a tool post from the compound rest 1 Rotate the tool post lock handle counter clockwise to remove it as in Figure 20 2 Pull the installed tool post straight up to remove it from the compound slide as shown in Figure 21 3 Replace the new tool post on the compound slide 4 Position the tool post to its intended working angle 5 Replace the tool post ...

Page 25: ... and all backlash has been cleared before you set the handwheel scale to 0 or it will not be accurate Adjusting Cross Slide The cross slide is only designed to move perpen dicular to the longitudinal axis of the lathe and it features a scale on the handwheel that displays graduations of one thousandths of an inch 001 To adjust the cross slide 1 Using the handwheel back the cross slide away from yo...

Page 26: ...ructions and be sure to account for the backlash To use the automatic carriage feed 1 Select the desired feed rate you need by looking at the charts on the lathe drive cover When new Model G0516 is geared for a car riage feed rate of 005 per revolution Use the manual feed handwheel to position the carriage to your desired starting point and set the scale on the handwheel to 0 2 Move the carriage f...

Page 27: ...d speeds for most types of turning applications See Figure 26 Figure 27 Threading charts Threading Charts By arranging the gears as shown on the charts you can set up the carriage feed to cut any of the thread pitches displayed See Figure 27 1 n 16 18 20 24 32 40 B E D F 70 40 60 80 70 80 60 45 70 80 60 50 70 40 50 100 70 80 45 60 70 40 30 100 1 n 8 9 10 11 12 14 B E D F 80 40 75 50 90 40 60 45 70...

Page 28: ...haft Lower Adjustable Shaft Pivot Shaft Figure 30 The shaded boxes show the thread pitches listed on this chart 1 n 16 18 20 24 B E D F 70 40 60 80 70 80 60 45 70 80 60 50 70 40 50 100 Rear Forward Figure 31 The shaded boxes show the thread pitches listed on this chart 3 The boxes on the left hand column exclud ing the box in the upper left hand corner rep resent the gear positions on each shaft T...

Page 29: ...e of 005 per spindle revolution or the gear combination shad ed in Figure 34 n 16 18 B E D F 70 40 60 80 7 8 60 45 Figure 32 The shaded boxes highlight the gear mesh lines 1 n 16 18 20 24 32 40 B E D F 70 40 60 80 70 80 60 45 70 80 60 50 70 40 50 100 70 80 45 60 70 40 30 100 Figure 33 The shaded boxes show specific gear setups 6 The boxes shaded in Figure 33 represent the actual gear combinations ...

Page 30: ...al lock washer off of each adjustable shaft as shown in Figure 40 Changing Gears For Carriage Feed Rate Figure 37 Knurled drive cover knob 0 005 0 010 C B D E F 35 80 90 30 100 50 80 66 30 100 Figure 36 010 feed rate setup shaded To learn how to change gears change the cur rent gear setup to the 010 feed rate that is shad ed in Figure 36 To change the carriage feed rate to 010 per spindle revoluti...

Page 31: ...ar bracket and hand tight en the shaft to keep it from meshing with the gears on the lower shaft 9 Remove the 35T and 90T gears those in the forward position on each adjustable shaft 10 Place the 50T gear on the upper adjustable shaft and place the 66T gear on the lower adjustable shaft Note when placing the gear on the lower adjustable shaft slide it up or down to make it mesh with the gear on th...

Page 32: ...ing The Model G0516 can be setup to turn left hand ed threads by adding another fixed shaft gear and moving the original fixed shaft gear to anoth er mounting location Figure 44 shows the three mounting locations for fixed shaft gears spindle drive pulley is removed for clarity For illustration purposes we label these mounting positions A B C Figure 44 Fixed shaft gear mounting positions Figure 45...

Page 33: ...ocation C and thread it into mounting location B as shown in Figure 47 Figure 48 All gears in mesh for reverse threading operations 5 Loosen the cap screw on the gear bracket and pivot the bracket so the top gear mesh es with the fixed shaft gear that is in position B as shown in Figure 48 6 Tighten the cap screw in the gear bracket to keep it from pivoting 7 Spin the lathe chuck by hand to ensure...

Page 34: ...gure 50 Tensioner adjustment bolt Figure 51 Checking for proper V belt tension 4 Move the pulley bracket away from the belt 5 Position the belt into the pulley sheaves that dictate the speed required for your operation 6 Move the pulley bracket into the belt and ten sion it until there is about 1 2 deflection on the side of the belt that is opposite of where the tensioner is making contact Figure ...

Page 35: ...familiarize yourself with the various controls and components of the mill drill as shown in Figures 52 and 53 NOTICE The hub on the coarse downfeed hand wheel must be engaged to use the micro downfeed knob Keep loose clothing out of the way of machinery and keep hair pulled back during operations Your safety is important Please follow the warnings below during this entire section Never leave a chu...

Page 36: ... spindle cap as shown in Figure 54 Note if you cannot remove the cap off by pulling on it give it a sideways bump with your hand Figure 55 Removing mill drill spindle lock nut Figure 56 Tapping draw bolt loose with hammer 3 Use a 19mm wrench as shown in Figure 55 to remove the spindle draw nut 4 Thread the draw nut up so it is flush with the top of the draw bolt 5 Using a brass or wood hammer tap ...

Page 37: ...n dle taper 9 Insert the flat washer and thread the hex nut onto the end of the draw bolt 6 Hold the drill chuck with one hand and remove the draw nut and washer with the other hand The drill chuck should now be easily removed from the bottom as shown in Figure 57 10 Hold the collet chuck in place with the span ner wrench and tighten the hex nut on the draw bolt just enough to snug it in place See...

Page 38: ... is shipped from the factory the compound slide is mounted on the cross slide and must be removed before the milling table can be installed Once installed the milling table moves back and forth with the cross slide To install the mill table 1 Use a 12mm wrench to remove the two bolts that secure the compound slide to the cross slide See Figure 59 Figure 59 Removing compound slide bolts 2 Remove th...

Page 39: ...anual oiler oil can filled with ISO 68 or SAE 20W non detergent oil or similar lubricant Ball fittings Shown in Figure 61 ball fittings are responsible for the majority of the machine lubrication To lubricate ball fittings depress the ball with the tip of the oil can nozzle and squirt a little oil inside the fitting Make sure to clean the outside of the ball fitting before and after each use to ke...

Page 40: ...ry 8 hours of actual use Figure 64 Ball fitting lubrication points 13 21 20 19 18 14 15 16 3 17 12 12 Bed Guide 13 Cross Slide Leadscrew 14 Bed Guide 15 Bed Guide 16 Apron 17 Cross Slide Leadscrew Support 18 Apron 19 Bed Guide 20 Bed Guide 21 Bed Guide Checking V Belt To ensure optimum power transmission from the motor the V belts must be in good condition and must operate under proper tension The...

Page 41: ...G0516 Lathe Mill 39 Maintenance Performed Approximate Hours Of Use Maintenance Log Date ...

Page 42: ...rise that are not described in this manual then feel free to call the Grizzly Service Department Similarly if you are unsure of how to perform any procedure in this section the Grizzly Service Department will be happy to guide you through the procedures or help in any other way About Service Figure 65 Cross slide gib screws The gib is held in place by the setscrews DO NOT overtighten The gib is pr...

Page 43: ...here are 4 tensioning screws for both the front and rear saddle gibs Before mak ing adjustments to the saddle gib ensure that the front lock lever is loose by turning it counter clockwise See Figures 67 68 It is important the screws are tightened evenly A slight drag should be detected while turning the hand crank at the end of the lathe Figure 67 Front saddle gib screws Mill Drill Gib There are 4...

Page 44: ...ndle axis Keep in mind that the point will have to be refinished whenever it is removed and returned to the chuck 3 Place a center in your tailstock 4 Attach a lathe dog to the bar stock and mount it between the centers See Figure 71 5 Turn approximately 010 off of the diameter Figure 71 Bar stock mounted on centers Figure 72 Adjusting for headstock end taper 6 Measure the workpiece with a microme...

Page 45: ...ease contact our service department for further instructions 8 Use the tailstock adjustment screws on both sides to adjust move the tailstock offset by the amount of the taper 9 Tighten the clamp nut lock screw and adjust ment screws Be careful not to move the tail stock out of position when tightening the adjustment screws 10 Turn another 010 off of the stock and check for taper Repeat steps 7 9 ...

Page 46: ... 44 G0516 Lathe Mill Service Performed Approximate Hours Of Use Service Log Date ...

Page 47: ...please write to Grizzly at the address below Grizzly Industrial Inc C O Technical Documentation P O Box 2069 Bellingham WA 98227 2069 We recommend you keep a copy of our current catalog for complete information regarding Grizzly s warranty and return policy If you need additional technical information relating to this machine or if you need general assistance or replacement parts please contact th...

Page 48: ...crew 3 4 10 TPI Cross Slide Screw 9 16 12 TPI Milling Capacity Measured without Drill Chuck Swing 123 4 Spindle to Work Table 91 2 Head Stock Height Adjustment 8 Range of Speeds 0 2500 RPM Drill Capacity 1 2 Lathe Motor Type TEFC Capacitor Start Induction Horsepower 3 4 Switch Forward Reverse w Emergency Stop Phase Single Phase Voltage 110V Amps 9 RPM 1710 Mill Motor Type DC Motor Horsepower 4 5 S...

Page 49: ...G0516 Lathe Mill 47 ...

Page 50: ...103 121 122 159 116 158 157 156 123 115 106 155 154 128 119 120 118 112 138 105 111 111 117 101 106 137 107 136 136 135 109 108 114 112 113 124 147 110 148 146 102 103 105 104 112 111 126 125 127 134 114 132 133 131 129 130 ...

Page 51: ...123 P0516123 SHAFT COVER 124 P0516124 BED 125 PN01M HEX NUT M6 1 0 126 PW03M FLAT WASHER 6MM 127 PB04M HEX BOLT M6 1 X 10 REF PART DESCRIPTION 128 P0516128 SPLASH GUARD 129 PS30M PHLP SCR M8 1 25 X 15 130 PW01M FLAT WASHER 8MM 131 PS04M PHLP SCR M8 1 25 X 20 132 P0516132 RACK 133 PS08M PHLP HD SCR M5 8 X 12 134 P0516134 LEADSCREW SUPPORT R 135 P0516135 LONG LEADSCREW 136 PRP56M ROLL PIN 4 X 25 137...

Page 52: ...ill 251 220 248 221 208 203 206 207 225 224 226 212 228 209 205 201 204 211 245 202 210 215 213 214 230 229 217 219 233 215 212 246 235 216 218 250 249 227 222 252 223 232 231 241 243 237 236 240 238 239 247 244 242 253 ...

Page 53: ...CER 224 PK68M KEY 4 X 4 X 40 225 P0516225 SPINDLE 226 PS11M PHLP HD SCR M6 1 X 16 227 P0516227 FRONT BEARING COVER REF PART DESCRIPTION 228 PLW01M LOCK WASHER 5MM 229 PTLW02M EXT TOOTH WASHER M5 230 PS40M PHLP HD SCR M5 0 8 X 16 231 P0516231 SPINDLE CENTER MT3 232 P0516232 3 JAW CHUCK D 125MM 233 PR04M EXT RETAINING RING 6MM 234 PS08M PHLP HD SCR M5 8 X 12 235 PS41M PHLP SCR M10 1 5 X 25 236 PS09M...

Page 54: ... 52 G0516 Lathe Mill 326 301 303 304 324 325 308 330 311 310 309 305 315 327 328 302 316 317 306 323 320 321 318 322 314 313 312 307 329 313 319 ...

Page 55: ...G0516 Lathe Mill 53 406 407 430 429 421 432 401 431 405 403 409 404 402 419 417 420 427 426 423 418 422 428 424 425 408 411 410 412 406 416 415 414 413 ...

Page 56: ...EL RIVET 329 P0516329 INDICATE LABEL 330 P0516330 TAILSTOCK CENTER MT2 REF PART DESCRIPTION 401 P0516401 CUTTER REST BASE 402 P0516402 CLAMP DISC 403 PB09M HEX BOLT M8 1 25 X 20 404 P0516404 CUTTER REST DISC 405 P0516405 CUTTER REST BOLT 406 PN04M HEX NUT M4 0 7 407 PS52M PHLP HD SCR M4 7 X 20 408 PS02M PHLP HD SCR M4 7 X 12 409 P0516409 OIL CUP 10MM 410 P0516410 FIXING PIN 411 P0516411 SQUARE CUT...

Page 57: ...0516 Lathe Mill 55 511 527 512 529 520 521 523 522 524 534 505 508 536 503 509 504 538 535 539 501 502 533 532 537 531 506 530 542 507 502 526 502 519 525 526 512 528 517 513 516 518 510 514 540 541 515 ...

Page 58: ... 56 G0516 Lathe Mill 630 601 610 604 611 603 602 607 605 606 608 614 616 613 612 615 607 609 629 618 623 624 628 626 618 625 617 620 627 633 621 632 631 620 619 622 634 ...

Page 59: ... SUPPORT 533 PW03M FLAT WASHER 6MM 534 P0516534 HANDLE BOLT 535 PB08M HEX BOLT M6 1 X 20 536 P0516536 HANDLE SLEEVE 537 P8101 BEARING 8101 538 P0516538 SPRING PLATE 539 P0516539 INDEX RING 542 PRP58M ROLL PIN 6 X 45 REF PART DESCRIPTION 601 P0516601 HANDLE 602 PS03M PHLP HD SCR M6 1 X 8 603 P0516603 COMPRESS SPRING 604 P0516604 STEEL BALL 5MM 605 P0516605 HANDLE SEAT 606 PS11M PHLP HD SCR M6 1 X 1...

Page 60: ... 58 G0516 Lathe Mill 821 818 817 813 810 815 820 816 809 846 832 811 812 819 822 823 824 850 827 830 829 835 831 836 833 834 851 802 803 805 807 825 826 845 801 828 804 806 808 802 849 843 844 847 848 ...

Page 61: ... BEARING 6001 822 P0516822 GEAR Z 40 823 PR03M EXT RETAINING RING 12MM 824 P0516824 FRONT SHAFT SPACER REF PART DESCRIPTION 825 P0516825 FIXED SHAFT BOLT 826 P0516826 REAR SHAFT SPACER 827 P0516827 SUPPORT PLATE 828 P0516828 GEAR Z 40 829 PW01M FLAT WASHER 8MM 830 PB03M HEX BOLT M8 1 25 X 16 831 P0516831 SLIDING BEARING 832 P0516832 ADJ SHAFT SPACER 833 P0516833 GEAR REST 834 P0516834 ADJ SHAFT NU...

Page 62: ... Mill 944 911 909 925 910 945 920 933 918 922 921 917 931 918 928 919 923 902 930 916 924 921 921 938 929 905 932 925 907 908 926 906 903 904 936 943 902 901 947 946 912 913 915 940 935 937 914 942 939 934 927 941 948 ...

Page 63: ...M 922 PR19M EXT RETAINING RING 28MM 923 P0516923 PIVOT 924 P0516924 PIVOT SPACER REF PART DESCRIPTION 925 PW04M FLAT WASHER 10MM 926 PN02M HEX NUT M10 1 5 927 PS59M PHLP HD SCR M3 5 X 14 928 PB07M HEX BOLT M8 1 25 X 25 929 PS05M PHLP HD SCR M5 8 X 8 930 P0516930 FAN SUPPORT 931 P0516931 ADJ SLOT SPACER 932 PS31M PHLP HD SCR M6 1 0 X 35 933 PB32M HEX BOLT M10 1 5 X 25 934 PN06M HEX NUT M5 0 8 935 P...

Page 64: ... 1205 1202 1201 1200 1203 1069 1163 1157 1152 1155 1159 1162 1156 1154 1132 1161 1070 1153 1071 1067 1068 1072 1017 1151 1045 1150 1110 1102 1164 1103 1039 1039 1 1065 1044 1068 1043 1030 1039 2 1040 1 1041 1040 1042 1046 1047 1066 ...

Page 65: ...061 1109 1108 1160 1141 1143 1048 1142 1104 1117 1105 1140 1106 1064 1060 1147 1130 1131 1029 1043 1030 1119 1118 1049 1122 1124 1121 1145 1165 1166 1083 1081 1139 1132 1138 1167 1082 1075 1051 1050 1096 1085 10841086 1087 1097 1088 1098 1099 1125 1054 1056 1052 1055 1053 1126 1148 1146 1127 1144 1093 1091 1100 1089 1094 1092 1090 1101 1059 1058 1110 1168 ...

Page 66: ...P05161060 CAP SCREW 1061 P05161061 GUIDE FINGER 1062 PSB06M CAP SCREW M6 1 X 25 1063 P05161063 SPINDLE BOX SEAT 1064 P05161064 WEDGE REF PART DESCRIPTION 1065 P05161065 LIMIT BLOCK 1066 P05161066 WEDGE 1067 P05161067 RULER 1068 P05161068 FUSELAGE 1069 P05161069 ELECTRIC BOX 1070 PLN09 LOCK NUT M12 1 75 1071 P05161071 BIG WASHER 1072 P05161072 CONNECTING STRUT 1075 PSB02M CAP SCREW M6 1 0 X 20 1078...

Page 67: ...1133 P05161133 LAMP 1134 P05161134 SPEED CONTROL KNOB 1135 P05161135 SWITCH 1136 P05161136 FUSE BOX 1137 P05161137 STOP SWITCH REF PART DESCRIPTION 1138 P05161138 GEAR 1139 P80101 BALL BEARING 80101 1140 P05161140 TRANSMISSION GEAR 1141 P05161141 BAR 1142 P05161142 LINKING BOARD 1143 PSS31M SET SCREW M5 0 8 X 8 1144 P05161144 TAPPING SCREW 2 9 X 8MM 1145 P05161145 H L LABEL 1146 P05161146 MOTOR CO...

Page 68: ...ried in the State of Washington County of Whatcom We shall in no event be liable for death injuries to persons or property or for incidental contingent spe cial or consequential damages arising from the use of our products To take advantage of this warranty contact us by mail or phone and give us all the details We will then issue you a Return Number which must be clearly posted on the outside as ...

Page 69: ...__ 50 001 60 000 __ 80 000 90 000 __ 30 001 40 000 __ 60 001 70 000 __ 90 000 __ 40 001 50 000 __ 70 001 80 000 6 To which age group do you belong __20 30 __41 50__61 70 __31 40 __51 60__ 70 7 Which of the following machines or accessories do you own Check all that apply __Engine Lathe __Abrasive Cutoff __Sheet Metal Machine __Band Saw Metal __Arc Welder __Other _____________________________ __Ban...

Page 70: ...INDUSTRIAL INC P O BOX 2069 BELLINGHAM WA 98227 2069 Place Stamp Here TAPE ALONG EDGES PLEASE DO NOT STAPLE Name_______________________________ Street_______________________________ City______________State______Zip______ Send a Grizzly Catalog to a friend ...

Page 71: ......

Page 72: ... IRECT AND 3AVE WITH RIZZLY n 4RUSTED 0ROVEN AND A REAT 6ALUE 2 s 3 52 2 2 s 2 233 00 7 4 523 s 2 30 3 7 4 52 6ISIT UR 7EBSITE 4ODAY ND ISCOVER 7HY RIZZLY S 4HE NDUSTRY EADER ALL4ODAY OR 2 ULL OLOR ATALOG ...

Reviews: