background image

-28-

Model g0716 (Mfg. since 2/11)

SEctiON 5: AccESSORiES

aCCEssoriEs

Some  aftermarket  accessories  can  be 

installed  on  this  machine  that  could  cause 

it to function improperly, increasing the risk 

of serious personal injury. to minimize this 

risk, only install accessories recommended 

for this machine by Grizzly.

NOTICE

Refer  to  the  newest  copy  of  the  Grizzly 

catalog for other accessories available for 

this machine. 

figure 28. half-mask respirator with disposable 

cartridge filters.

h2499—Small half-Mask Respirator
h3631—Medium half-Mask Respirator
h3632—Large half-Mask Respirator
h3635—cartridge filter pair p100
Wood dust has been linked to nasal cancer and 
severe  respiratory  illnesses.  if  you  work  around 
dust  everyday,  a  half-mask  respirator  can  be  a 
lifesaver. also compatible with safety glasses!

G1512—pro-Stik® Sandpaper cleaner pad
this  crepe-rubber  sandpaper  Cleaner  quickly 
removes  gum  and  grit  from  sandpaper  strips 
without damage. Just run the cleaner through the 
sander several times along the length of the sand-
ing  drum  until  it  is  clean.  Extend  the  life  of  your 
sandpaper with this innovative natural cleaner.

figure 26. g1512 pro-stik

®

 Belt Cleaner.

3" x 10 ft. Aluminum Oxide Sanding Rolls

G3071—60 Grit

G3072—80 Grit

G3073—100 Grit

G3074—120 Grit

G4400—150 Grit

G4401—180 Grit

G4402—220 Grit

figure 27. 3" x 10 ft. sandpaper rolls.

Summary of Contents for G0716

Page 1: ...t NOVEMBER 2010 By Grizzly Industrial Inc REVISED JUNE 2011 TS Warning No portion of this manual may be reproduced in any shape Or form without the written approval of Grizzly Industrial inc For model...

Page 2: ...g grinding tool integrity and the usage of personal protective equipment The manufacturer will not be held liable for injury or property damage from negligence improper training machine modifications...

Page 3: ...ting Power 18 Test Run 19 Recommended Adjustments 19 SECTION 4 OPERATIONS 20 Basic Controls 20 Workpiece Inspection 21 Sandpaper 21 Selection 21 Replacement 22 Depth of Cut 25 Feed Rate 26 Sanding Tip...

Page 4: ...ew minutes to give us feedback Grizzly Documentation Manager P O Box 2069 Bellingham WA 98227 2069 Email manuals grizzly com Contact Info We are proud to offer this manual with your new machine We ve...

Page 5: ...understand this entire manual before beginning any operations Figure 1 Model G0716 identification Sanding Motor Conveyor Motor Wheel Assembly Stand Lifting Handle Elevation Lock Knob Conveyor Belt Sa...

Page 6: ...h x Width 17 1 2 x 13 1 2 in Shipping Dimensions Type Wood Slat Crate Content Machine Weight 221 lbs Length x Width x Height 32 x 25 x 26 in Electrical Power Requirement 110V Single Phase 60 Hz Minimu...

Page 7: ...ding Belt Length 62 1 2 in Sanding Belt Width 3 in Drum Information Infeed Sanding Drum Size 5 1 8 x 10 in Construction Conveyor Belt Rubber Body Cast Iron Steel and Aluminum Base Steel Paint Powder C...

Page 8: ...erate under the influence of drugs or alcohol when tired or when distracted OWNER S MANUAL Read and understand this owner s manual BEFORE using machine Untrained users can be seriously hurt EYE PROTEC...

Page 9: ...CTION Unless otherwise noted feed work against the rotation of blades or cutters Feeding in the same direction of rotation may pull your hand into the cut FORCING MACHINERY Do not force machine It wil...

Page 10: ...ding drum can remove a large amount of flesh in a few sec onds Always keep hands away from the sanding drum during operation Avoid pinching injuries by never putting your hand between the workpiece an...

Page 11: ...sufficient length of time damage overheating or fire may result especially if connected to an undersized circuit To reduce the risk of these hazards avoid over loading the machine during operation an...

Page 12: ...ers indicate smaller sizes Any extension cord used with this machine must contain a ground wire match the required plug and receptacle and meet the following require ments Minimum Gauge Size 14 AWG Ma...

Page 13: ...e Clamps 4 2 Needed for Setup Your machine was carefully packaged for safe transportation Remove the packaging materials from around your machine and inspect it If you discover the machine is damaged...

Page 14: ...Inventory Figure 3 Qty A Drum Sander Assembly Not Shown 1 B Left Right Long Top Braces 231 8 2 C Wheels 4 2 D Legs 4 E Long Bottom Braces 201 4 2 F Elevation Handwheel Handle 1 G Leg Foot Pads 4 H Whe...

Page 15: ...Model G0716 Mfg Since 2 11 13 Hardware Recognition Chart...

Page 16: ...space allocation Physical Environment The physical environment where your machine is operated is important for safe operation and the longevity of its components For best results operate this machine...

Page 17: ...on the top braces upside down on a protected surface in the form of a rectangle then attach the legs to the braces with 16 M8 1 25 x 12 carriage bolts and M8 1 25 lock nuts as shown in Figure 5 Hand t...

Page 18: ...1 25 x 16 hex bolts and M8 1 25 lock nuts see Figure 9 Note The left and right wheel brackets are different configurations Figure 9 Wheels assemblies x 4 Cotter Pin Figure 10 Lifting handle assemblie...

Page 19: ...y to align the mounting holes slightly loosen the stand fasteners Be sure to re tighten them after securing the sander assembly Figure 11 Sander assembly secured to the stand x 4 9 Thread the handle i...

Page 20: ...achine can be connected to the power source an electrical circuit and connec tion device must be prepared per the POWER SUPPLY section in this manual and all previ ous setup instructions in this manua...

Page 21: ...ine from power when investigating or correcting potential problems 5 Rotate the conveyor variable feed rate dial clockwise to verify the conveyor belt feed rate changes then turn it counterclockwise u...

Page 22: ...and understand this entire manual before beginning any operations Basic Controls Refer to Figure 16 and the descriptions below to better understand the basic controls used when sanding A Elevation Lo...

Page 23: ...ng the conveyor belt On the con trary a workpiece supported on the bowed side will rock during a cut and could cause kickback or severe injury Sandpaper Selection Sanding a workpiece smooth requires m...

Page 24: ...device so that the jaw is aligned with the slot in the drum surface see Figure 18 Replacement Replacement sandpaper for the Model G0716 is available in 3 bulk rolls see Page 28 for options from Grizzl...

Page 25: ...firmly secured by the clamping devices before connecting the sander to power 8 While keeping reasonable tension on the strip with one hand roll the drum away from you with the other hand to wrap the s...

Page 26: ...nst the drum the edges are not more than 1 8 apart and they are not over lapped If any of the conditions above are not true repeat the installation procedure until they are 14 Close and secure the dus...

Page 27: ...ari ables such as the hardness of the wood the width of the workpiece and the feed rate Generally a 1 4 turn of the elevation handwheel 1 32 depth of cut per pass is acceptable for coarser grits or so...

Page 28: ...andpaper with a higher grit to achieve a finer finish refer to Sandpaper on Page 21 When making multiple passes on the workpiece do not lower the sanding drum more than 1 32 or 1 4 turn of the elevati...

Page 29: ...ds of kickback place it on the con veyor belt at the correct angle then allow the belt to feed it under the sanding drum 8 When the sanding drum has complete con trol of the workpiece step to the rear...

Page 30: ...spirator H3635 Cartridge Filter Pair P100 Wood dust has been linked to nasal cancer and severe respiratory illnesses If you work around dust everyday a half mask respirator can be a lifesaver Also com...

Page 31: ...emove the resin Clean the conveyor belt with soapy water General Cleaning The bearings on the Model G0716 have been lubricated and sealed at the factory No other care of these bearings is necessary un...

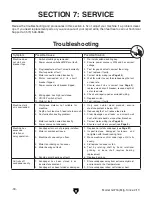
Page 32: ...ce switch 10 Test replace if faulty Machine stalls or is overloaded 1 Workpiece material not suitable for machine 2 Depth of cut too much feed rate too much 3 Dust collection ducting problem 4 Motor c...

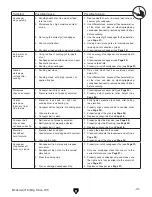
Page 33: ...onveyor 1 Conveyor belt dirty or worn 2 Pressure rollers not properly adjusted 1 Clean replace conveyor belt see Page 29 2 Properly adjust pressure roller height see Page 36 Uneven workpiece thickness...

Page 34: ...n feed rate through the entire sanding operation 2 Make sure the elevation lock knob is tight Snipe marks in workpiece 1 Improper pressure roller tension 2 Workpiece too long to be supported without a...

Page 35: ...the ends of both tensioning screws extend evenly approximately 1 4 beyond the hex nut as shown in Figure 31 If the belt slips during operation rotate the screws clockwise in small amounts until the b...

Page 36: ...uring operation which will result in poor sanding results If the gibs are too tight it will be difficult to adjust the sanding drum elevation which will cause excessive wear on the parts of the elevat...

Page 37: ...o check and adjust the conveyor belt to sand ing drum parallelism 1 Make sure the gibs are properly adjusted 2 Plane the board so that the thickness on each side of it is equal 3 Take several light cu...

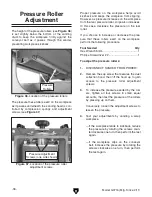
Page 38: ...rollers 1 DISCONNECT SANDER FROM POWER 2 Remove the cap screw that secures the dust collection hood then lift the hood up to gain access to the pressure roller adjustment screws 3 To increase the pres...

Page 39: ...DER FROM POWER 3 Raise the sanding drum all the way up 4 Loosen the hex nut on the stop screw then adjust the height of the screw that protrudes above the frame to be no less than 1 4 5 Re tighten the...

Page 40: ...tion for re installation 3 Remove the knob and flat washer from the top of the sanding head support see Figure 39 remove the hex bolts spacers and washers from the bottom of the support then remove th...

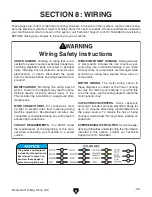
Page 41: ...k all wires dis connected or connected during any wiring task to ensure tight connections CIRCUIT REQUIREMENTS You MUST follow the requirements at the beginning of this man ual when connecting your ma...

Page 42: ...r 80Mfd 300VAC Ground ON OFF Switch Conveyor Circuit Board Conveyor Motor Sanding Motor 5 15 Plug 110VAC As Recommended Ground Neutral Hot Bridge Rectifier Thermal Overload Circuit Breaker HF 7A Trans...

Page 43: ...T M8 1 25 X 12 5 P0716005 HANDLE BASE 20 P0716020 LEFT WHEEL MOUNTING BRACKET 6 PFH43M FLAT HD SCR M6 1 X 10 21 P0716021 WHEEL 5 7 PN04M HEX NUT M4 7 22 PB03M HEX BOLT M8 1 25 X 16 8 P0716008 LEFT FRO...

Page 44: ...103 104 105 106 107 108 109 110 111 112 113 114 115 116 117 118 119 120 124 125 126 131 132 133 134 135 136 137 138 139 140 141 142 143 144 145 146 147 148 149 150 151 108 105 108 104 113 114 105 107...

Page 45: ...D ROLLER 138 P0716138 STRAIN RELIEF 1 2 SNAP IN 110 PW02M FLAT WASHER 5MM 139 P0716139 POWER CORD 14G 3C 10 5 15 111 PLW01M LOCK WASHER 5MM 140 P0716140 CONVEYOR MOTOR 24VDC 112 PN06M HEX NUT M5 8 141...

Page 46: ...34 235 236 237 238 239 240 241 242 243 244 245 246 247 248 249 250 251 252 253 254 255 256 257 258 259 260 261 262 263 264 265 266 267 268 269 270 271 272 273 274 275 276 277 278 279 280 281 281 1 281...

Page 47: ...222 OUTSIDE BEARING RETAINER 271 P0716271 THREADED STUD M8 1 25 X 80 223 P6205 2RS BALL BEARING 6205 2RS 272 P0716272 DRUM HOUSING SUPPORT 224 P0716224 INTERNAL BEARING RETAINER 273 PWF08M FENDER WASH...

Page 48: ...f any label is removed or becomes unreadable REPLACE that label before using the machine again Contact Grizzly at 800 523 4777 or www grizzly com to order new labels REF PART DESCRIPTION REF PART DESC...

Page 49: ...metalworker ____ 0 2 Years ____ 2 8 Years ____ 8 20 Years ____20 Years 6 How many of your machines or tools are Grizzly ____ 0 2 ____ 3 5 ____ 6 9 ____10 7 Do you think your machine represents a good...

Page 50: ...LINE FOLD ALONG DOTTED LINE GRIZZLY INDUSTRIAL INC P O BOX 2069 BELLINGHAM WA 98227 2069 Place Stamp Here Name_______________________________ Street_______________________________ City______________S...

Page 51: ...tried in the State of Washington County of Whatcom We shall in no event be liable for death injuries to persons or property or for incidental contingent special or consequential damages arising from...

Page 52: ...Buy Direct and Save with Grizzly Trusted Proven and a Great Value Since 1983 ORDER 24 HOURS A DAY 1 800 523 4777 Visit Our Website Today For Current Specials...

Reviews: