background image

Model G0843P (Mfd. Since 11/17)

-7-


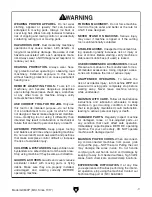
WEARING PROPER APPAREL.  Do  not  wear 

clothing,  apparel  or  jewelry  that  can  become 

entangled  in  moving  parts.  Always  tie  back  or 

cover long hair. Wear non-slip footwear to reduce 

risk of slipping and losing control or accidentally 

contacting cutting tool or moving parts.

HAZARDOUS DUST. Dust created by machinery 
operations  may  cause  cancer,  birth  defects,  or 
long-term  respiratory  damage.  Be  aware  of  dust 
hazards  associated  with  each  workpiece  mate-
rial. Always wear a NIOSH-approved respirator to 
reduce your risk.

HEARING PROTECTION.  Always  wear  hear-

ing  protection  when  operating  or  observing  loud 

machinery.  Extended  exposure  to  this  noise 

without  hearing  protection  can  cause  permanent 

hearing loss.

REMOVE ADJUSTING TOOLS.  Tools  left  on 

machinery  can  become  dangerous  projectiles 

upon startup. Never leave chuck keys, wrenches, 

or  any  other  tools  on  machine.  Always  verify 

removal before starting!

USE CORRECT TOOL FOR THE JOB. Only use 

this  tool  for  its  intended  purpose—do  not  force 

it  or  an  attachment  to  do  a  job  for  which  it  was 

not designed. Never make unapproved modifica-

tions—modifying  tool  or  using  it  differently  than 

intended may result in malfunction or mechanical 

failure that can lead to personal injury or death!

AWKWARD POSITIONS.  Keep  proper  footing 

and balance at all times when operating machine. 

Do not overreach! Avoid awkward hand positions 

that  make  workpiece  control  difficult  or  increase 

the risk of accidental injury.

CHILDREN & BYSTANDERS. Keep children and 

bystanders at a safe distance from the work area.

Stop using machine if they become a distraction.

GUARDS & COVERS. Guards and covers reduce 
accidental  contact  with  moving  parts  or  flying 
debris.  Make  sure  they  are  properly  installed, 
undamaged,  and  working  correctly  BEFORE 
operating machine.

FORCING MACHINERY. Do not force machine. 

It  will  do  the  job  safer  and  better  at  the  rate  for 

which it was designed.

NEVER STAND ON MACHINE.  Serious  injury 

may  occur  if  machine  is  tipped  or  if  the  cutting 

tool is unintentionally contacted. 

STABLE MACHINE. Unexpected movement dur-

ing  operation  greatly  increases  risk  of  injury  or 

loss of control. Before starting, verify machine is 

stable and mobile base (if used) is locked.

USE RECOMMENDED ACCESSORIES. Consult 

this owner’s manual or the manufacturer for rec-

ommended  accessories.  Using  improper  acces-

sories will increase the risk of serious injury.

UNATTENDED OPERATION. To  reduce  the 
risk  of  accidental  injury,  turn  machine 

OFF  and 

ensure  all  moving  parts  completely  stop  before 
walking  away.  Never  leave  machine  running 
while unattended. 

MAINTAIN WITH CARE. Follow all maintenance 

instructions  and  lubrication  schedules  to  keep 

machine  in  good  working  condition.  A  machine 

that  is  improperly  maintained  could  malfunction,  

leading to serious personal injury or death. 

DAMAGED PARTS.  Regularly  inspect  machine 

for  damaged,  loose,  or  mis-adjusted  parts—or 

any  condition  that  could  affect  safe  operation. 

Immediately  repair/replace  BEFORE  operating 

machine. For your own safety, DO NOT operate 

machine with damaged parts!

MAINTAIN POWER CORDS. When  disconnect-
ing  cord-connected  machines  from  power,  grab 
and pull the plug—NOT the cord. Pulling the cord 
may  damage  the  wires  inside.  Do  not  handle  
cord/plug with wet hands. Avoid cord damage by 
keeping it away from heated surfaces, high traffic 
areas, harsh chemicals, and wet/damp locations.

EXPERIENCING DIFFICULTIES.  If  at  any  time 
you experience difficulties performing the intend-
ed operation, stop using the machine! Contact our 
Technical Support at (570) 546-9663.

Summary of Contents for G0843P

Page 1: ...WNER S MANUAL For models manufactured since 11 17 COPYRIGHT MARCH 2018 BY GRIZZLY INDUSTRIAL INC WARNING NO PORTION OF THIS MANUAL MAY BE REPRODUCED IN ANY SHAPE OR FORM WITHOUT THE WRITTEN APPROVAL OF GRIZZLY INDUSTRIAL INC ES19293 PRINTED IN CHINA V1 03 18 ...

Page 2: ...ng grinding tool integrity and the usage of personal protective equipment The manufacturer will not be held liable for injury or property damage from negligence improper training machine modifications or misuse Some dust created by power sanding sawing grinding drilling and other construction activities contains chemicals known to the State of California to cause cancer birth defects or other repr...

Page 3: ...ounting 13 Dust Collection 13 Test Run 14 SECTION 4 OPERATIONS 15 Operation Overview 15 Replacing Sanding Discs 16 Sanding Operations 17 SECTION 5 ACCESSORIES 18 SECTION 6 MAINTENANCE 20 Schedule 20 Cleaning Protecting 20 SECTION 7 SERVICE 21 Troubleshooting 21 Table Gap Parallelism 23 Calibrating Miter Gauge 24 Calibrating Table Tilt 24 SECTION 8 WIRING 25 Wiring Safety Instructions 25 Wiring Dia...

Page 4: ...made every effort to be exact with the instruc tions specifications drawings and photographs in this manual Sometimes we make mistakes but our policy of continuous improvement also means that sometimes the machine you receive is slightly different than shown in the manual If you find this to be the case and the difference between the manual and machine leaves you confused or unsure about something...

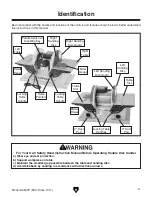
Page 5: ...le Slot Miter Gauge 2 Dust Port Table Slot Locking Table Handles 2 Dust Port Paddle Switch w Disabling Key Right Sanding Disc Locking Table Handle Locking Table Handle Scale Pointers For Your Own Safety Read Instruction Manual Before Operating Double Disc Sander a Wear eye and ear protection b Support workpiece on table c Maintain the smallest gap possible between the table and sanding disc d Avoi...

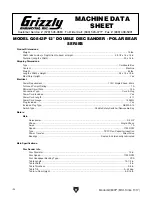
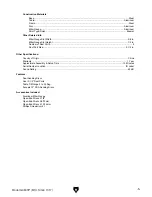
Page 6: ...d Box Content Machine Weight 84 lbs Length x Width x Height 26 x 19 x 18 in Must Ship Upright Yes Electrical Power Requirement 110V Single Phase 60Hz Full Load Current Rating 7A Minimum Circuit Size 15A Connection Type Cord Plug Power Cord Included Yes Power Cord Length 6 ft Power Cord Gauge 16 AWG Plug Included Yes Included Plug Type NEMA 5 15 Switch Type Paddle Safety Switch w Removable Key Moto...

Page 7: ...Miter Gauge Aluminum Paint Type Finish Enamel Other Related Info Miter Gauge Slot Width 5 8 in Miter Gauge Slot Height 1 4 in Number of Dust Ports 2 Dust Port Size 2 1 2 in Other Specifications Country of Origin China Warranty 1 Year Approximate Assembly Setup Time 10 Minutes Serial Number Location ID Label Sound Rating 60 dB Features Dual Sanding Discs Dual 2 1 2 Dust Ports Table Tilt Range 0 to ...

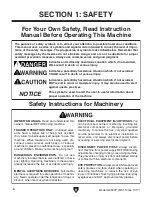
Page 8: ... proof DANGEROUS ENVIRONMENTS Do not use machinery in areas that are wet cluttered or have poor lighting Operating machinery in these areas greatly increases the risk of accidents and injury MENTAL ALERTNESS REQUIRED Full mental alertness is required for safe operation of machin ery Never operate under the influence of drugs or alcohol when tired or when distracted For Your Own Safety Read Instruc...

Page 9: ... moving parts or flying debris Make sure they are properly installed undamaged and working correctly BEFORE operating machine FORCING MACHINERY Do not force machine It will do the job safer and better at the rate for which it was designed NEVER STAND ON MACHINE Serious injury may occur if machine is tipped or if the cutting tool is unintentionally contacted STABLE MACHINE Unexpected movement dur i...

Page 10: ... or getting clothes or hair getting entangled in sanding disc Workpieces thrown by sander can strike nearby operators with great force Long term respiratory damage can occur from using sander without a respirator and adequate dust collection system To minimize these risks anyone operating machine MUST completely heed hazards and warnings below AVOIDING ENTANGLEMENT Becoming entangled in moving par...

Page 11: ...sized circuit To reduce the risk of these hazards avoid over loading the machine during operation and make sure it is connected to a power supply circuit that meets the specified circuit requirements For your own safety and protection of property consult an electrician if you are unsure about wiring practices or electrical codes in your area Note Circuit requirements in this manual apply to a dedi...

Page 12: ...ord size gets longer and the gauge size gets smaller higher gauge numbers indicate smaller sizes Any extension cord used with this machine must be in good condition and contain a ground wire and matching plug receptacle Additionally it must meet the following size requirements Minimum Gauge Size 14 AWG Maximum Length Shorter is Better 50 ft Grounding Plug Requirements Figure 1 Typical 5 15 plug an...

Page 13: ...ed any issues between Grizzly or the shipping agent You MUST have the original pack aging to file a freight claim It is also extremely helpful if you need to return your machine later Unpacking SUFFOCATION HAZARD Keep children and pets away from plastic bags or packing materials shipped with this machine Discard immediately This machine presents serious injury hazards to untrained users Read throu...

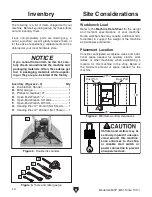
Page 14: ...ewdriver 1 1 D Open End Wrench 7 8 1 E Open End Wrench 12 14mm 1 F Open End Wrench 8 10mm 1 G Sanding Disc 12 80 Grit Not Shown 1 H Sanding Disc 12 220 Grit Not Shown 1 Site Considerations Figure 4 Minimum working clearances 16 291 2 Dust Port 25 Dust Port Children and visitors may be seriously injured if unsuper vised around this machine Lock entrances to the shop or disable start switch or power...

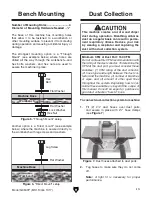
Page 15: ...oses attached to dust ports Dust Collection To connect dust collection system to machine 1 Fit 2 21 2 dust hoses over dust ports and secure in place with 21 2 hose clamps see Figure 7 Minimum CFM at Dust Port 150 CFM Do not confuse this CFM recommendation with the rating of the dust collector To determine the CFM at the dust port you must consider these variables 1 CFM rating of the dust collector...

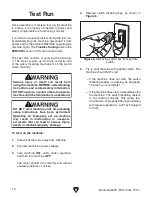
Page 16: ...anding its controls and related safety information DO NOT operate or allow others to operate machine until the information is understood To test run the machine 1 Clear all setup tools away from machine 2 Connect machine to power supply 3 Turn machine ON verify motor operation and then turn machine OFF The motor should run smoothly and without unusual problems or noises 5 Try to start machine with...

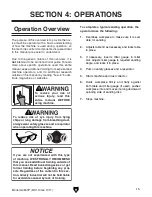
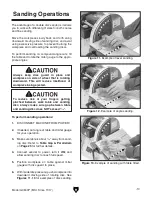
Page 17: ... as necessary and locks table in place 3 If necessary inserts miter gauge in miter slot adjusts miter gauge to required sanding angle and locks it in place 4 Puts on safety glasses and a respirator 5 Starts machine and dust collector 6 Holds workpiece firmly and flatly against both table and miter gauge if used pushes workpiece into and moves it along downward spinning side of sanding disc 7 Stops...

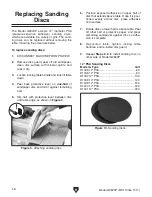
Page 18: ...Slip half with protective layer between disc and table edge as shown in Figure 9 Figure 9 Attaching sanding disc Replacing Sanding Discs 6 Position exposed adhesive on upper half of disc that extends above table Once it is posi tioned evenly across disc press adhesive onto surface 7 Rotate disc so lower half is above table Peel off other half of protective paper and press remaining sandpaper again...

Page 19: ...gers getting pinched between work table and sanding disc always make sure gap between table and sanding disc does NOT exceed 1 16 Always keep disc guard in place and workpiece on side of wheel that is rotating downward This will reduce likelihood of workpiece being ejected Figure 11 Example of level sanding Figure 12 Example of angle sanding The advantage of a double disc sander is it allows you t...

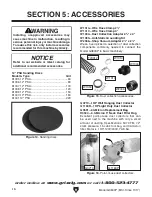
Page 20: ... 220 G0710 1HP Wall Hanging Dust Collector G1163P 1HP Light Duty Dust Collector G3591 30 Micron Replacement Bag H4340 3 0 Micron 5 Neck Dust Filter Bag Excellent point of use dust collectors that can be used next to the machine with only a small amount of ducting Specifications 537 CFM 7 2 static pressure 1 5 cubic foot bag and 30 micron filter Motor is 1 HP 120V 240V 7A 3 5A W1314 Wire Hose Clamp...

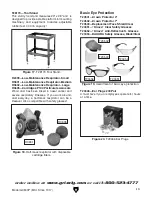
Page 21: ...3632 Low Maintenance Respirator Large H3635 Cartridges P100 Particulate Aerosols Wood dust has been linked to nasal cancer and severe respiratory illnesses If you work around dust everyday a half mask respirator can be a lifesaver Also compatible with safety glasses Figure 18 Half mask respirator with disposable cartridge filters H3631 H3635 T20446 Ear Plugs 200 Pair A must have if you or employee...

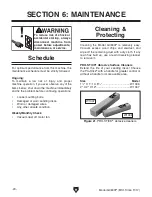
Page 22: ... Check Vacuum dust off motor fan Schedule To reduce risk of shock or accidental startup always disconnect machine from power before adjustments maintenance or service Cleaning the Model G0843P is relatively easy Vacuum excess wood chips and sawdust and wipe off the remaining dust with a dry cloth If any resin has built up use a resin dissolving cleaner to remove it Cleaning Protecting PRO STICK Ab...

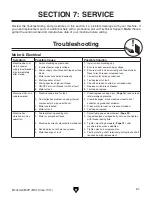
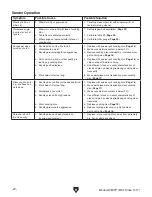
Page 23: ...t breaker or replace fuse 4 Correct motor wiring connections 5 Test replace if at fault 6 Check fix broken shorted or corroded wires 7 Replace switch circuit breaker 8 Test repair replace Machine stalls or is underpowered 1 Machine undersized for task 2 Dust collection problem causing internal components to clog up with dust 3 Motor overheated 4 Motor at fault 1 Clean replace sanding discs Page 16...

Page 24: ...ssure depth or install coarser grit sanding disc Page 16 4 Replace with coarser grit sanding disc Page 16 or strip coating off before sanding 5 Use different stock or accept characteristics of stock and plan on cleaning replacing sanding discs frequently 6 Move workpiece more frequently across sanding disc Page 17 Glossy spots burn ing or streaks on workpiece 1 Sanding disc too fine for the desire...

Page 25: ...urn the disc sander ON until you have verified that it does not touch the table at any point in its rotation If sandpaper touches tables at any point re adjust table parallelism 5 Re install guard To reduce risk of your fingers getting pinched between work table and sanding disc always make sure gap between table and sanding disc does NOT exceed 1 16 The miter slots must be parallel with the face ...

Page 26: ... on miter gauge position pointer on 90 and retighten screw 6 Re check accuracy with square Calibrating Table Tilt To ensure accurate sanding results the table tilt needs to be properly calibrated When the table is set perpendicular to the sanding disc the scale setting should read 0 If it does not perform the following procedure to calibrate the table tilt Item s Needed 90 Square 1 Phillips Screwd...

Page 27: ...at the time of printing but may not match your machine If you find this to be the case use the wiring diagram inside the motor junction box CAPACITORS INVERTERS Some capacitors and power inverters store an electrical charge for up to 10 minutes after being disconnected from the power source To reduce the risk of being shocked wait at least this long before working on capacitors EXPERIENCING DIFFIC...

Page 28: ... 110 VAC 5 15 Plug Motor Junction Box ON OFF Paddle Switch PA9F PA9F 450V 450V 2 2 Viewed from Behind KEDU HY18 250V 10A Figure 25 G0843P switch connections Figure 26 G0843P start capacitor connections Electrical Components 26 Model G0843P Mfd Since 11 17 READ ELECTRICAL SAFETY ON PAGE 25 ...

Page 29: ...possible but we cannot guarantee that all parts shown are available for purchase Call 800 523 4777 or visit www grizzly com parts to check for availability 1 2 3 4 5 6 7 8 9 10 11 12 13 14 15 16 17 18 19 20 21 22 23 24 25 26 27 28 29 30 31 32 41 42 43 44 45 46 15 23 32 18 20 20 10 21 21 31 18 11 12 3 4 3 1 3 2 3 3 3 7 3 8 36 48 51 49 50 26 27 28 35 47 52 53 54 55 19 18 ...

Page 30: ...EDU HY18 6 P0843P006 12 DISC LEFT 36 P0843P036 POWER CORD 18G 3W 72 5 15P 7 P0843P007 12 DISC RIGHT 41 P0843P041 MITER BAR 8 P0843P008 SANDPAPER 60 GRIT 42 P0843P042 MITER GAUGE 9 P0843P009 SANDPAPER 220 GRIT 43 P0843P043 KNOB BOLT M5 8 X 17 22D 10 P0843P010 TABLE BRACKET LEFT 44 P0843P044 MITER GAUGE SCALE POINTER 11 P0843P011 TABLE BRACKET RIGHT 45 P0843P045 PHLP HD SCR M5 8 X 6 12 P0843P012 TAB...

Page 31: ...pproved eye protection and respirator 3 Only plug power cord into a grounded outlet 4 Support workpiece with miter gauge backstop or work table 5 Maintain 1 16 maximum clearance between table and sandpaper 6 Always sand in accordance with directional arrows on machine 7 Ensure sander is properly assembled adjusted and all guards are in place before operating 8 Never sand pointed stock with point f...

Page 32: ......

Page 33: ... metalworker ____ 0 2 Years ____ 2 8 Years ____ 8 20 Years ____20 Years 6 How many of your machines or tools are Grizzly ____ 0 2 ____ 3 5 ____ 6 9 ____10 7 Do you think your machine represents a good value _____Yes _____No 8 Would you recommend Grizzly Industrial to a friend _____Yes _____No 9 Would you allow us to use your name as a reference for Grizzly customers in your area Note We never use ...

Page 34: ...D LINE FOLD ALONG DOTTED LINE GRIZZLY INDUSTRIAL INC P O BOX 2069 BELLINGHAM WA 98227 2069 Place Stamp Here Name_______________________________ Street_______________________________ City______________State______Zip______ Send a Grizzly Catalog to a friend ...

Page 35: ... shall be tried in the State of Washington County of Whatcom We shall in no event be liable for death injuries to persons or property or for incidental contingent special or consequential damages arising from the use of our products To take advantage of this warranty contact us by mail or phone and give us all the details We will then issue you a Return Number which must be clearly posted on the o...

Page 36: ......

Reviews: