background image

ELECTRICAL EQUIPMENT INJURY RISKS. 

You can be shocked, burned, or killed by touching 

live electrical components or improperly grounded 

machinery. To reduce this risk, only allow qualified 

service  personnel  to  do  electrical  installation  or 

repair work, and always disconnect power before 

accessing or exposing electrical equipment.

DISCONNECT POWER FIRST.  Always  discon-

nect  machine  from  power  supply  BEFORE  mak-

ing  adjustments,  changing  tooling,  or  servicing 

machine.  This  prevents  an  injury  risk  from  unin-

tended  startup  or  contact  with  live  electrical  com-

ponents.

EYE PROTECTION. Always wear ANSI-approved 

safety glasses or a face shield when operating or 

observing  machinery  to  reduce  the  risk  of  eye 

injury or blindness from flying particles. Everyday 

eyeglasses are NOT approved safety glasses.

OWNER’S MANUAL. Read and understand this 

owner’s manual BEFORE using machine. 

TRAINED OPERATORS ONLY. Untrained oper-

ators  have  a  higher  risk  of  being  hurt  or  killed. 

Only  allow  trained/supervised  people  to  use  this 

machine.  When  machine  is  not  being  used,  dis-

connect  power,  remove  switch  keys,  or  lock-out 

machine to prevent unauthorized use—especially 

around children. Make your workshop kid proof!

DANGEROUS ENVIRONMENTS. Do  not  use 

machinery in areas that are wet, cluttered, or have 

poor lighting. Operating machinery in these areas 

greatly increases the risk of accidents and injury.

MENTAL ALERTNESS REQUIRED. Full mental 

alertness is required for safe operation of machin-

ery. Never operate under the influence of drugs or 

alcohol, when tired, or when distracted.

For Your Own Safety, Read Instruction 

Manual Before Operating This Machine

The purpose of safety symbols is to attract your attention to possible hazardous conditions. 

This manual uses a series of symbols and signal words intended to convey the level of impor-

tance of the safety messages. The progression of symbols is described below. Remember that 

safety messages by themselves do not eliminate danger and are not a substitute for proper 

accident prevention measures. Always use common sense and good judgment.

Indicates a potentially hazardous situation which, if not avoided, 
MAY result in minor or moderate injury. It may also be used to alert 
against unsafe practices.

Indicates a potentially hazardous situation which, if not avoided, 
COULD result in death or serious injury.

Indicates an imminently hazardous situation which, if not avoided, 
WILL result in death or serious injury.

Alerts the user to useful information about proper operation of the 
machine to avoid machine damage.

NOTICE

-12-

Model G0911–G0914 (Mfd. Since 05/21)

Safety Instructions for Machinery

SECTION 1: SAFETY

Summary of Contents for G0911

Page 1: ... since 05 21 Meets FDA Safety Standards G0911 Shown Here COPYRIGHT SEPTEMBER 2022 BY GRIZZLY INDUSTRIAL INC WARNING NO PORTION OF THIS MANUAL MAY BE REPRODUCED IN ANY SHAPE OR FORM WITHOUT THE WRITTEN APPROVAL OF GRIZZLY INDUSTRIAL INC KS21997 PRINTED IN CHINA V1 09 22 Keep for Future Reference ...

Page 2: ...ng grinding tool integrity and the usage of personal protective equipment The manufacturer will not be held liable for injury or property damage from negligence improper training machine modifications or misuse Some dust created by power sanding sawing grinding drilling and other construction activities contains chemicals known to the State of California to cause cancer birth defects or other repr...

Page 3: ... Track Function 38 Performing Work Time Function 39 Inspecting Workpiece 40 Cutting Engraving Tips 40 Water Chiller Overview 41 Air Pump Overview 41 Extraction Fan Overview 41 Operating Laser 42 SECTION 5 ACCESSORIES 45 SECTION 6 MAINTENANCE 47 Schedule 47 Cleaning Protecting 47 Lubrication 47 Maintaining Laser Components 51 Water Chiller System 54 Cleaning Air Pump Filter 54 Extraction Fan 55 Mac...

Page 4: ... the instruc tions specifications drawings and photographs in this manual Sometimes we make mistakes but our policy of continuous improvement also means that sometimes the machine you receive is slightly different than shown in the manual If you find this to be the case and the difference between the manual and machine leaves you confused or unsure about something check our website for an updated ...

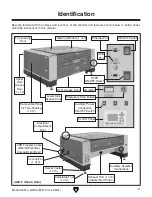
Page 5: ...p Loading Door Viewing Window 1 of 3 Cooling Fan 1 of 2 Upper Side Access Door 1 of 2 Removable Panel for Thru Feeding 1 of 4 Electrical Compartment Door Adjustable Foot 1 of 4 Emergency Stop Button Ammeter Ethernet Port Lower Side Access Door ON OFF Switch USB Port Exhaust Port 1 of 2 Adapter Not Shown Swivel Caster 1 of 4 USB Transfer Cable Behind Electrical Compartment Door Auxiliary Power Conn...

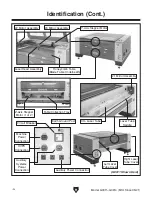
Page 6: ... of 2 Table Collection Tray Circuit Breaker Honeycomb Table Blade Table Underneath 1 Mirror Assembly 2 Mirror Assembly 3 Mirror Assembly G0911 Shown Here Laser Tube Saddle Auxiliary Power Connection Right Laser Tube Cover Left Laser Tube Cover Earth Ground Post Machine Power Connection Auxiliary Systems Power Connection HVPS Connection ...

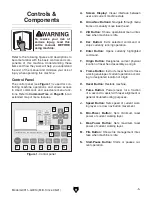
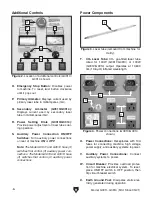
Page 7: ...command F Origin Button Designates current physical location of laser head assembly as origin G Frame Button Instructs laser head to trace working envelope of current operation accord ing to designated location of origin H Reset Button Restarts machine I Pulse Button Powers laser for a fraction of a second to assist with laser alignment or general troubleshooting purposes J Speed Button Sets speed...

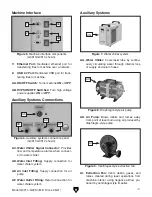
Page 8: ...ons on rear of machine ON or OFF Note The Model G0911 and G0912 have 3 switches that control 3 auxiliary power con nections The Model G0913 and G0914 have 4 switches that control 4 auxiliary power connections Additional Controls Power Components T CO2 Laser Tube CO2 gas filled laser tube rated for 100W G0911 G0913 or 130W G0912 G0914 output Operates at 10 600 nm 10 6 µm infrared wavelength T U Pow...

Page 9: ...is gases and fumes created during laser operations from machine interior using negative airflow pro duced by centrifugal style impeller Y Y Ethernet Port Dedicated ethernet port for transferring files to machine over a network Z USB 2 0 Port Dedicated USB port for trans ferring files to machine AA ON OFF Switch Turns machine ON or OFF AB HVPS ON OFF Switches Turn high voltage power supplies ON or ...

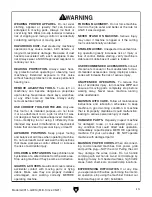
Page 10: ...inci pal plane Frame Slop Machine error code that indicates travel exceeds working envelope of X and Y axes Home Position Machine designated zero point on all axes Name Over Lap Machine error code which indicates file with same name is detected in destination memory location Origin User designated zero point for a workpiece from which laser will reference positioning of all cutting engraving Profi...

Page 11: ...achine Electrical Power Requirement 110V Single Phase 60 Hz Full Load Current Rating 10 7A Minimum Circuit Size 15A Connection Type Cord Plug Power Cord Included Yes Power Cord Length 72 in Power Cord Gauge 14 AWG Plug Included Yes Included Plug Type 5 15 Switch Type Ruida Control Panel Water Chiller Electrical Power Requirement 110V Single Phase 60 Hz Full Load Current Rating 6 5A Extraction Fan ...

Page 12: ...manent Magnet Power Transfer Belt Step Resolution 1 8º Per Step Laser Information Type Sealed CO2 Laser Tube Wattage 100W 130W 100W 130W Wavelength 10 600 nm Focus Automatic Cooling System Distilled Water Cutting Information Cutting Area 39 x 63 in Cutting Speed 0 24 000mm min 945 in min Minimum Cutting Thickness 0 5mm 0 02 in Maximum Cutting Thickness 20mm 0 8 in Minimum Cutting Width 1mm 0 04 in...

Page 13: ...ne ID Label ISO 9001 Factory Yes Certification FDA Material Processing Laser Product Features Ruida LCD Control Panel Leadshine Stepper Motors HIWIN Linear Guideways II VI Optical Lenses Wireless Networking Connectivity RDWorks Laser Cutting Engraving Software USB 2 0 Port Auxiliary Power Receptacles for Air Pump and Water Chiller Accessories Water Chiller for Cooling Laser Tube Extraction Fan for...

Page 14: ... not use machinery in areas that are wet cluttered or have poor lighting Operating machinery in these areas greatly increases the risk of accidents and injury MENTAL ALERTNESS REQUIRED Full mental alertness is required for safe operation of machin ery Never operate under the influence of drugs or alcohol when tired or when distracted For Your Own Safety Read Instruction Manual Before Operating Thi...

Page 15: ...e sure they are properly installed undamaged and working correctly BEFORE operating machine FORCING MACHINERY Do not force machine It will do the job safer and better at the rate for which it was designed NEVER STAND ON MACHINE Serious injury may occur if machine is tipped or if the cutting tool is unintentionally contacted STABLE MACHINE Unexpected movement dur ing operation greatly increases ris...

Page 16: ...safety devices on machine Laser is designed to shut off if cover is opened Severe injury may occur if operator or bystanders come into contact with laser beam during operation SAFE OPERATING LOCATION DO NOT place machine where it can be exposed to rain or mois ture Exposure to water creates a shock hazard and will reduce life of machine POWER DISCONNECT To reduce risk of elec trocution or injury f...

Page 17: ...ed on the potential hazards control measures manufacturer s operating procedures use of personal protective equipment PPE emergency procedures and safety precautions for CNC laser operations To reduce these risks operator and bystanders MUST completely heed the warnings below FUME EXTRACTION CNC lasers must be equipped with a fume extractor that uses MERV 15 or HEPA filters NEVER modify fume extra...

Page 18: ...e sure it is connected to a power supply circuit that meets the specified circuit requirements Note Circuit requirements in this manual apply to a dedicated circuit where only one machine will be running on the circuit at a time If machine will be connected to a shared circuit where multiple machines may be running at the same time con sult an electrician or qualified service personnel to ensure c...

Page 19: ...ary basis Extension cords cause voltage drop which can damage electrical components and shorten motor life Voltage drop increases as the extension cord size gets longer and the gauge size gets smaller higher gauge numbers indicate smaller sizes Any extension cord used with this machine must be in good condition and contain a ground wire and matching plug receptacle Additionally it must meet the fo...

Page 20: ...s also highly recommended that the operator is included in the assembly process because some day to day operational adjustments are linked to areas being assembled Use a flashlight to inspect hidden machine areas for any stray packing materials zip ties on belts and any debris that could catch fire or jam mechanisms during operation Only make adjustments when instructed DO NOT touch or wipe mirror...

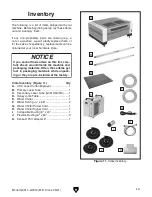
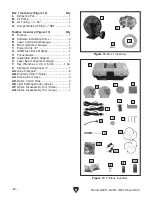
Page 21: ...are missing e g a nut or a washer we will gladly replace them or for the sake of expediency replacements can be obtained at your local hardware store Figure 11 Crate inventory Model G0911 G0914 Mfd Since 05 21 19 K Crate Inventory Figure 11 Qty A CNC Laser Cutter Engraver 1 B Primary Laser Tube 1 C Secondary Laser Tube G0913 G0914 1 D Honeycomb Table 1 E Water Chiller 1 F Water Tubing 5 16 x 68 2 ...

Page 22: ...13 Qty P Toolbox 1 Q Software Installation Discs 2 R Laser Cutting Depth Gauge 1 S Mirror Alignment Gauge 1 T Power Cords 72 3 U USB Flash Drive 512MB 1 V Focus Gauge 1 W Adjustable Airflow Adapter 1 X Laser Beam Alignment Gauge 1 Y Hex Wrenches 2 2 5 3 5mm 1 Ea Z Flat Head Screwdriver 1 8 1 AA Hose Clamps 6 6 AB Proximity Switch Spare 1 AC Locking Door Keys 4 AD Optics Cotton Rolls 2 AE Light Emi...

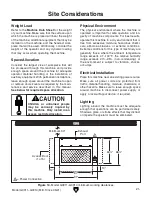
Page 23: ...ults operate this machine in a dry environment that is free from excessive moisture hazardous chemi cals airborne abrasives or extreme conditions Extreme conditions for this type of machinery are generally those where the ambient temperature range exceeds 41 104 F the relative humidity range exceeds 20 95 non condensing or the environment is subject to vibration shocks or bumps Electrical Installa...

Page 24: ...l person move crate to machine work site location 2 Remove crate top and sides components inside crate and blocks near machine base Note To reduce weight remove honey comb table blade table and any loose parts from cabinet Table components are not permanently mounted and require no tools to remove or install 3 Lift machine with forklift just enough to clear pallet then move pallet out of the way 4...

Page 25: ... non corrosive to prevent water hoses from pre maturely deteriorating In hot locations where ambient temperatures can rise over 100ºF 37ºC you may be required to purchase a dedicated refrigeration style water cooler have bags of ice readily available and replaced or incorporate additional water chilling equipment in the same loop The water tempera ture MUST be kept below 122ºF 50ºC for proper lase...

Page 26: ...aminant build up Water quality and effective cooling directly contribute to the operational life of the laser tube 7 Connect power cord to 110V power connec tion on water chiller see Figure 19 8 Connect water chiller system to power and turn ON Allow water to cycle for one minute and continue filling reservoir with distilled water until water level is in green area on water level gauge see Figure ...

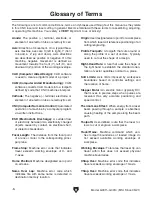
Page 27: ...se kinks and abrasive damage Note The air pump generates vibrations and should be secured to prevent pump from walking during operation 4 Connect air pump to power supply Note Air pump can be connected to auxiliary power connection on rear of machine Installing Extraction Fan The extraction fan vents debris and fumes cre ated during laser operations using a centrifugal style fan The extraction fan...

Page 28: ...exhaust port adapter on machine then connect and secure other end of ducting to inlet port of extraction fan see Figure 23 4 Use 1 6 hose clamp to connect and secure remaining ducting to extraction fan outlet port see Figure 23 To install extraction fan 1 Insert exhaust port adapter into upper and lower exhaust ports on rear of machine and secure with 1 6 hose clamp on upper exhaust port see Figur...

Page 29: ...pper motors run correctly and machine proper ly homes 3 proximity and limit switches function correctly 4 top loading door interlock switches operate properly and 5 Emergency Stop button functions correctly Items Needed Qty Additional Person 1 Class 4 Laser Eye Protection for each person 1 Scrap Iron or Steel As Needed Scrap Wood As Needed To test run machine 1 Clear all setup tools away from mach...

Page 30: ...switch is functioning correctly If laser head assembly does move dis connect machine from power Proximity switch safety feature is not working Call Grizzly Tech Support before replacing proximity switch 10 Touch X axis proximity switch target see Figure 27 with scrap piece of iron or steel Note Proximity switches have red indicator light that will illuminate when the proximity switch is activated ...

Page 31: ...replacing interlock switches 20 Press Emergency Stop button to turn machine OFF 21 WITHOUT resetting Emergency Stop button try to start machine by pressing ON OFF switch Machine should not start If machine does not start safety feature of Emergency Stop button is working correct ly Congratulations Test Run is complete If machine does start immediately turn it OFF and disconnect power Safety featur...

Page 32: ...al research outside of this manual by reading how to books trade magazines or websites 30 Model G0911 G0914 Mfd Since 05 21 To complete a typical operation the operator performs the following 1 Creates artwork using desired design soft ware prepares artwork for cutting engraving using RDWorks software and exports RD file for upload Page 31 2 Inspects auxiliary systems water chiller air pump and ex...

Page 33: ...w and Help Graphics Properties Contains basic attributes of graphics operations including location size scale and reference points System Commands Commonly used command buttons derived from Menu Bar Alignment Controls Used for aligning objects and optimizing type settings Control Panel Contains settings for toolpath lay ers cut types feeds and cutting speeds Output Panel Contains settings for savi...

Page 34: ...rt as separate layers DST DSB will be imported onto currently selected layer 4 Imported file will be displayed in RDWorks main interface Proceed to Preparing Artwork on this page Importing Artwork The Model G0911 G0914 accepts RD files saved using the included RDWorks software The file can be saved to a USB flash drive or transferred to the machine over a local area network Before saving all layer...

Page 35: ...an as desired see Figure 34 Note Choose Cut mode for outline burns through a workpiece or Scan mode for fill layers used in engraving 7 Set Min Power and Max Power as desired see Figure 34 Note On Models G0913 and G0914 set Min Power and Max Power for secondary laser tube next to 2 checkbox Tip Test scrap workpiece material with lower power settings below 20 and slowly increase power to determine ...

Page 36: ...Figure 37 4 Safely remove USB flash drive from personal computer 5 Proceed to Transferring RD File w USB Flash Drive on Page 35 Saving RD File to Machine w USB Transfer Cable 1 Connect machine to personal computer run ning RDWorks with USB transfer cable locat ed in electrical compartment 2 Turn machine ON and wait for startup proce dure to complete 3 In RDWorks output panel select USB Auto to ope...

Page 37: ...e Press Test button to verify network connection has been established 6 Click Ok to return to output panel see Figure 35 on Page 34 7 Select Download and then proceed to Loading RD File From Machine Memory on Page 36 Item Needed USB Flash Drive Included w Machine 1 Transferring RD File w USB Flash Drive 1 Turn machine ON and wait for startup proce dure to complete Before operations on the Model G0...

Page 38: ...ed file and use left and right arrow nav buttons and to select Copy to memory then press Enter 8 Once file transfer message is displayed press Esc button to return to status screen File is now ready for laser operations Loading RD File From Machine Memory 1 Turn machine ON and wait for startup proce dure to complete 2 When machine startup is completed status screen will be displayed see Figure 40 ...

Page 39: ...ing door before beginning operations Setting Manual Focus 1 Turn machine ON and wait for startup proce dure to complete 2 Open top loading door and move laser head assembly to easily accessible area 3 Load flat even workpiece onto table under laser head assembly 4 Press Z U button on control panel to display Z U menu screen then use arrow nav but tons to highlight Z move see Figure 44 5 Use left a...

Page 40: ...in RDWorks in reference to working envelope Note For example if operator set origin to center of image in RDWorks software posi tion laser head assembly over center of table 5 Press Origin button on control panel Machine will audibly beep to indicate origin has been properly set 6 Loosen 1 cap screw on auto focus sensor mount raise auto focus sensor even with tip of air nozzle then tighten cap scr...

Page 41: ...e From Machine Memory on Page 36 3 Press File button on control panel to display file management screen see Figure 47 4 Use arrow nav buttons to highlight Work time and press Enter see Figure 47 5 File management screen will display Calculating Work Time Please Wait during function 6 When controller finishes calculating total cut ting engraving time job duration is displayed on file management scr...

Page 42: ...g them and may cause unpredictable cutting engraving results Always use wood workpieces that do not have knots or position working envelope away from visibly knotted areas to maintain consistent cutting engraving quality Wet or Green Wood Avoid using wood with a high water content Wood exposed to excessive moisture such as rain or snow will cut engrave poorly and cause large clouds of smoke and de...

Page 43: ...environments susceptible to extreme heat To prevent water from freezing add 50 50 non corrosive anti freeze to water chiller reservoir IMPORTANT Always use anti freeze that is listed as non corrosive to prevent water hoses from pre maturely deteriorating Air Pump Overview Laser cutting operations require an air nozzle to focus a jet of air that blows fumes smoke dust and other materials away from ...

Page 44: ...put accurately in the artwork file Note For a complete list of CNC laser com mands a Command Tree diagram is located in SECTION 10 APPENDIX on Page 95 Operating Laser Items Needed Qty Class 4 Laser Eye Protection 1 Hex Wrench 2 5mm 1 Tape Measure 1 Operating Single Laser Head G0911 G0912 1 Clear all setup tools away from machine 2 Turn machine ON and wait for startup proce dure to complete 3 Open ...

Page 45: ...PORTANT An ammeter indication exceed ing mA rating may be caused by impending laser tube failure or electrical faults 7 Measure thickness of workpiece and verify adequate space exists between workpiece and laser head assembly then place workpiece on table Note Excess space will be adjusted later when setting focal length 8 Load RD file from machine memory see Loading RD File From Machine Memory on...

Page 46: ...entered in RDWorks but can be altered using the control panel 1 DISCONNECT MACHINE FROM POWER 2 Open top loading door and loosen 2 cap screws securing left belt mounting bracket on primary laser head assembly position primary laser head assembly as desired then secure cap screws see Figure 50 3 Measure distance between primary and sec ondary laser head assembly air nozzle cen terlines see Figure 5...

Page 47: ...ller System Figure 54 Model T33669 130W Laser Tube Model G0911 G0914 Mfd Since 05 21 45 SECTION 5 ACCESSORIES T33667 39 x 63 Honeycomb Table Replacement honeycomb table for use with the Model G0911 G0914 CNC Laser Cutter Engraver T30339 Water Chiller System G0911 G0912 T33670 Water Chiller System G0913 G0914 Replacement water chiller system for use with the Model G0911 G0912 CNC Laser Cutter Engra...

Page 48: ... Lasers Replacement air pump for use with the Model G0911 G0914 CNC Laser Cutter Engraver T32362 Replacement Focal Lens 63 5mm Focal Length for G0911 G0914 Replacement focal lens for use with the Model G0911 G0914 CNC Laser Cutter Engraver G0953 HEPA Fume Extractor for Lasers Pulls fumes and particulates through eight types of filters within three housings filtering the air of harmful odors chemic...

Page 49: ...esent in tube Check auxiliary systems for proper function and fill water reservoir as required Weekly Maintenance Clean and vacuum dust buildup on auxiliary systems and air pump filter Wipe shaft and rail metal surfaces with light sewing machine oil Monthly Check Verify fasteners on moving parts are secure Inspect laser optics and clean as required Inspect condition of electrical system Verify pro...

Page 50: ...xiglas and labels Water can short electronics and corrode parts Shaft and Rail Metal Surfaces By design the shafts rails and other metal parts on this machine have hardened surfaces that are highly resistant to corrosion and wear However periodically wipe metal parts with light sewing machine oil to extend their life Note Lubrication can cause sludge build up that will bind moving parts and corros...

Page 51: ... shop rag lightly covered with sewing machine oil wipe linear guideway and carriage until clean 7 Dip rag in oil and apply a thin coating across entire surface of linear guideway 8 Repeat Steps 3 7 on left and right Y axis linear guideways and carriages see Figures 63 64 X Axis Linear Guideway Carriage Carriage Left Y Axis Linear Guideway Right Y Axis Linear Guideway 9 Remove and dispose of any sh...

Page 52: ...e linear guideways see Figure 68 The bearings for these pulleys are sealed and maintenance free To inspect and clean pulley belts and cogs 1 DISCONNECT MACHINE FROM POWER 2 Slowly move laser head along X and Y axes while inspecting condition of belts and pulley cogs with flashlight To clean and lubricate Z Axis table lift 1 DISCONNECT MACHINE FROM POWER 2 Access lower cabinet by opening front acce...

Page 53: ... the reflective surfaces and diffuse the beam resulting in low quality cuts If the lenses and mirrors are not kept clean any ash or dust on the surface will absorb laser ener gy This energy converts to heat causing a ther mal lens effect where the optics will become permanently pitted after normal use As a result laser machine optics are considered consumable Once the optics have begun degrading t...

Page 54: ... wash and dry your hands In the event you have to handle lenses or mirrors always wear sterile disposable gloves Items Needed Qty Small Bellows 1 Optics Grade Cotton Swabs As Needed Lens Paper As Needed Denatured Isopropyl Alcohol As Needed Clean Shop Rags As Needed Method 1 Optics Installed When lenses and mirrors are installed they can be cleaned using a cotton swab see Figure 69 IMPORTANT While...

Page 55: ...OWER 2 Use small bellows to blow any particulates off lens mirror surface IMPORTANT DO NOT physically wipe lens es or mirrors 3 Place small drop of denatured isopropyl alco hol on center of lens cleaning paper Note Flooding paper with solvent only leaves residual streaks Only place enough solvent so that paper conforms to surface and sol vent does not absorb to edge of paper 4 Grab edge of paper a...

Page 56: ...e as required 4 Inspect water for discoloration and evidence of algae If contaminated drain water clean reservoir and refill with distilled water 5 Reconnect water chiller system to power and turn ON Allow water to cycle for 1 minute and verify air bubbles have released from laser tube 6 Verify water level is in green area on water level gauge Note For additional information on alarm codes and tro...

Page 57: ...c tion fan far enough to gain access to input and output ports 6 Vacuum chips dust and ash from extraction fan intake screen 7 Vacuum deposits at bends in ducting 8 Re attach ducting to extraction fan and secure For long term machine storage or when not in operation during winter months it is MANDATORY that ALL water is drained from the laser tube Freezing temperatures can be encountered even in h...

Page 58: ...arge to frame 10 Inspect test replace if at fault 11 Replace motor Machine stalls or is underpowered 1 Laser beam path not aligned 2 Machine undersized for task 3 Pulley slipping on shaft 4 One or more synchronous belt s are damaged binding or slipping 5 Stepper motor at fault 1 Properly align laser beam path Page 71 2 Increase power settings decrease speed use thinner workpiece Page 40 3 Tighten ...

Page 59: ...laser beam path Page 71 Clean laser optics Page 52 5 Verify air supply hose is unobstructed and connected to air nozzle Verify extraction fan is functional and ducting is unobstructed 6 Workpiece material beyond machine capability Page 40 7 Verify mirrors are secure and reflective side is facing outward Page 81 Align laser beam path Page 71 Clean laser optics Page 52 Inspect adjust table level Pag...

Page 60: ... 82 Replace if at fault One or more axes will not move 1 Direction wire and pulse wire switched on controller connector 2 Stepper motor s disconnected 3 Stepper motor s at fault 4 No pulse signal from controller 1 Rewire direction pulse wire on controller connector 2 Reconnect stepper motor s 3 Inspect replace stepper motor s 4 Inspect replace controller Machine fails to home or moves beyond soft ...

Page 61: ... noisy direc tional changes due to belt slip and reduce resolution quality of the cut The following sections show proper belt tension deflection values for each axis See Figure 73 for a typical method of testing belt deflection using moderate pressure Adjusting Synchronous Belts X Axis Belt Adjustment 1 DISCONNECT MACHINE FROM POWER 2 Open top loading door and center laser head assembly over table...

Page 62: ...lection is greater than or less than 8mm proceed to Step 4 Z Axis Belts Adjustment 1 Turn machine ON press Z U button on con trol panel to access Z U menu then highlight Z move 2 Press left arrow nav button on control panel to raise table all the way up 3 DISCONNECT MACHINE FROM POWER 4 Open front access door Note Z axis synchronous belt components are the same on left and right sides 4 To adjust ...

Page 63: ...utlines procedures for replacing the synchronous belts on the Model G0911 G0914 Items Needed Qty Hex Wrenches 2 5 3 5mm 1 Ea Scissors 1 Wood Blocks As Needed Replacement Synchronous Belts As Needed Clean Shop Rags As Needed X Axis Belt Replacement 1 DISCONNECT MACHINE FROM POWER 2 Open top loading door and center laser head assembly over table 3 Remove 2 cap screws on right belt mount ing bracket ...

Page 64: ...gh left and right idler pulleys and verify belt meshes with pulley teeth see Figure 83 7 Insert right belt mounting bracket between right belt loop and install bracket using 2 cap screws removed in Step 3 on Page 61 8 Insert left belt mounting bracket between left belt loop and install bracket using 2 cap screws removed in Step 4 9 Verify correct X axis synchronous belt deflection see X Axis Belt ...

Page 65: ...oop and install bracket using 2 cap screws removed in Step 4 9 Insert front belt mounting bracket between front belt loop and install bracket using 2 cap screws removed in Step 5 10 Verify correct Y axis synchronous belt deflec tion see Y Axis Belts Adjustment on Page 60 4 Remove 2 cap screws on rear belt mount ing bracket securing Y axis synchronous belt then remove bracket from belt see Figure 8...

Page 66: ...l panel to raise table enough to fit wood blocks under both table support brackets between leadscrews see Figure 87 Lower table until support brackets rest on wood blocks 4 DISCONNECT MACHINE FROM POWER 5 Loosen 2 cap screws on belt tensioner then pull belt tensioner away from belt to release tension see Figure 88 6 With belt tension released cut defective belt and remove from machine 7 Remove 4 c...

Page 67: ...e 64 12 Re install 1 cap screw and flat washer on leadscrew nut removed in Step 9 on Page 64 13 Repeat Steps 7 12 beginning on Page 64 on rear leadscrew Note If replacing left Z axis synchronous belt open left lower side access door for easier access to rear leadscrew 14 Install replacement synchronous belt around front and rear leadscrew idler pulleys and stepper motor idler pulley see Figure 91 ...

Page 68: ...YSTEMS FROM POWER 2 Open laser tube access door 3 Disconnect water hose s at INLET port s of water chiller and place end s into bucket to collect water runoff see Figure 95 The Model G0911 G0914 table may slowly twist or drop over time causing inadequate workpiece cutting and variations in engraving quality Items Needed Qty Protective Gloves 1 Precision Ruler 1 To level table 1 DISCONNECT MACHINE ...

Page 69: ...eps to re align if original alignment is altered 4 Disconnect water hose s at OUTLET port s of water chiller and manually blow through hose s several times to purge laser tube s and hoses of water IMPORTANT Remove as much residual water from laser tube s as possible If freez ing temperatures occur laser tube glass will crack and render laser tube inoperable 5 Install caps or tape on all open water...

Page 70: ...iscard laser tube shipping container Retain original box for ordering replacement tubes or in the event of damage caused during shipping 3 Remove dust caps or tape if installed from laser tube IMPORTANT DO NOT force caps off water spout if they cannot be removed by hand Carefully cut them off using utility knife 4 Carefully remove laser tube from shipping container and position anode end on anode ...

Page 71: ... outlet spout is pointed up as shown in Figure 99 10 G0913 G0914 Only Repeat Steps 1 9 on secondary laser tube Note Laser tube anode and cathode ends will be reversed in figures 11 Verify water chiller system inlet and outlet hoses are connected to auxiliary systems connection panel according to Installing Water Chiller System on Page 23 Tip If you are replacing laser tube replace distilled water ...

Page 72: ...ater chiller reservoir level is in green area see Installing Water Chiller System on Page 23 17 Turn water chiller system OFF 20 Verify gap of approximately 6 is still present between cathode end of laser tube and cen ter of first mirror 21 Verify laser tube is centered evenly in rubber saddle pads and no contaminants are visible on pad surfaces 22 Clean rubber pads on saddle straps and place on l...

Page 73: ...f the laser beam path is critical to power efficiency cutting engraving quality and laser tube service life Items Needed Qty Class 4 Laser Eye Protection per person 1 Laser Beam Alignment Gauge 1 Mirror Alignment Gauge 1 Hex Wrenches 2 5 3mm 1 Ea Manila Folder As Needed Sheet of Paper As Needed Masking Tape As Needed Aligning Primary Laser Beam Path 1 Prepare machine for operation according to SEC...

Page 74: ...on will only oper ate with top loading door closed If laser beam is in center of crosshairs alignment is optimal Proceed to Step 17 If laser beam is not in center of cross hairs adjustment is required Proceed to Step 14 14 Loosen lock nuts on 3 thumbscrews located behind Mirror 1 see Figure 109 Note Tension bolts on mirror assemblies help prevent misalignment during operation Always keep moderate ...

Page 75: ...trol panel If laser beam is within center of mirror alignment is optimal Remove mirror align ment gauge from Mirror 2 then proceed to Step 24 If laser beam is not in center of mirror adjustment is required Proceed to Step 21 21 If no adjustments were made in Step 14 loosen lock nuts on 3 brass thumbscrews located behind Mirror 1 assembly see Figure 109 on Page 72 22 Adjust direction of beam path b...

Page 76: ...nment is optimal Proceed to Step 29 If laser beam is not in center of cross hairs adjustment is required Proceed to Step 26 26 Loosen lock nuts on 3 brass thumbscrews located behind Mirror 2 assembly see Figure 114 27 Adjust direction of beam path by tightening thumbscrews depending on desired direction of beam travel see Figure 115 28 Repeat Step 25 29 Remove laser beam alignment gauge open top l...

Page 77: ...Repeat Step 31 35 Tighten all lock nuts on mirror assembly thumbscrews if loosened for adjustment DO NOT tighten thumbscrews 36 G0913 G0914 Only Proceed to Aligning Secondary Laser Beam Path on this page 37 Align reference laser beam path as instructed in Aligning Reference Laser on Page 80 38 Re install 4 cap screws and 1 right laser tube cover removed in Step 3 and close all doors opened for ali...

Page 78: ...ht corner of table 76 Model G0911 G0914 Mfd Since 05 21 3 Close top loading door and check alignment by pressing Pulse button on control panel Compare results with Figure below IMPORTANT Pulse function will only oper ate with top loading door closed If laser beam is in center of crosshairs alignment is optimal Proceed to Step 7 If laser beam is not in center of crosshairs adjustment is required Pr...

Page 79: ...dary Mirror 2 and hold in place with mask ing tape see Figure 126 10 Verify Mirror 1 and Mirror 2 alignment by pressing Pulse button on control panel If laser beam is in center of mirror align ment is optimal Remove mirror alignment gauge from Mirror 2 then proceed to Step 14 If laser beam is not in center of mirror adjustment is required Proceed to Step 11 5 Adjust direction of beam path by tight...

Page 80: ...ceed to Step 16 16 Loosen lock nuts on 3 brass thumbscrews located behind Mirror 2 assembly see Figure 127 17 Adjust direction of beam path by tightening thumbscrews depending on desired direction of beam travel see Figure 128 18 Repeat Step 15 19 Remove laser beam alignment gauge open top loading door then place a clean sheet of paper or manila folder under laser head assembly 20 Set focal length...

Page 81: ... focal point alignment by press ing Pulse button on control panel Compare results with Figure 130 24 Repeat Step 21 25 Tighten all lock nuts on mirror assembly thumbscrews if loosened for adjustment DO NOT tighten thumbscrews 26 Re install 4 cap screws and 1 left laser tube cover removed in Step 1 then proceed to Step 37 on Page 75 If laser beam focal point is dark and even alignment is optimal Pr...

Page 82: ...point matches Correct Focus example in Figure 130 on Page 79 If reference laser focal point is dark and even alignment is complete If reference laser focal point is not dark and even repeat Step 5 6 G0913 G0914 Only Align second reference laser on opposite 1 mirror assembly The reference laser is a low power 650 nm Class 3B red laser used as a visual indicator of the laser beam focal point The bea...

Page 83: ... optics disassembly tool see Figure 136 Tip If optics disassembly tool is too large to fit behind mirror assembly 2mm hex wrench can be used as substitute 4 Remove mirror by applying duct tape to non reflective rear surface and lifting 5 Install replacement mirror in mirror assembly and re install compression ring 6 Close covers and doors opened in Step 2 Removing Replacing Focus Lens 1 DISCONNECT...

Page 84: ...er Driver DIP Switches 3 Compare X axis stepper driver DIP switch configuration to diagram in Figure 139 If DIP switch does match diagram DIP switch is set correctly If DIP switch does not match diagram flip rocker switches to match diagram 4 Compare Y axis stepper driver DIP switch configuration to diagram in Figure 139 If DIP switch does match diagram DIP switch is set correctly If DIP switch do...

Page 85: ... may not match your machine If you find this to be the case use the wiring diagram inside the motor junction box CAPACITORS INVERTERS Some capacitors and power inverters store an electrical charge for up to 10 minutes after being disconnected from the power source To reduce the risk of being shocked wait at least this long before working on capacitors EXPERIENCING DIFFICULTIES If you are expe rien...

Page 86: ...r Tube Y Axis Stepper Motor B X Axis Stepper Motor B Reference Laser Reference Laser Power Supply Auto Focus Sensor Z Axis Limit Switch Y Axis Limit Switch X Axis Limit Switch Interlock Switch 1 Interlock Switch 2 Y Axis Stepper Driver 3DM580 High Voltage Power Supply MYJG100W Y 1 G0911 MYJG130W Y 1 G0912 X Axis Stepper Driver 3DM580 110V Machine Power Receptacle 110V HVPS Power Receptacle 110V Au...

Page 87: ... Supply TL 400S 48 48V USB Port USB Transfer Cable Ethernet Port PC USB UDISK ETHERNET 110V Auxiliary Power Receptacles Emergency Stop Button ON OFF Switch HVPS ON OFF Switch AC1 AC1 110V Machine Power Receptacle 110V HVPS Power Receptacle 110V Auxiliary Systems Power Receptacle Circuit Breaker DZ47sLE AC1 AC1 Model G0911 G0914 Mfd Since 05 21 85 READ ELECTRICAL SAFETY ON PAGE 83 G0913 G0914 Wirin...

Page 88: ...S B Controller Figure 140 Electrical cabinet overview G0911 G0912 shown Figure 142 Control panel and power controls G0911 G0912 shown 86 Model G0911 G0914 Mfd Since 05 21 READ ELECTRICAL SAFETY ON PAGE 83 Electrical Components ...

Page 89: ...ers Figure 146 Power connections G0911 G0912 shown Figure 145 High voltage power supply Figure 144 Transformers and EMI filter Model G0911 G0914 Mfd Since 05 21 87 READ ELECTRICAL SAFETY ON PAGE 83 Electrical Components Cont ...

Page 90: ...48 1 48 2 48 2 48 3 48 3 48 4 48 4 48 5 64 68 64 67 64 65 51 53 54 55 56 57 57 58 59 50 52 30 74 79 79 75 76 78 76 27 85 86 64 77 67 77 88 88 68 65 65 66 69 87 70 69 70 86 86 89 89 89 74 90 91 93 91 91 93 94 94 71 72 73 72 73 71 71 72 73 67 77 78 72 73 78 80 80 81 73 72 82 72 73 88 Model G0911 G0914 Mfd Since 05 21 BUY PARTS ONLINE AT GRIZZLY COM Scan QR code to visit our Parts Store Main SECTION ...

Page 91: ... HANDLE 64 P0911064 KEYED ALIKE CAM LOCK 27 P0913027 POWER COMPARTMENT G0913 G0914 65 P0911065 L HANDLE SPRING PLUNGER 28 P0911028 EXHAUST PORT ADAPTER 6 66 P0911066 RECESSED PULL HANDLE 29 P0911029 POWER CONNECTION ASSEMBLY G0911 G0912 67 P0911067 ACCESS DOOR HINGE 29 P0913029 POWER CONNECTION ASSEMBLY G0913 G0914 68 P0911068 RUBBER GROMMET 24MM 29 1 P0911029 1 POWER CONNECTION PANEL G0911 G0912 ...

Page 92: ... 106 12 106 13 106 14 106 15 106 16 106 16 106 17 106 18 106 19 106 20 106 21 106 22 106 23 106 24 106 25 110 111 112 113 114 161 163 164 162 115 116 118 117 119 120 120 121 147 148 149 150 146 122 123 136 124 125 128 129 151 152 130 132 132 153 153 154 155 156 156 156 159 159 160 160 156 155 133 133 107 142 142 142 141 165 140 140 143 141 141 140 157 157 157 158 147 108 159 116 137 157 120 120 12...

Page 93: ... FOCUS BRACKET 135 P0913135 MIRROR ASSEMBLY 1 G0913 G0914 106 15 P0911106 15 AUTO FOCUS SENSOR 136 P0911136 TIMING BELT 300 3M 106 16 P0911106 16 BUTTON HD CAP SCR M3 5 X 6 NYLON 137 P0911137 TIMING BELT 228 3M 106 17 P0911106 17 CAP SCREW M3 5 X 14 138 P0911138 TIMING BELT 3M 15 15 X 2032MM 106 18 P0911106 18 KNURLED THUMB SCREW M7 1 X 14 D10 139 P0911139 TIMING BELT 3M 15 15 X 3250MM 106 19 P091...

Page 94: ...226 227 228 229 230 231 232 233 234 235 236 237 238 239 240 241 242 243 244 244 245 245 246 247 248 251 252 252 252 252 254 253 253 253 215 216 217 216 217 223 218 223 223 92 Model G0911 G0914 Mfd Since 05 21 BUY PARTS ONLINE AT GRIZZLY COM Scan QR code to visit our Parts Store Electrical Accessories ...

Page 95: ...YJG130W Y 1 G0912 G0914 241 P0911241 RED LED 215 P0911215 ELECTRICAL COOLING FAN GBOC 12025HSL 242 P0911242 SOFTWARE INSTALLATION DISC 216 P0911216 ELECTRICAL COOLING FAN FILTER 243 P0911243 USER MANUAL DISC 217 P0911217 ELECTRICAL COOLING FAN COVER 244 P0911244 OPTICS COTTON ROLLS 218 P0911218 SILICONE TUBING 8ID X 11OD X 1725L 245 P0911245 LOCKING DOOR KEYS 2 PC SET 219 P0911219 WATER CHILLER CW...

Page 96: ... GREEN 301 P0913301 MACHINE ID LABEL G0913 306 P0911306 TOUCH UP PAINT GRIZZLY BEIGE 301 P0914301 MACHINE ID LABEL G0914 307 P0911307 TOUCH UP PAINT GLOSSY BLACK 302 P0911302 DON T OPEN DOOR LABEL 308 P0911308 ELECTRICITY LABEL 303 P0911303 LASER WARNING LABEL 309 P0911309 GRIZZLY COM LABEL 304 P0911304 MODEL NUMBER LABEL G0911 310 P0911310 GRIZZLY NAMEPLATE SMALL 304 P0912304 MODEL NUMBER LABEL G...

Page 97: ...g layer Set origin for currently loaded file Frame boundary of currently loaded file Clear running time of memory files Delete all memory files Quick format of internal memory Complete format of internal memory Total running time of all memory files Runs selected file in queue Trackframe selected file in queue Forecast running time of current file Clear running time of selected file Delete selecte...

Page 98: ...Input Information X Limit Y Limit Z Limit U Limit Water prot1 Water prot2 Open prot X Limit Y Limit Z Limit U Limit Raises or lowers Z axis height Rotates U axis rotary attachment Sets axes movement mode and speed Sets laser pulse mode and duration Enables and sets multiple origins Loads saves factory and user parameters Automatically focuses Z axis Sets IP and Gateway addresses of machine Sets sc...

Page 99: ...ental contingent special or consequential damages arising from the use of our products The manufacturers reserve the right to change specifications at any time because they constantly strive to achieve better quality equipment We make every effort to ensure that our products meet high quality and durability standards and we hope you never need to use this warranty In the event you need to use this...

Page 100: ......
Reviews: