-68-
Model G0949G (Mfd. Since 01/22)
Backlash Adjustment
Reducing backlash to less than 0.002" is
impractical and can lead to accelerated wear
of the wedge, nut, and leadscrew. Avoid the
temptation to overtighten the backlash set
screw while adjusting.
Backlash is the amount of play in a leadscrew and
can be felt as the free play in a handwheel when
changing direction of rotation. The amount of the
backlash can be viewed on the handwheel gradu-
ated dial.
When adjusting backlash, tighten the components
enough to remove backlash, but not so much that
the components bind the leadscrew, making it
hard to turn. Overtightening will cause excessive
wear to the sliding block and leadscrew.
Tools Needed
Qty
Hex Wrenches 2, 5, 6mm ............................1 Ea.
Punch Pin 2mm ................................................ 1
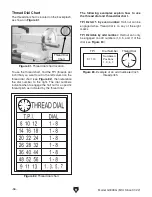
Figure 101. Location of cap screw that secures
leadscrew nut.
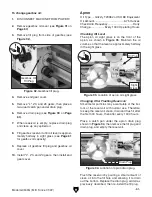
3. Rotate cross slide handwheel clockwise to
feed leadscrew nut out from under cross
slide, as shown in
Figure 102.
4. Tighten backlash adjustment cap screw
shown in
Figure 102 in small increments.
5. Hold leadscrew nut and test after each
adjustment by rotating handwheel back-and-
forth until backlash amount is approximately
0.002"–0.004".
6. Feed leadscrew nut back under cross slide
and replace cap screw removed in
Step 2.
Compound Rest Backlash
1. Turn compound rest handwheel counter-
clockwise several turns.
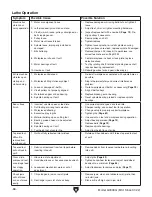
2. Loosen set screws on compound rest face-
plate several turns (see
Figure 103).
Figure 102. Cross slide leadscrew nut.
Leadscrew Nut
Backlash
Adjustment
Cap Screw
Cap Screw
Figure 103. Compound rest backlash
adjustments.
Faceplate
Set
Screws
Cross Slide Backlash
1. Feed cross slide toward operator until it
reaches end of its travel.
2. Remove cap screw that secures cross slide
leadscrew nut (see
Figure 101).
Summary of Contents for G0949G
Page 108: ......


