background image

G1847 / G1852 / G 1861 / G3811 Air Nailers/Staplers

-17-

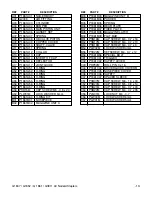
REF

PART #

DESCRIPTION

REF

PART #

DESCRIPTION

101 PSB15M

CAP SCREW M5 - 0.8 x 20

102 PLW01M

LOCK WASHER 5mm

103 P1847103

DEFLECTOR

104 P1847104

SPRING

105 P1847105

SEAL

106 P1847106

CAP

107 P1847107

O-RING

108 P1847108

O-RING

109 P1847109

HD VALVE PISTON

110 P1847110

O-RING

111 P1847111

O-RING

112 P1852112

COLLAR

113 P1847113

O-RING

116 P1852114

MAIN PISTON UNIT

117 P1847117

O-RING

118 P1847118

CYLINDER

119 P1847119

BUMPER

120 P1847120

O-RING

121 P1847121

TUBE

122 P1847122

O-RING

123 P1847123

JOINT GUIDE

201 P1847201

SEAL

202 P1847202

TRIGGER VALVE HEAD

203 P1847203

TRIGGER VALVE STEM

204 P1847204

O-RING

205 P1847205

O-RING

206 P1847206

TRIGGER VALVE GUIDE

207 PEC01M

E-CLIP 3mm

208 P1847208

TRIGGER

209 P1847209

STEPPED PIN

210 P1847210

SPRING

214 PRP11M

ROLL PIN 2.5 x 16mm

215 P1847215

SAFETY LEVER

216 P1847216

SHAFT

217

P1847217

SPRING

218

PEC02M

E-CLIP 4mm

301

P1847301

NAILER BODY

302

P1847302

O-RING

303

P1847303

NIPPLE

304

G2308

AIR FITTING

401

PSB15M

CAP SCREW M5 - 0.8 x 20

402

PLW01M

LOCK WASHER 5mm

403

P1847403

DRIVER GUIDE COVER B

404

P1847404

NOSEPIECE

405

PSB41M

CAP SCREW M4 - 0.7 x 14

406

PSB17M

CAP SCREW M4 - 0.7 x 10

407

P1852407

NOSEPIECE COVER

408

P1852408

STOPPER

409

P1852409

MAGAZINE UNIT A

410

P1852410

STOPPER

411

PLW02M

LOCK WASHER 4 mm

412

PSB17M

CAP SCREW M4 - 0.7 x 10

413

P1852413

MAGAZINE UNIT B

414

P1852414

REAR PLATE

415

PLW02M

LOCK WASHER 4mm

416

PSB18M

CAP SCREW M4 - 0.7 x 8

417

P1852417

PUSHER

418

P1852418

SPRING

419

PSB18M

CAP SCREW M4 - 0.7 x 8

420

P1852420

FIXED PLATE

421

P1852421

MAGAZINE LATCH

422

P1852422

STOPPER 

423

PSB23M

CAP SCREW M4 - 0.7 x 12

424

PLW02M

LOCK WASHER 4mm

425

P1852425

SAFETY 

426

P1852426

FLAT BAR

427

PLN01M

LOCK NUT M4 - 0.7

428

P1847430

O-RING KIT

Summary of Contents for G1847

Page 1: ...MARCH 1999 PRINTED IN USA DISCONTINUED MACHINE MANUAL DISCLAIMER THE INFORMATION IN THIS MANUAL REPRESENTS THE LAST CONFIGURATION OF THE MACHINE BEFORE IT WAS DISCONTINUED MACHINE CONFIGURATIONS MAY HAVE CHANGED AS PRODUCT IMPROVEMENTS WERE INCORPORATED IF YOU OWN AN EARLIER VER SION OF THE MACHINE THIS MANUAL MAY NOT EXACTLY DEPICT YOUR MACHINE CONTACT CUSTOMER SERVICE IF YOU HAVE ANY QUESTIONS A...

Page 2: ...NECTING TO AIR 5 LOADING BRADS 6 LOADING STAPLES 7 TEST FIRE 8 AIR QUALITY 8 4 MAINTENANCE 9 GENERAL 9 CLEANING OILING 9 JAMMING 10 ALIGNING NOSE PIECE 10 DRIVER REPLACEMENT 11 O RING 12 5 CLOSURE 13 G1847 PARTS DIAGRAM AND LIST 14 15 G1852 PARTS DIAGRAM AND LIST 16 17 G1861 PARTS DIAGRAM AND LIST 18 19 G3811 PARTS DIAGRAM AND LIST 20 21 MACHINE DATA 22 TROUBLESHOOTING GUIDE 23 WARRANTY AND RETURN...

Page 3: ...tective hair cover ing to contain long hair 10 ALWAYS USE SAFETY GLASSES Also use face or dust mask if tool operation is dusty Everyday eyeglasses only have impact resistant lenses they are NOT safety glasses 11 SECURE WORK Use clamps or a vise to hold work when practical It s safer than using your hand and frees both hands to operate tool 12 DON T OVERREACH Keep proper footing and balance at all ...

Page 4: ...oduced in the line whichever is greater Inspect air hoses fre quently 12 All air tools exhaust compressed air If work ing in an area where dust will become air borne due to exhausted air WEAR RESPI RATORY PROTECTION 1 Make sure the safety nose is functioning properly before loading fasteners 2 Make sure the magazine spring is set before operating 3 ALWAYS point nailer away from yourself and others...

Page 5: ...e any service questions or parts requests please call or write to us at the location listed below Grizzly Industrial Inc 1203 Lycoming Mall Circle Muncy PA 17756 Phone 570 546 9663 Fax 800 438 5901 E Mail techsupport grizzly com Web Site http www grizzly com To comment on this manual write to Grizzly Industrial Inc C O Technical Documentation P O Box 2069 Bellingham WA 98227 To operate this or any...

Page 6: ... the manufacturer in a carefully packed carton If you discover damaged after delivery please call Customer Service immediately for advice Save the containers and all packing materials for possible inspection by the carrier or its agent Otherwise filing a claim can be difficult Carefully remove the items packed in the carton It may be a good idea to save the carton and packing material in case it m...

Page 7: ...uld be discarded Loading small partial bands of brads can also jam the gun Also be sure that the brads you are using are the correct size and style for the gun Do not force the magazine shut after load ing If the magazine seems stuck or if it requires more pressure than normal to slide the magazine into it s firing position slide it back out and remove the brads Try slid ing the magazine while emp...

Page 8: ... air source Failure to do so could result in a misfire and possible serious injury to the operator or others in the work area DO NOT operate these pneumatic guns without wearing ANSI approved goggles or safety glasses Be sure that you are not wearing loose fitting clothing or jewelry that could become entangled with the trigger and cause misfires Serious personal injury could result Never attempt ...

Page 9: ...ty air enters your nailer 1 Use an in line system to automatically oil fil ter and dry compressed air Grizzly offers an in line regulator filter water separator lubri cator G2304 Please refer to our catalog for price and ordering information 2 Keep your air filter clean Replace periodi cally 3 Drain compressor s air tank s frequently more often in high humidity This prevents corrosion in the tanks...

Page 10: ...egulator and or in line regulator to ensure that they are set cor rectly Adjust accordingly General CLEANING Keep the nailer nose as clean as possible Dirt and debris have a tendency to work their way into the nailer from the nose Wipe off any dirt that collects on the outside of the nailer before connecting it to the air supply OILING Keep the nailer oiled Use special pneu matic tool oil to keep ...

Page 11: ...teners remaining in the gun 2 Partially unscrew the cap screws that hold the nosepiece cover in place Slide the nose piece cover down and pull it off Figure 5 G1861 Remove the safety tip before removing the nosepiece cover 4 Remove any fasteners lodged in the nailer nose 5 Re attach the nosepiece cover Make sure it lines up properly G1861 Attach the safety tip 6 Load fasteners and connect the nail...

Page 12: ... into the hole wedging and then pulling The cap insert will work its way out Figure 9 5 Reach into the air cylinder with a pair of nee dle nose pliers grasp the tip of the main pis ton unit and pull it out The driver is con nected to the main piston unit 6 Inspect driver condition and repair or replace as necessary 7 Re assemble the nailer 8 Do not put any fasteners into the magazine Connect the a...

Page 13: ...ten the cap screws sequen tially If the cap screws are not tightened evenly the cap will not seat correctly air will leak and the nailer will not function Ensure that the washers are installed under the cap screw heads 4 Check all bolts to make sure they are tight and test the nailer to ensure that it works properly 5 Do not put any fasteners into the magazine Connect the air hose Check for any le...

Page 14: ...tment listed in the General Information Additional information sources are necessary to realize the full potential of of pneumatic nailers Trade journals woodworking magazines and your local library are good places to start WARNING As with all power tools there is danger associat ed with pneumatic nailers staplers Use the tool with respect and caution to lessen the possibility of mechanical damage...

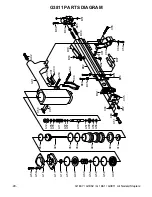
Page 15: ...AGRAM 101 102 103 104 105 106 107 108 109 110 111 118 119 116 117 112 113 120 121 301 122 123 216 217 218 404 403 407 405 401 402 406 201 202 203 204 205 210 206 214 215 207 208 209 302 303 304 429 408 411 413 409 410 414 415 416 418 417 421 422 419 427 425 424 423 ...

Page 16: ...1847209 STEPPED PIN 210 P1847210 SPRING 214 PRP11M ROLL PIN 2 5 x 16mm 215 P1847215 SAFETY LEVER 216 P1847216 SHAFT 217 P1847217 SPRING 218 PEC02M E CLIP 4mm 301 P1847301 NAILER BODY 302 P1847302 O RING 303 P1847303 NIPPLE 304 G2308 AIR FITTING 401 PSB15M CAP SCREW M5 0 8 x 20 402 PLW01M LOCK WASHER 5mm 403 P1847403 DRIVER GUIDE COVER B 404 PSB17M CAP SCREW M4 0 7 x 10 405 P1847405 NOSEPIECE COVER...

Page 17: ...1 214 215 207 208 209 421 427 424 414 416 415 409 413 410 411 412 408 418 417 422 423 419 420 218 426 118 119 116 117 112 113 103 104 105 106 107 108 109 110 111 302 303 304 120 121 122 202 203 204 205 210 206 123 101 102 406 403 405 407 401 402 404 G1852 PARTS DIAGRAM ...

Page 18: ...10 P1847210 SPRING 214 PRP11M ROLL PIN 2 5 x 16mm 215 P1847215 SAFETY LEVER 216 P1847216 SHAFT 217 P1847217 SPRING 218 PEC02M E CLIP 4mm 301 P1847301 NAILER BODY 302 P1847302 O RING 303 P1847303 NIPPLE 304 G2308 AIR FITTING 401 PSB15M CAP SCREW M5 0 8 x 20 402 PLW01M LOCK WASHER 5mm 403 P1847403 DRIVER GUIDE COVER B 404 P1847404 NOSEPIECE 405 PSB41M CAP SCREW M4 0 7 x 14 406 PSB17M CAP SCREW M4 0 ...

Page 19: ...A59 A16 A14 A08 A07 A55 A54 A06 A53 A05 A17 A04 A57 A03 A55 A13 A51 A11 A12 A10 A57 A09 A56 C56 C51 B02 C03 B07 C02 B05 B03 B56 B01 A02 B09 A01 C06 B52 C01 A54 A52 C55 C07 C52 C57 C53 C54 B54 B53 B08 B06 B54 B51 C04 C57 C52 B55 B04 C05 G1861 PARTS DIAGRAM ...

Page 20: ...LW01M LOCK WASHER 5mm A60 P1861A60 O RING KIT B01 P1861B01 NOSEPIECE B02 P1861B02 MAGAZINE UNIT A B03 P1861B03 MAGAZINE UNIT B B04 P1861B04 PUSHER B05 P1861B05 SPRING B06 P1861B06 REAR PLATE B07 P1861B07 FIXED PLATE B08 P1861B08 MAGAZINE LATCH B09 P1861B09 FLAT BAR B51 PSB16M CAP SCREW M4 0 7 x 16 B52 PSB17M CAP SCREW M4 0 7 x 10 B53 PSB18M CAP SCREW M4 0 7 x 8 B54 PLW02M LOCK WASHER 4mm B55 PSS22...

Page 21: ...RAM A53 A12 C56 C07 A01 A02 C02 C01 C03 C53 C54 C06 A55 A55 A11 A57 A57 A10 A57 A09 A56 A56 A05 A51 A52 A03 A04 A17 A59 A58 A16 A13 A14 A54 A08 A07 A55 A54 A54 A06 B09 B05 C58 C51 C52 C04 C05 B51 B06 B07 C59 C60 B52 C61 C55 C08 B10 B04 B51 B08 B05 B03 B53 B02 B01 C57 ...

Page 22: ...811C55 CAP SCREW C56 PLN01M LOCK NUT M4 0 7 C57 P3811C57 LOCK NUT C58 PLW03M LOCK WASHER 6mm C59 P3811C59 CAP SCREW C60 P3811C60 LOCK WASHER C61 P3811C61 LOCK WASHER REF PART DESCRIPTION A01 P3811A01 NAILER BODY A02 G2308 AIR FITTING A03 P1861A03 CYLINDER A04 P1861A04 BUMPER A05 P3811A05 MAIN PISTON UNIT A06 P1861A06 GASKET SET A07 P1861A07 SPRING A08 P1861A08 HD VALVE PISTON A09 P1861A09 COPPER C...

Page 23: ... 1 4 NPT Recommended Lubricating Oil Pneumatic Tool Oil Nailer Weight G1847 3 10 lbs G1852 3 15 lbs G1861 4 20 lbs G3811 3 80 lbs Parts and Accessories A rebuilding kit is available from Grizzly and includes all O rings The rebuilding kit and other parts can be individually ordered through our Service Department Grizzly also carries air hose in line regulator filter water separator lubricator quic...

Page 24: ...cate O Rings and or check for loose screws 9 Nosepiece is misaligned 9 Align nosepiece Nails don t set properly and or nailer 1 Nailer is inadequately lubricated 1 Disassemble and re lubricate does not recover quickly 2 HD valve spring is broken 2 Replace spring 3 Exhaust port is blocked 3 Clean exhaust port Jamming 1 Driver guide is worn 1 Replace guide 2 Fasteners are incorrect size 2 Use recomm...

Page 25: ...izzly shall be tried in the State of Washington County of Whatcom We shall in no event be liable for death injuries to persons or property or for incidental contingent spe cial or consequential damages arising from the use of our products To take advantage of this warranty contact us by mail or phone and give us all the details We will then issue you a Return Number which must be clearly posted on...

Page 26: ...___Other__________________________________________________ 2 Which of the following magazines do you subscribe to ___American Woodworker ___Practical Homeowner ___Cabinetmaker ___Shop Notes ___Family Handyman ___Today s Homeowner ___Fine Homebuilding ___WOOD ___Fine Woodworking ___Wooden Boat ___Home Handyman ___Woodshop News ___Journal of Light Construction ___Woodsmith ___Old House Journal ___Wo...

Page 27: ...INDUSTRIAL INC P O BOX 2069 BELLINGHAM WA 98227 2069 Place Stamp Here TAPE ALONG EDGES PLEASE DO NOT STAPLE Name_______________________________ Street_______________________________ City______________State______Zip______ Send a Grizzly Catalog to a friend ...

Reviews: