


Model H8235 3-Piece Framing/Brad/Palm Nailer Kit
-21
-
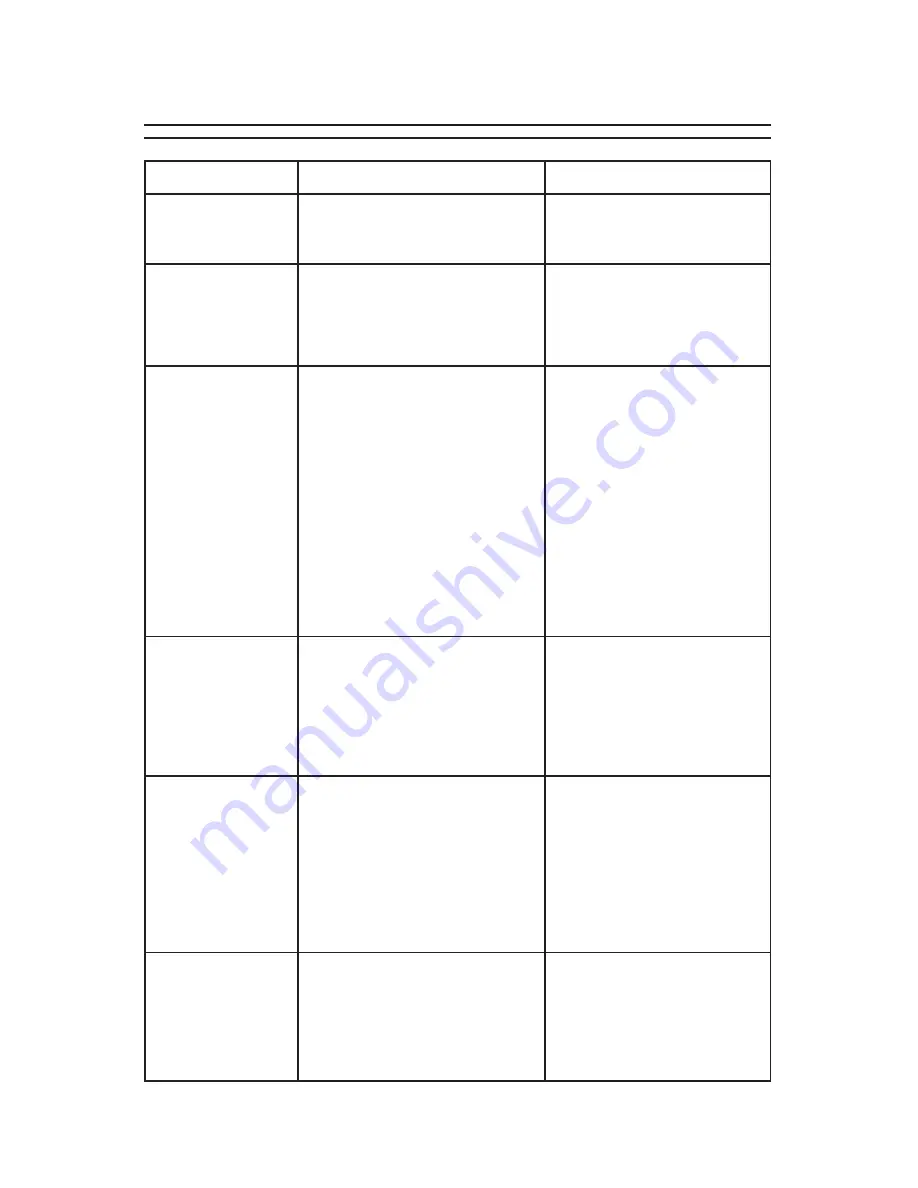
TROUBLESHOOTING
Symptom
Possible Cause
Solution
Air leaking at trig-
ger valve area.
1. O-rings in trigger valve housing
are damaged.
1. O-rings must be replaced
& operation of safety nose
must be checked.
Air leaking.
1. Loose screws in housing.
2. Damaged O-ring(s).
3. Loose air fitting.
4. Damaged housing gasket(s).
1. Tighten screws.
2. Replace O-ring(s).
3. Tighten air fitting & use tef-
lon tape.
4. Replace gasket(s).
Tool skips nails
while discharging.
1. Excessive air pressure.
2. Air leaks.
3. Dirt in nose.
4. Dirt or damage prevents nails
from moving freely in maga-
zine.
5. Inadequate air flow to tool.
6. Worn O-ring on piston or lack
of lubrication.
7. Damaged O-rings on trigger
valve.
8. Worn bumper.
9. Cap seal leaking.
1. Reduce air pressure to tool.
2. Tighten screws and fittings.
3. Clean nose.
4. Clean magazine and
inspect/repair damage.
5. Check fitting, hose, com-
pressor & air pressure.
6. Replace piston O-ring.
Lubricate.
7. Replace trigger valve O-
rings.
8. Replace bumper.
9. Replace cap seal.
Tool runs slowly
or has a loss of
power.
1. Undersized air hose.
2. Nailer is not lubricated.
3. Broken spring in cap assem-
bly.
4. Exhaust port in cap is blocked.
5. Air pressure too low.
1. Use a larger air hose.
2. Lubricate nailer.
3. Replace spring.
4. Clean or replace damaged
internal parts.
5. Increase air pressure.
Fasteners frequent-
ly jam the nailer.
1. Nails are the wrong size.
2. Nails are bent or dirty.
3. Magazine or nose screws are
loose.
4. Driver or driver guide are worn
or damaged.
5. Nails are wrong angle.
1. Use correct nails.
2. Use undamaged, clean
nails.
3. Tighten magazine.
4. Replace worn or damaged
parts.
5. Use correct angle nails.
Nailer does not fire. 1. Nailer is not lubricated.
2. Nail is jammed in magazine or
discharge area.
3. Piston shaft is damaged.
4. Air pressure too low.
1. Lubricate nailer.
2. Clear nailer magazine or
discharge area.
3. Replace piston shaft.
4. Check/increase air pres-
sure.


