-24-
Model G0833P (Mfd. Since 06/17)
14. Install saw blade as outlined in Blade
Installation on Page 33.
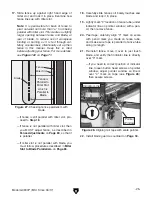
15. Place fence on rails (on right hand side of
blade, as shown in
Figure 26).
Note:
Make sure cam foot contacts cam on
fence lock handle before you place fence on
rail; otherwise, fence will not lock onto rail
tube.
Figure 26. Fence installed on rails.
Cam
Foot
12. Attach rear rail to holes on main table using
(2) M10-1.5 x 25 cap screws, 10mm lock
washers, and 10mm flat washers, as shown
in
Figure 25. Check to make sure rear rail is
parallel to table and below miter slots before
completely tightening cap screws.
13. Secure rear rail to extension wings with (2)
M8-1.25 x 35 cap screws, (4) 8mm flat wash-
ers, (2) 8mm lock washers, and (2) M8-1.25
hex nuts (see
Figure 25).
Figure 25. Rear rail installed.
x 2
x 2
Rear Rail
10. Install front rail tube onto front rail with (5)
M6-1 x 16 cap screws, 6mm flat wash-
ers, and 6mm lock washers, as shown in
Figure 24. Finger-tighten fasteners.
Figure 24. Front rail tube attached to front rail.
11. While standing at front of table, pull rail tube
toward you as far as possible, then final
tighten fasteners installed in
Step 10. This
will help make sure there is enough room for
fence to slide.
Front Rail Tube
x 5
16. Adjust foot at rear of fence so that gap
between fence and table top is even from
front to back.
Cam
Summary of Contents for Polar Bear G0833P
Page 92: ......


