background image

-2-

Model T10157 (Mfd. Since 07/19)

Inventory

NOTICE

If you cannot find an item on this list, check 

the mounting location on the workbench or 

examine the packaging materials carefully. 

Some items are pre-installed for shipping 

purposes.

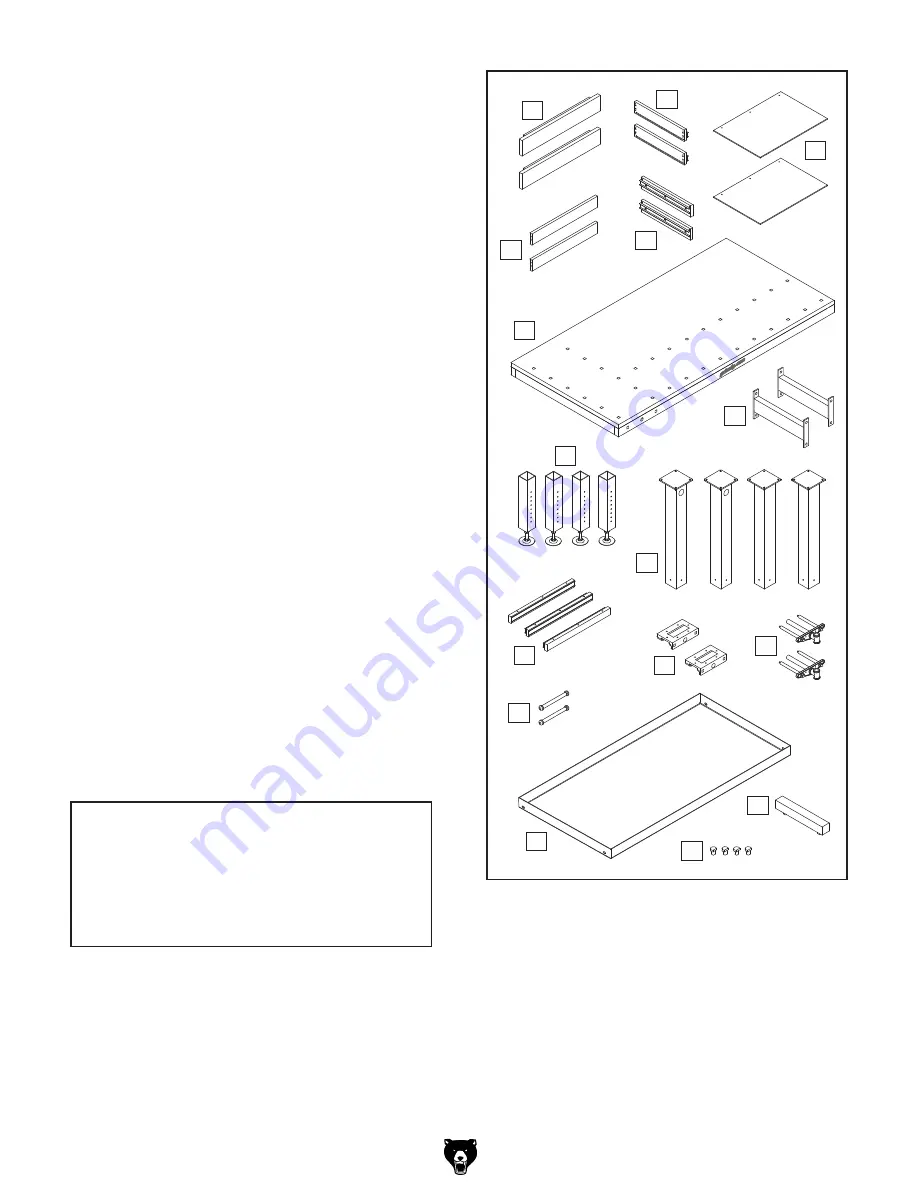
Inventory (Figure 2) 

Qty

A.  Front Drawer Panels ................................... 2

B.  Right Drawer Panels .................................. 2

C.  Bottom Drawer Panels ............................... 2

D.  Back Drawer Panels ................................... 2

E.  Left Drawer Panels ..................................... 2

F.  Workbench Top .......................................... 1

G.  Leg Supports .............................................. 2

H.  Lower Legs ................................................. 4

I.  Upper Legs ................................................. 4

J.  Drawer Support Assemblies ....................... 3

K.  Leadscrew Plates ....................................... 2

L.  Vise Assemblies ......................................... 2

M.  Wooden Handles ........................................ 2

N.  Bottom Shelf ............................................... 1

O.  Bench Stop Bar .......................................... 1

P.  Bench Dogs ................................................ 4

The following is a list of items shipped with your 
workbench.  Before  beginning  setup,  lay  these 
items out and inventory them.

If  any  non-proprietary  parts  are  missing  (e.g.  a 
nut or a washer), we will gladly replace them; or 
for the sake of expediency, replacements can be 
obtained at your local hardware store.

Figure 2. Inventory.

Fasteners (Not Shown) 

Qty

Q.  Wood Dowels ........................................... 22

R.  Wood Screws #8 x 1

1

4

" ............................ 22

S.  Hex Bolts 

5

16

"-18 x 

3

4

" .............................. 20

T.  Flat Washers 

5

16

" ...................................... 20

U.  Lag Screws 

5

16

" x 1" ................................. 16

V.  Wood Screws #10 x 1

1

2

" ............................ 9

W.  Wood Screws #8 x 1" ............................... 20

A

B

C

D

E

F

G

H

I

J

K

L

M

N

O

P

Summary of Contents for T10157

Page 1: ...teel legs with leveling foot pads Two oak faced vises with 4 leadscrew travel 13 wide x 2 thick and one removable top plate Four bench dogs and a bench stop bar All wood surfaces finished with durable lac quer Overall dimensions 62 wide x 30 in depth x 32 39 tall Weight 110 lbs For questions or help with this product contact Tech Support at 570 546 9663 or techsupport grizzly com MODEL T10157 HEAV...

Page 2: ...ies 3 K Leadscrew Plates 2 L Vise Assemblies 2 M Wooden Handles 2 N Bottom Shelf 1 O Bench Stop Bar 1 P Bench Dogs 4 The following is a list of items shipped with your workbench Before beginning setup lay these items out and inventory them If any non proprietary parts are missing e g a nut or a washer we will gladly replace them or for the sake of expediency replacements can be obtained at your lo...

Page 3: ...Model T10157 Mfd Since 07 19 3 USE THIS CHART TO MATCH UP HARDWARE DURING THE INVENTORY AND ASSEMBLY PROCESS 5mm 5mm Flat Head Cap Screw Hardware Recognition Chart ...

Page 4: ...ght Drawer Panel Front Drawer Panel 4 Install 2 wood dowels in rear holes of right drawer panel then press back drawer panel onto wood dowels see Figure 6 Figure 4 Tapered end of drawer slide right drawer panel shown Tapered End Back Drawer Panel x 2 Figure 6 Installing back drawer panel Assembly Items Needed Qty Wood Glue As Needed 90 Square 1 Phillips Screwdriver 2 1 Another Person 1 Wrench or S...

Page 5: ...eft and right drawer panels to back and front drawer panels with 8 8 x 11 4 wood screws see Figure 9 Figure 9 Securing left and right drawer panels to front and rear drawer panels x 3 Figure 10 Upper and lower leg x 8 Upper Leg Lower Leg 9 Repeat Steps 1 8 for second drawer 10 With assistance from another person place workbench top upside down on flat protected surface 11 Slide lower legs into upp...

Page 6: ... drawer support assemblies x 6 Drawer Support Assembly x 9 Figure 12 Leg assemblies Note In next step orient legs so bottom shelf hole in each leg will face inward as shown in Figure 11 x 8 Leg Support Leadscrew Holes Bottom Shelf Hole 1 of 4 Note In next step legs must also be ori ented so one leadscrew hole faces to side and other faces front see Figure 12 This is necessary to properly install v...

Page 7: ...s shown in Figure 16 Note You can install shelf with lip facing up or down 22 Install drawers then insert bench stop bar and bench dogs into workbench top to finish assembly Note Left and right drawers are different If they do not fit switch their positions Figure 16 Bottom shelf installed x 4 Bottom Shelf 20 Remove caps from wooden handles insert handles through ends of vise assemblies then glue ...

Page 8: ...15L PT10157015L FRONT LEFT DRAWER PANEL V2 01 10 33 PT10157033 UPPER LEFT LEG W O LEADSCREW HOLE 15R PT10157015R FRONT RIGHT DRAWER PANEL V2 01 10 33 1 PT10157033 1 UPPER RIGHT LEG W O LEADSCREW HOLE 16V2 PT10157016V2 DRAWER PANEL LEFT V2 01 10 34V2 PT10157034V2 VISE ROD 15 8MM M12 V2 07 19 17V2 PT10157017V2 DRAWER PANEL RIGHT V2 01 10 35V2 PT10157035V2 FLAT WASHER 8 5 X 24 X 1 4 V2 07 19 18V2 PT1...

Reviews: