background image

-12-

model t10432 (mfg. since 11/10)

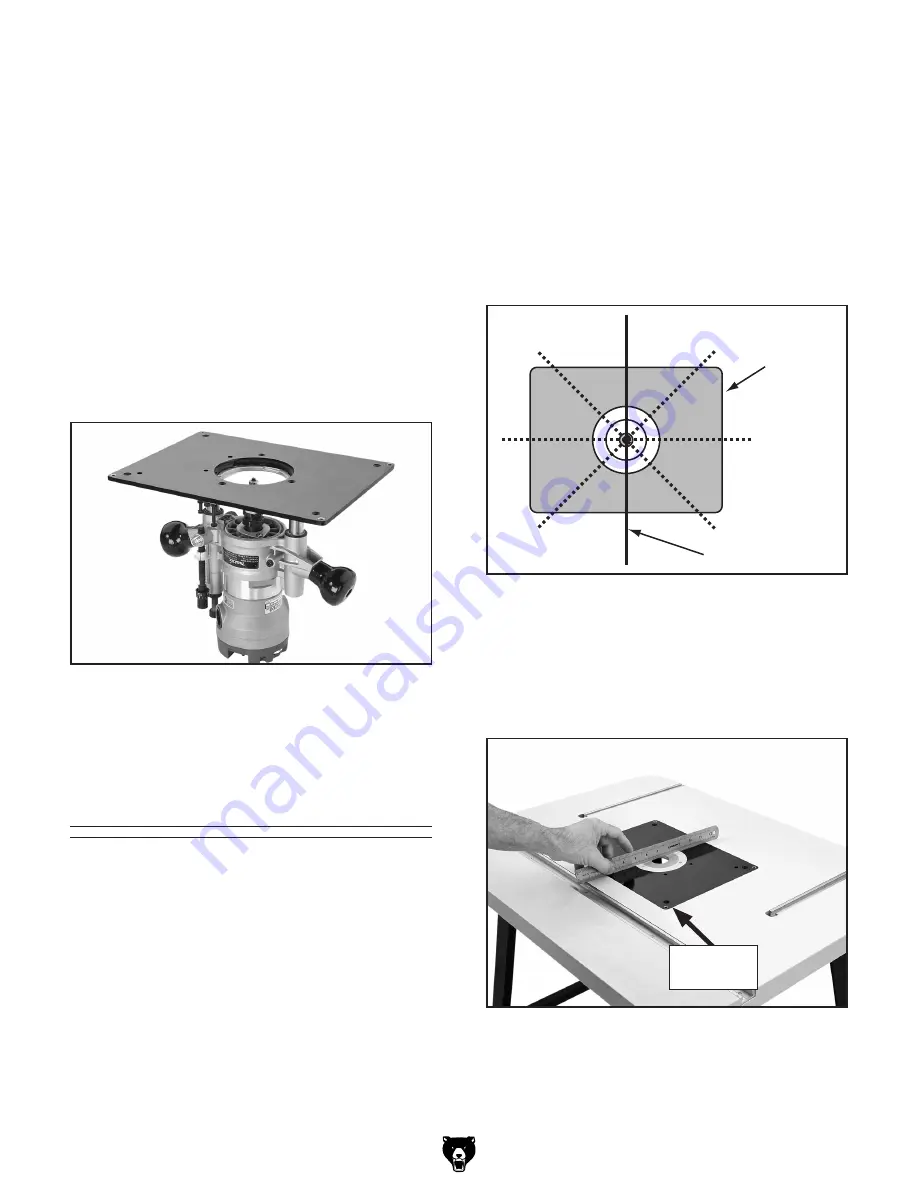
Aligning Router 

Mounting Board

To align the router mounting board and table 

inserts even with the table:

1.  disConneCt router From poWer!

2.  remove the fence assembly from the table.

3.  lay the straightedge across the router mount-

ing  board  and  table  inserts  in  a  star  pattern 
(see 

figure  13)  so  that  both  ends  are  over 

the table.

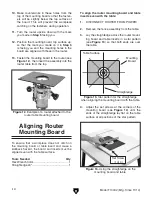
Straightedge

Mounting

Board

Table Surface

figure 13. star pattern for the straightedge 

when aligning the mounting board with the table.

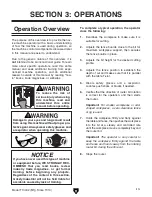
4.  adjust  the  set  screws  at  the  corners  of  the 

mounting  board  (see 

figure  14)  until  the 

ends of the straightedge lay flat on the table 
surface at all positions of the star pattern.

10.  make  countersinks  in  these  holes  from  the 

top of the mounting board so that the fasten-
ers  will  be  slightly  below  the  top  surface  of 
the  board.  this  will  prevent  the  workpiece 
catching on the fasteners during operation.

11.  turn  the  router  upside  down  with  the  mark 

you made in 

Step 5 facing you.

12.  position the mounting board, top surface up, 

so  that  the  mark  you  made  on  it  in 

Step  3 

is  facing  you  and  the  mounting  holes  in  the 
board are aligned with those in the router.

13.  Fasten the mounting board to the router (see 

figure 12), then insert the assembly into the 
router table from the top.

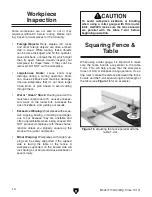
figure 12. example of a router attached to the 

router table mounting board.

to  ensure  that  a  workpiece  does  not  catch  on 
the  mounting  board  or  table  insert  and  cause  a 
kickback  hazard,  the  board  and  inserts  must  be 
aligned even with the table surface.

Tools Needed 

Qty

hex Wrench 3mm .............................................. 1
straightedge 24" ................................................ 1

figure 14. using the straightedge on the 

mounting board and table.

set screw

(1 of 4)

Summary of Contents for T10432

Page 1: ...anual Copyright January 2011 By Grizzly Industrial Inc Warning No portion of this manual may be reproduced in any shape Or form without the written approval of Grizzly Industrial inc For models manufactured SINCE 11 10 TSJB13636 printed IN CHINA ...

Page 2: ...ng grinding tool integrity and the usage of personal protective equipment The manufacturer will not be held liable for injury or property damage from negligence improper training machine modifications or misuse Some dust created by power sanding sawing grinding drilling and other construction activities contains chemicals known to the State of California to cause cancer birth defects or other repr...

Page 3: ...d the entire SETUP section in this manual to make sure the person making the modification is capable of performing the required tasks and to make sure that your router is firmly secured to the router mounting board INTRODUCTION 2 Manual Accuracy 2 Contact Info 2 Router table Description 2 Specifications 3 SECTION 1 SAFETY 4 Safety Instructions for Machinery 4 Additional Safety for Router Tables 6 ...

Page 4: ...y not exactly match the manual If you find this to be the case and the dif ference between the manual and machine leaves you in doubt check our website for the latest manual update or call technical support for help Before calling find the manufacture date of your machine by looking at the date stamped into the machine ID label see below This will help us determine if the manual version you receiv...

Page 5: ...Width Height 321 2 x 243 4 x 341 2 Shipping Dimensions Type Cardboard Weight 62 lbs Length Width Height 38 x 26 x 6 Main Specifications Maximum Table Opening Size 37 8 Number of Table Inserts 2 Table Insert Inside Openings 11 4 25 8 Fence Board Size x 2 18 x 6 Number of T Slots Per Fence Board 1 Number of Table T Slots 1 T Slot Size 3 4 x 3 4 Dust Port Size 21 2 Other Specifications Country Of Ori...

Page 6: ...operate under the influence of drugs or alcohol when tired or when distracted OWNER S MANUAL Read and understand this owner s manual BEFORE using machine Untrained users can be seriously hurt EYE PROTECTION Always wear ANSI approved safety glasses or a face shield when operating or observing machinery to reduce the risk of eye injury or blindness from flying particles Everyday eyeglasses are not a...

Page 7: ...RECTION Unless otherwise noted feed work against the rotation of blades or cutters Feeding in the same direction of rotation may pull your hand into the cut FORCING MACHINERY Do not force machine It will do the job safer and better at the rate for which it was designed GUARDS COVERS Guards and covers can protect you from accidental contact with moving parts or flying debris Make sure they are prop...

Page 8: ...ould cause serious personal injury BLIND CUTTING Keep the router bit on the underside of the workpiece when making blind cuts This will decrease the risk of accidental con tact with the rotating bit ROUTER BIT ROTATION Always feed the workpiece against the rotation direction of the bit Otherwise the workpiece could be aggressively pulled from your hands drawing them into the spinning bit ROUTER BI...

Page 9: ...1 Needed for Setup Your router table was carefully packaged for safe transportation Remove the packaging materials from around your router table and inspect the contents If you discover the router table is dam aged please immediately call Customer Service at 570 546 9663 for advice Save the containers and all packing materials for possible inspection by the carrier or its agent Otherwise filing a ...

Page 10: ...or a washer we will gladly replace them or for the sake of expediency replacements can be obtained at your local hardware store NOTICE If you cannot find an item on this list check the mounting location on the machine or the packaging materials Sometimes parts are pre installed for shipping or they become hidden by packaging materials O Hardware Not Shown Hex Bolts M6 1 x 18 Table Braces 4 Fender ...

Page 11: ...s attached to the underside of the table 3 Attach the long bottom stand braces to the legs with 8 M8 1 25 x 10 carriage bolts 8mm flat washers and M8 1 25 hex nuts as shown in Figure 4 4 Attach the short bottom stand braces with the remaining 8 M8 1 25 x 10 carriage bolts 8mm flat washers and M8 1 25 hex nuts as shown in Figure 5 5 Install the 4 rubber feet onto the ends of the legs Turn the stand...

Page 12: ...ots on the fence board faces position them towards the center slide the router guard over the bolts then secure it in place with the 2 6mm flat washers and M6 1 tri knobs as shown in Figure 8 10 Slide the dust port onto the dust port housing then attach the assembly to rear of the fence support with the 2 M5 8 x 55 Phillips head screws as shown in Figure 9 DO NOT operate the attached router withou...

Page 13: ...e down and position it so that it is facing you in the same orientation that it will face the front of the router table 5 Make marks on the base and the router to guide you when mounting the router so that it will correctly face the front of the router table 6 Remove the router base from the router 7 Turn the router table mounting board upside down center the router base on the board so that the m...

Page 14: ... the mounting board so that the fasten ers will be slightly below the top surface of the board This will prevent the workpiece catching on the fasteners during operation 11 Turn the router upside down with the mark you made in Step 5 facing you 12 Position the mounting board top surface up so that the mark you made on it in Step 3 is facing you and the mounting holes in the board are aligned with ...

Page 15: ...y glasses and a respirator Locates push sticks or blocks if needed 6 Verifies that the direction of router bit rotation is correct for the operation and then starts the router Important For smaller workpieces or odd shaped workpieces a zero clearance fence or jig is used 7 Holds the workpiece firmly and flatly against thetableandfence thenpushestheworkpiece into the bit at a steady and controlled ...

Page 16: ...ve Warping Workpieces with exces sive cupping bowing or twisting are danger ous to cut because they are unstable and often unpredictable when being shaped DO NOT process workpieces with these charac teristics unless you properly square up the stock with a jointer and planer Minor Warping Workpieces with slight cup ping can be safely supported if the cupped side is facing the table or the fence A w...

Page 17: ...traightedge Shim Outfeed Fence Board Straight Router Bit Infeed Fence Board Top View Figure 16 Fence setup for edge jointing guard removed for clarity 6 Place a straightedge against the outfeed fence board then adjust the fence assembly so that the straightedge is also against the bit flute as illustrated in Figure 16 7 Make sure the fence boards are parallel with the table T slot lock the fence a...

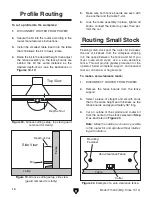
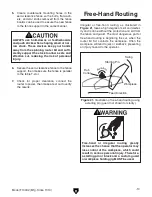
Page 18: ...n place tighten all knobs connect the router to power then per form the cut Routing Small Stock Feeding small stock past the router bit increases the risk of kickback from the workpiece slipping into the space between the fence and bit If you must route small stock use a zero clearance fence This will provide greater protection for the operator better workpiece support and reduced tear out on narr...

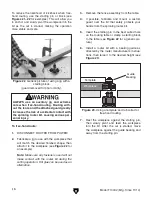
Page 19: ...uter to power then make a test cut to verify the results Free Hand Routing Irregular or free hand routing as illustrated in Figure 21 takes a high degree of skill and dexter ity and is done without the protection and aid from the fence and guard The most dangerous part of free hand routing is beginning the cut when the router bit first contacts the workpiece Often the workpiece will tend to jerk o...

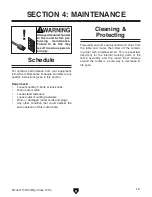
Page 20: ...attach it to the workpiece see Figure 22 for an example Note Make sure any fasteners used will not make contact with the router bit during the cutting operation Hot glue can be used as an alternative 3 Remove the fence assembly from the table 4 If possible fabricate and mount a custom guard over the bit that safely protects your hands from the spinning router bit 5 Insert the starting pin in the b...

Page 21: ...cords and plugs Any other condition that could hamper the safe operation of this router table Schedule Always disconnect power to the router before per forming maintenance Failure to do this may result in serious person al injury Cleaning Protecting Frequently vacuum sawdust and wood chips from the table and router then blow off the remain ing dust with compressed air This is especially important ...

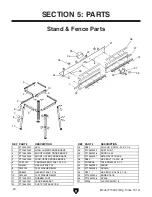
Page 22: ...NOB 1 4 20 4 PT10432004 SHORT UPPER CROSS BRACE 27 PT10432027 MITER SLOT TRACK 5 PT10432005 LONG UPPER CROSS BRACE 28 PB05 HEX BOLT 1 4 20 X 3 4 6 PCB11M CARRIAGE BOLT M8 1 25 X 12 31 PHTEK38 TAP SCREW 4 X 1 2 7 PN03M HEX NUT M8 1 25 32 PT10432032 FENCE 8 PW01M FLAT WASHER 8MM 33 PT10432033 GUARD 9 PB83M HEX BOLT M6 1 X 16 34 PB11 HEX BOLT 5 16 18 X 1 1 2 10 PW03M FLAT WASHER 6MM 35 PT10432035 KNO...

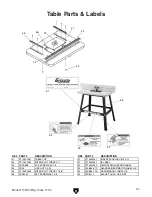
Page 23: ...T10432047 INSERT W GUIDE PIN 9 X 12 42 PT10432042 MITER SLOT TRACK 32 51 PT10432051 ID LABEL 43 PHTEK38 TAP SCREW 4 X 1 2 52 PT10432052 AMPUTATION HAZARD LABEL 44 PN05 HEX NUT 1 4 20 53 PLABEL 57C GLASSES RESPIRATOR LABEL HS 45 PT10432045 MITER SLOT TRACK 11 3 4 54 PLABEL 12D READ MANUAL LABEL HS 46 PSS02M SET SCREW M6 1 X 6 55 PPAINT 7 BLACK TOUCH UP PAINT ...

Page 24: ... 22 Model T10432 Mfg Since 11 10 ...

Page 25: ...r metalworker ____ 0 2 Years ____ 2 8 Years ____ 8 20 Years ____20 Years 6 How many of your machines or tools are Grizzly ____ 0 2 ____ 3 5 ____ 6 9 ____10 7 Do you think your machine represents a good value _____Yes _____No 8 Would you recommend Grizzly Industrial to a friend _____Yes _____No 9 Would you allow us to use your name as a reference for Grizzly customers in your area Note We never use...

Page 26: ...D LINE FOLD ALONG DOTTED LINE GRIZZLY INDUSTRIAL INC P O BOX 2069 BELLINGHAM WA 98227 2069 Place Stamp Here Name_______________________________ Street_______________________________ City______________State______Zip______ Send a Grizzly Catalog to a friend ...

Page 27: ...e tried in the State of Washington County of Whatcom We shall in no event be liable for death injuries to persons or property or for incidental contingent special or consequential damages arising from the use of our products To take advantage of this warranty contact us by mail or phone and give us all the details We will then issue you a Return Number which must be clearly posted on the outside a...

Page 28: ...Buy Direct and Save with Grizzly Trusted Proven and a Great Value Since 1983 ORDER 24 HOURS A DAY 1 800 523 4777 Visit Our Website Today For Current Specials ...

Reviews: