-32-
Model T32339 (Mfd. Since 03/21)
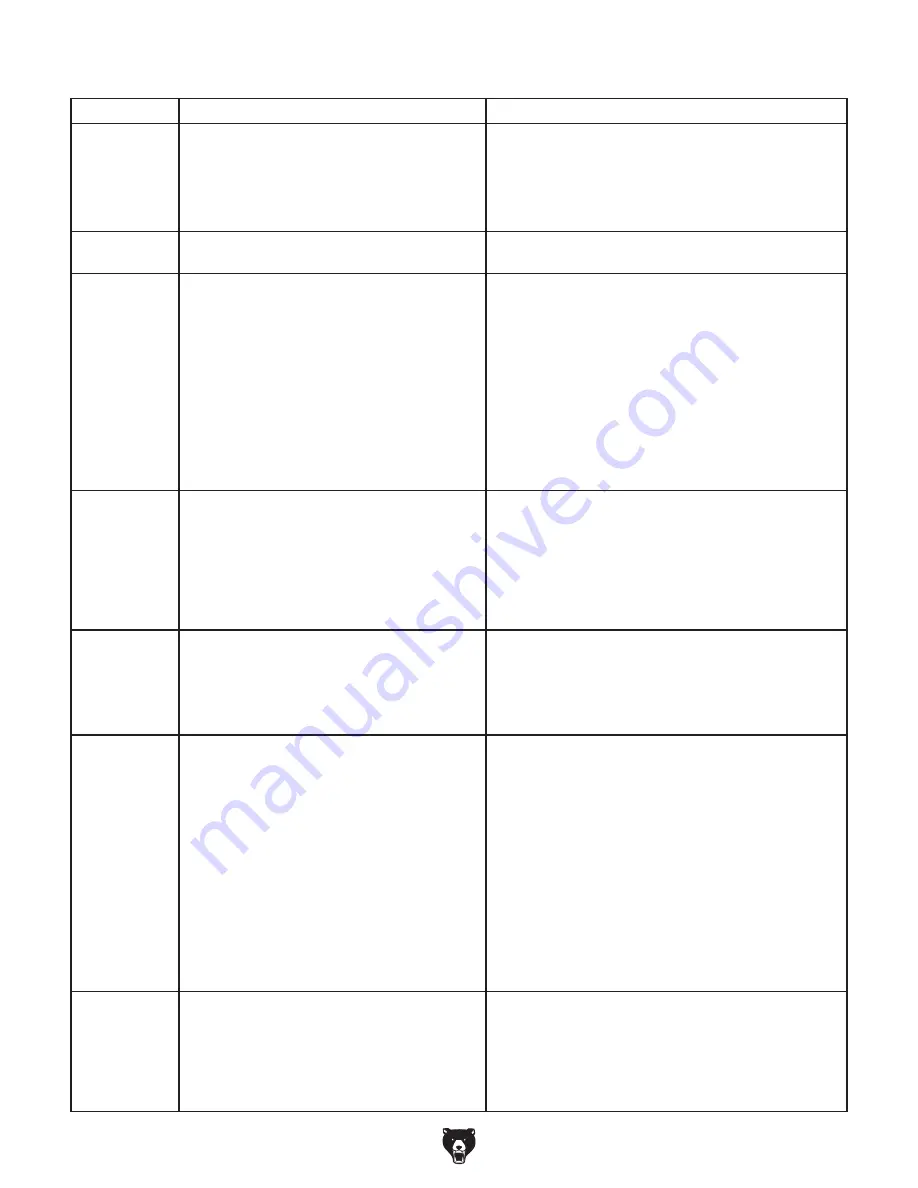
Symptom
Possible Cause
Possible Solution
Low pressure
in tank, or
tank pressure
drops after
compressor is
turned
OFF.
7. Pressure relief valve releasing below 125
PSI.
8. Gasket(s) leaking.
9. Worn pump piston rings.
7. Replace pressure relief valve.
8. Check gaskets on cylinder head assemblies, repair or
replace as needed.
9. Inspect and replace pump piston rings.
Air leaks from
air filter(s).
1. Check valve components are dirty/damaged.
2. Reed valve(s) not sealing.
1. Clean/replace check valve components (
Page 33).
2. Remove cylinder head and replace reed valve(s).
Compressor
does not build
pressure, or
does not reach
full pressure.
1. Drain valve is open.
2. Tank needs to be drained.
3. Air filter(s) dirty/clogged.
4. Air leak in tank or delivery pipes.
5. Check valve components are dirty/damaged.
6. Reed valve(s) not sealing.
7. Head gasket or valve body gasket leaking.
8. Worn pump piston rings.
9. Broken crankshaft or connecting rod.
1. Close drain valve.
2. Open drain valve to drain condensation, then close.
3. Replace air filter(s) (
Page 26).
4. Check air tank, pipes, and all connections for leaks
(
Page 28). Do not attempt to repair leaking/damaged
tank, only replace.
5. Clean/replace check valve components (
Page 33).
6. Remove cylinder head and replace reed valve(s).
7. Remove cylinder head and replace gasket(s).
8. Inspect and replace pump piston rings.
9. Replace or rebuild compressor pump.
Air tools have
oily discharge.
1. Tank needs to be drained.
2. Too much oil in crankcase.
3. In-line oiler is out of adjustment (if used).
4. In-line filter is damaged or missing (if used).
5. Crankcase oil is not correct type.
6. Compressor pump at fault.
1. Open drain valve to drain condensation, then close.
2. Drain oil to proper level (
Page 25).
3. Adjust in-line oiler drip ratio or use correct viscosity oil.
4. Replace filter or in-line filter assembly.
5. Drain and replace with correct oil (
Page 25).
6. Worn compressor piston, rings, or valves. Rebuild or
replace pump.
Air tools
have watery
discharge or
get cold and
freeze up with
ice during use.
1. Tank needs to be drained.
2. In-line water separator is full (if used).
3. Ambient environment has too much humidity.
1. Open drain valve to drain condensation, then close.
2. Drain water separator.
3. Install in-line air dryer and water separator.
Air tool has low
supply pressure
but compressor
has sufficient
air pressure.
1. Air hose is too long.
2. Regulator needs to be adjusted for higher
airflow delivery.
3. Machine is undersized.
4. In-line filter is damaged or clogged (if used).
5. In-line water separator is full (if used).
6. Pressure switch cut-in/cut-out settings have
been adjusted incorrectly.
7. Air leaks in hose.
8. Regulator at fault.
9. Pressure gauge(s) at fault.
1. Use shorter hose.
2. Turn regulator knob clockwise to increase line PSI. DO
NOT exceed pressure rating of attached tool.
3. Use smaller attachment tool or larger air compressor.
4. Replace filter or in-line filter assembly.
5. Drain water separator.
6. Adjust settings (
Page 35). Do not exceed cut-in/cut-
out pressures listed on data sheet (
Page 6) or inside
pressure switch.
7. Check air hoses and all connections for leaks
(
Page 28).
8. Inspect regulator for leaks. Replace if at fault.
9. Replace pressure gauge(s).
Safety relief
valve leaks.
1. Pressure switch cut-in/cut-out settings have
been adjusted incorrectly.
2. Safety relief valve at fault.
3. Pressure switch at fault.
1. Adjust settings (
Page 35). Do not exceed cut-in/cut-
out pressures listed on data sheet (
Page 6) or inside
pressure switch.
2. Test/replace.
3. Turn compressor
OFF, disconnect from power, and
empty tank. DO NOT USE until switch is replaced.
Operation (Cont.)
Summary of Contents for T32339
Page 48: ......

