background image

  Click Save to save the software installer to 

your preferred directory or click Run to the run 
the software installer immediately.  

  Run the installer and follow the prompts to 

install and configure your Softphone.  

  Once you have installed Softphone, you see a 

shortcut on your desktop.  

  Double-click the shortcut icon to launch 

Softphone. The Softphone interface appears, 
as shown here:  


QuickTime™ and a

TIFF (Uncompressed) decompressor

are needed to see this picture.


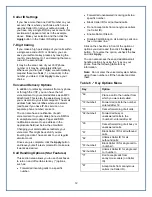
Use the Softphone as you would your ATA or IP 
phone. Use the mouse to click on the numbers you 
want to dial. See the following table for information 
on the Softphone keys.


Table 7 - Softphone Keys  

Key 

Function  

A  

Click here to get a dial tone or to make a 
call if you have already entered the 
number you wish to call. 

B  

Click here to use line one out of a possible 
two.  

C  

Click here to use line two out of a possible 
two.  

D  

Click here to adjust the microphone 
volume. This is the volume at which the 
outside caller hears you speak.  

E  

Click here to mute your voice so that the 
outside caller cannot hear you.  

F  

d # 

Click here to dial numbers, and the * an
keys.  

G  

re to turn off either your computer 

Click he
speakers or the USB phone speakers. If 
you use this option, you will not be able to 
hear the outside caller speak.  

H  

ch 

Click here to adjust the volume at whi
you hear the outside caller speak.  

I  

Click here to show and configure device 
settings.  

J  

Click here to launch the VCP.  

K  

Click here to show your call list.  

L  

Click here to end the call.  

M  

Click here to redial the last dialed number.  

N  

Click here to clear the last dialed digit.  

O  

Click here to close the Softphone 
application.  

P  

Click here to display version information 
about the Softphone application.  


For Further Information 

If you have other questions about your VoIP 

15 


service, please contact us. 

Summary of Contents for Single-User VoIP Service

Page 1: ...Single User VoIP Service User Manual Version 20080501 Revised 20110202...

Page 2: ...ys 15 For Further Information 15 Your VoIP Service Congratulations You have chosen Voice over Internet service VoIP to serve your telecommunications needs To use your VoIP service you will use the tou...

Page 3: ...Up and Use To set up your voicemail use the pa 123456 After you log in the first time you will have the option to change your password You can set up your voicemail box from any of the following types...

Page 4: ...7 Delete the message not available for previously deleted messages 9 Save the message not available for previously deleted and saved messages 00 Forward the message to a mailbox Return to the Main men...

Page 5: ...ive you information about and control over your account Account change your account information or password Call Activity view and or export the calls you have made and received Voicemail listen to sa...

Page 6: ...the CallBlast tab View and manage your voicemail using the Voicemail tab View and export all your calls from the Call Activity tab Account Tab The Account tab appears by default when you login to the...

Page 7: ...ime From Number To Number call Duration and Type Incoming Outgoing Missed From this page you can review particular calls by the following process Choose what Call Type you want to view All Incoming Ou...

Page 8: ...mail option or by saving the MP3 file that s played in the above point Delete unwanted voicemail messages they will disappear overnight Set up delivery of voicemail to your email or notification of vo...

Page 9: ...ne ring begin ringing 5039141310 and ring that for 4 rings before stopping 3 If neither phone has picked up after two rings begin ringing 3108614708 and ring that for 3 rings before stopping Warning i...

Page 10: ...IP line that CallBlast waits before launching a call to the CallBlasted number s Zero is recommended for your Primary VoIP phone Note It takes 1 2 rings for a mobile phone to begin ringing even if you...

Page 11: ...rther customize various settings and features including 7 Digit Calling set up Voicemail Settings Enhanced Services Settings e g Do Not Disturb or Disable Call Waiting and the Time Zone used to time s...

Page 12: ...This might be useful if you are traveling and don t have access to your regular email account Once set up is complete click the Apply button and leave yourself a test voicemail to make sure it works...

Page 13: ...change your time zone select a new time zone from the drop down menu and click Apply You can also see your time zone on the Account tab but cannot change it from there 911 Info Tab The 911 Info tab s...

Page 14: ...n on potential limitations of this 911 feature including the differences between the VoIP 911 feature and traditional 911 service Great Options Downloads Tab From the Great Options tab you can downloa...

Page 15: ...ut of a possible two C Click here to use line two out of a possible two D Click here to adjust the microphone volume This is the volume at which the outside caller hears you speak E Click here to mute...

Reviews: