background image

33

34

DETECTOR MODES

Ground Grab

All soils contain minerals. Signals from ground minerals interfere with the signals from 
metal objects.  All soils differ, and can differ greatly, in the type and amount of ground 
minerals present. This detector incorporates ground balancing algorithms which elimi-
nate interference caused by the ground minerals found in most soils. We therefore rec-
ommend that you use GROUND GRAB to most accurately calibrate the detector to the 
specific ground conditions where you are hunting.
This process will maximize the detector’s target identification accuracy and depth detec-
tion capability. 
The Steps is as follows:
1. Find a patch of ground which is free of metal. Use the DISCRIMINATION mode, with no targets discriminated out.
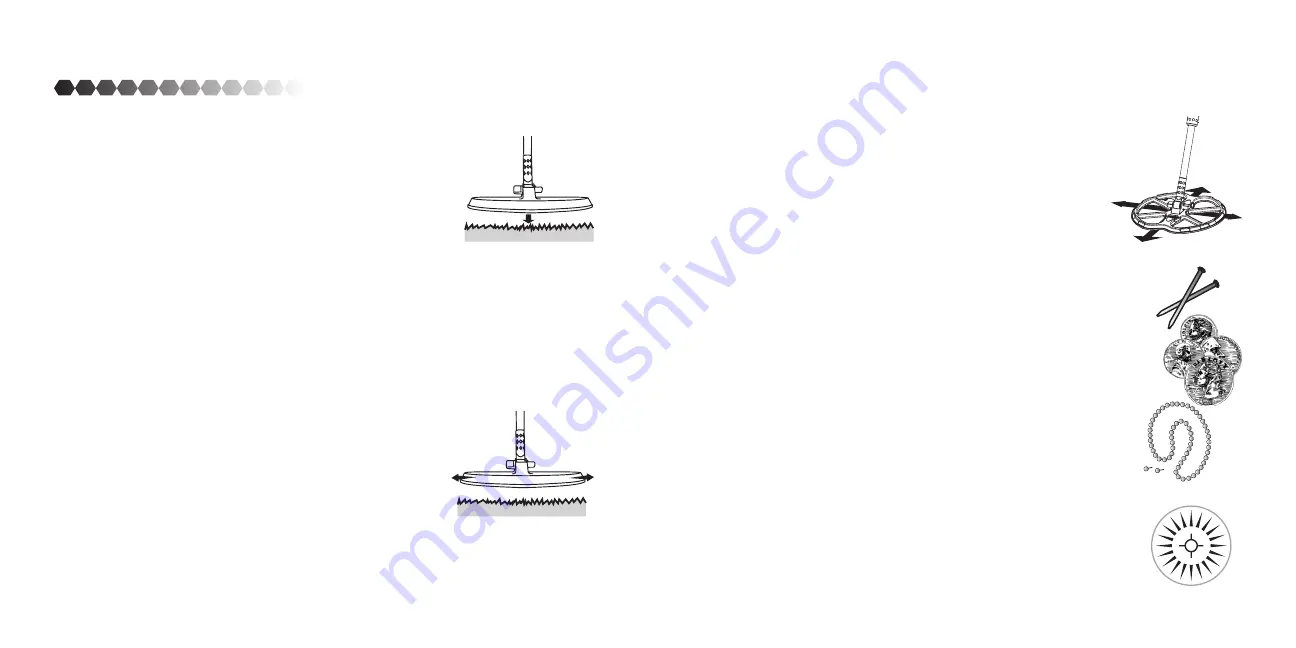
2. Hold the detector with the search coil about 6 inches above the ground ,then press G Grab button to activate ground 
     grab process, then lower the coil down to within 2 inches off the ground.
3. Repeat to lift up and lower down the search coil for several times until the LCD shows “GRAB OK”.
If ‘GRAB ER’ appears, maybe the ground is too dirty with metal trash or just wet salt soil. Find another clean place ground 
grab again till it is grab ok. Ground grab results is crucial to the performance of PP mode.

Discrimination 

Pick the discrimination mode you want to detect in. Keep the coil parallel to the ground 
moving it from left to right with a stable speed. Out of the metals highlighted it will cat-
egorize the metal detected so you are aware of what metal is buried. It will inform you 
in two ways; 1. by highlighting the metal detected and 2. a tone response.
Discrimination identification accuracy can be influenced by moisture and temperature. 
The coil sweeping speed can also affect discrimination, generally faster sweeping mo-
tion has a higher sensitivity.

Pinpointing 

Pinpoint does a narrow search that will give you the exact location of a buried object.  It will identify an object by a signal 
and tone response.  Hold the trigger to activate the pinpoint function.  Once activated, sweep the coil over the target 
area in an “X” pattern.  Make a visual note of the place on the ground where the strongest signal is identified.  Then dig 

in the center of the “X.”  When the trigger is released the metal detector will return back to 
the previous mode. NOTE: Normally,the detector takes about 5 minutes to stabilize after it 
powers on, it is not recommended to do pinpointing during this period of time.  The sensi-
tivity of detector will drift over time. If sensitivity drifts upward,the detector will sound off 
spontaneously. If sensitivity drifts downward,the detector will become less sensitive. Drift 
is exacerbated by the environment condition change especially the temperature change. 
so, in case the sensitivity drifts , you can try Ground Grab again.

Notch Modes 

When in Notch there are four options:

           All Metals:

 Use this mode if you are looking for a wide range of objects. It is designed to 

           find all metal objects. 

           Coin:

 When using this mode it will show you the metals found in coins. It is designed to find 

           all types of coins and eliminate trash objects such as iron and foil.

            Jewelry:

 When in this mode it will show you the metals common in jewelry. It is designed 

           to find jewelry such as rings, bracelets, watches and necklaces.
             

Custom:

 Use this mode if you want to choose the specific metals to search for . It is designed 

           for you to find certain metal objects that you programmed it to. 
When an object is detected it will highlight the name of the metal found as well as use a tone 
that identifies the metal.

GPS

The GPS mode allows you to save certain locations that you are wanting to return to later. The 
farthest it will read you from your saved location is 999 yds. The closer you get to the saved spot 
the lower the number will go, 000 yds means you’ve reached your spot. NOTE: While in use, please 
keep the control box away from metal objects or magnetic materials because those objects affect 
the accuracy of its internal compass. 

Summary of Contents for MX400 Stryker Lite

Page 1: ... E T E C T O R 602 Fountain Parkway Grand Prairie TX 75050 800 847 8269 Ground EFX and Stryker Lite are TM trademarks of WGI Innovations LTD Sport Responsible is a TM trademark of WGI Innovations LTD User s Manual 5baksov com ua ...

Page 2: ...D Display 12 How it Works 13 TechDisplay 14 26 Tech Shortcuts 27 28 Traditional LCD Display 29 Traditional Display 30 32 DetectorModes 33 34 How to Detect 35 36 Courtesy 37 Tips 38 Warning 39 AudioFeatures 40 ToneRecognition 41 TroubleShooting 42 Warranty Services 43 FCCStatement 44 ...

Page 3: ... that tells you the exact location of the object that is buried PULL TABS Also known as pop tops Discarded pull tabs come from beverage cans They can be all different shapes and sizes They are primarily made of alu minum which can be bothersome to many treasure hunters GROUND GRAB All soils contain minerals Signals from ground minerals interfere with the signals from metal objects If metal is dete...

Page 4: ...5 6 CONTENTS Coil Bracket Bottom Rod Lock Bracket Top Rod Battery Compartment LCD Display Handle Unit Arm cuff with strap Stand Wire Headphone Jack Pinpoint Trigger ...

Page 5: ... bracket Then tighten but do not over tighten NOTE The large hole faces down This is where the cable will enter the rod Connecting the Wiring Take the Cable Pull and place it down the Rods Screw the end of the Cable Pull to the end of the wire Place the connector in the opening Then pull the hoop at the top to pull the cable through the rods Connecting the Handle Unit Disconnect the Cable Pull and...

Page 6: ... the two screws Pull the door towards you and up to take the door off Insert 6 AA batteries according to the markings within the compartment Cau tion Never mix old and new batteries Nev er mix alkaline carbon zinc or recharge able batteries 2 Place the battery compartment back and screw in the screws 3 5 Adjusting the display To adjust the display tilt the display for ward or back to your desired ...

Page 7: ...ry values due to their metallic qualities Smaller gold or silver objects will have a different value than larger gold or silver objects Trash objects can give off a different value each time you pass over it The angle of the detector can affect the identification of an object as well If you decide to test the detector by waving a coin over the coil wave it with the flat side parallel to the coil t...

Page 8: ...tecting in Discimination Mode 13 14 PINPOINT Trigger TECH MAIN MENU To enter the Main Menu page press the MENU button 1 From here you can change set tings start Ground Grab Discrimi nation Notch GPS watch Video Tutorials and read FAQ S 2 To go back to detecting in the set tings already made press Menu again ...

Page 9: ... volume press the minus or plus sign button 3 4 15 16 To change the sensitivity of the coil press the minus or the plus sign button 5 There are two choices for the screen style Traditional and Tech Press the button of the style you want to use 6 The RESET button will reset all the settings back to default To return to the Main Menu press the BACK button 7 ...

Page 10: ... When it is finished Grabbing you will ei ther see GRABBING OK or ERROR Press the DISCRIMINATION but ton to eliminate metals from de tection 1 TECH DISCRIMINATION To eliminate a metal press the plus sign button 2 To add a metal press the minus sign button Press the BACK button when you are finished to start detecting 4 NOTE Metals black out when they are elimi nated ...

Page 11: ...CH There are three pre programed but tons that will eliminate metals that are not found in what you are want ing to detect 2 ALL METAL COIN JEWELRY NOTE To customize what you are detecting just presstheONorOFFbuttonnexttothemetallisted CUSTOM Press the BACK button to begin detecting 3 ...

Page 12: ...n press the NEW LOCATION button 2 21 22 To change letters numbers use the up or down arrow buttons 3 To move to the next character use the left arrow right arrow or EN TER buttons 4 Press SAVE button to save your location 5 Press the BACK button to go back to the main menu 6 Press DELETE button to erase a character ...

Page 13: ...irection of where you need to go to reach the saved destina tion 3 The smaller buble tells you how far to go in a certain direction in Yards 23 24 Press the MENU button to return to the Main Menu 4 TECH VIDEOTUTORIALS Press the VIDEO TUTORIALS but ton to watch videos on the metal detector 1 Press the video you would like to watch or scroll down to the de sired video 2 NOTE To scroll down or up pre...

Page 14: ...on to return to the Video Tutorial Menu 5 NOTE The videos will play continually till you either press stop or back button NOTE Holding the or button will make it fast forward or rewind faster 25 26 TECH FAQ Press the FAQ button to read fre quently asked questions 1 Press the scroll area to scroll down or up 2 Press the BACK button to return to the Main Menu 3 ...

Page 15: ...NS button An up and down will appear Press either arrow to your desired sensitivity level SENS BUTTON To turn ON the light press the LED button Press again to turn it OFF LED BUTTON When you press the MODE button it will take you to the Main Menu where you can choose Discrimina tion or Notch to detect in MODE BUTTON Takes you back to Discrimination or Notch menu depending on what Mode you are in F...

Page 16: ...or press the button Press SENS to change Sensitivity setting While Sensitivity is selected press to change Sensitivity To save changes wait for 2 3 sec or press the button MENU Press to go to the Main Settings page See page 16 for more details PINPOINT Trigger MENU VOL 29 30 DISCRIM 10 99 4 0 55 60 65 75 80 8 5 IDENTIFICA TION PINPOINT I R O N F O I L N ICKEL P TAB S CAP ZIN C D I M E Q U A R T E ...

Page 17: ...List SAVE Press on Save Press to move between letters Press to change selected letter Press to Save and you will see on the display Save Ok and then returned to Save Waypoint options or press to cancel the current settings and return the Save options You will then be returned to Save Waypoint options Waypoint Press on a saved Location to activate GPS function Press to the saved waypoint you would ...

Page 18: ...outheexactlocationofaburiedobject Itwillidentifyanobjectbyasignal and tone response Hold the trigger to activate the pinpoint function Once activated sweep the coil over the target area in an X pattern Make a visual note of the place on the ground where the strongest signal is identified Then dig inthecenterofthe X Whenthetriggerisreleasedthemetaldetectorwillreturnbackto thepreviousmode NOTE Norma...

Page 19: ...ther clean area nearby to retry ground grab While in Discrimination Notch Mode keep the coil parallel to the ground moving it from left to right with a stable speed If it finds something it will highlight the metal found and give off a certain tone refer to page 27 When a metal is detected hold the trigger to activate Pinpoint function Sweep the coil over the target in an X pattern While in Pin Po...

Page 20: ...3 5 circles like this NOTE Keep the LCD Display horizontal TIPS 2In order to get the maximum accuracy of the compass we suggest rotating it 3 5 times in a circle to calibrate at the be ginning of the GPS mode when you change to a new environment 3The normal function of the product may be dis turbed by strong Electro Magnetic Interference If so simply reset the product to resume normal opera tion b...

Page 21: ...nk there might be electrical lines or pipes buried below the surface Do not use detector in a military area where bombs or other explosives were once buried Avoid striking any lines that are or could be electrically powered Keep away from pipelines they could be carrying flammable gas or liquid AUDIO FEATURES Headphone Jack Use for less disturbance to others around you as well as to drown out dist...

Page 22: ...y Stay away from power lines benches wire fences and other metal detectors that can cause false readings Reduce the sensitivity level Abnormal erratic Sounds Check that the Mode you wanted is selected The All metals mode allows you to search for all metals so you will not miss the one you are looking for TONE RECOGNITION There are eight tones indicating 8 different metals iron foil nickel P Tab S ...

Page 23: ... MUST completely fill out and mail the warranty card along with your proofofpurchasetoWGIInnovationswithin 14 daysafterthedateofpurchase Asanalternativetomail you mayalsovisitourwebsiteandregisteryourproductat youarestillrequiredtomailWGI Innovations your proof of purchase before the warranty is placed in effect Follow the onscreen directions to complete the process WGI Innovations LTD will replac...

Reviews: