background image

Need Help? www.GroutGroovy.com | 866-269-9404

7

Quick Start Guide

1

. Prepare the surface to be cleaned.

•  Apply a small amount of soap or a mild household cleaning 

solution to your grout.

2. To use Grout Groovy

TM 

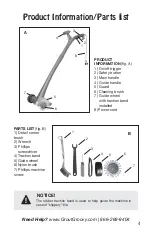
(fig. A, pg 4), depress the safety 

button on the main handle and squeeze the on/off trigger.

•    To turn the machine off release the on/off trigger.

•    Holding the machine with both hands, make sure the 

underside of the machine is kept level and guide the 

machine at a constant speed over the grout area moving 

forward and backward similar to using a vacuum cleaner.

•    There is no need to apply preasure. The nylon brush 

provides plenty of scrubbing power.

3. For stubborn, dirty grout, repeat if necessary.

4. For corners and tight spaces use the detail corner prush 

(fig. B, pg 4).

5. After grout is clean, mop or towel floor until clean.


CAUTION: Risk of eye injury, use safety glasses or similar eye 

protection. To reduce the risk of electric shock, replace damaged 

cord immediately. To reduce the risk of injury to persons, do not 

operate without guards in place. To reduce risk of electric shock, 

do not expose unit to water or operate unit on wet ground. Double 

insulation - when servicing, use only identical replacement parts. 

To reduce the risk of electric shock, disconnect from the supply 

circuit when cleaning or servicing.

NOTICE!

Summary of Contents for VERTICAL GROUT CLEANING MACHINE

Page 1: ...User Guide 1 VERTICAL GROUT CLEANING MACHINE Need Help www GroutGroovy com 866 269 9404...

Page 2: ...tory ones operator error negligence or accidents repairs or alterations improper installation or typical normal wear and tear may result in the item not being covered under warranty To take advantage...

Page 3: ...not in use Do not immerse the machine in water or other liquid Do not use the machine if the guard is damaged or worn Make sure that the cleaning brush is properly secure to the machine in accordance...

Page 4: ...le NOTICE 4 PARTS LIST fig B 1 Detail corner brush 2 Wrench 3 Phillips screwdriver 4 Traction band 5 Guide wheel 6 Nylon brush 7 Phillips machine screw 3 2 1 5 6 7 B 4 A 2 1 3 4 5 6 7 PRODUCT INFORMAT...

Page 5: ...Phillips machine screw 2 into the hole that is now aligned and tighten with the screw driver provided in the parts package Just snug it don t over tighten 2 Insert guide wheel into motor hub fig D 3 R...

Page 6: ...move the old nylon cleaning brush by loosening the spindle nut 2 using the wrench 1 while holding the spindle 4 using the supplied screwdriver 3 Insert the shaft of the new brush onto the spindle with...

Page 7: ...aner There is no need to apply preasure The nylon brush provides plenty of scrubbing power 3 For stubborn dirty grout repeat if necessary 4 For corners and tight spaces use the detail corner prush fig...

Page 8: ...ww GroutGroovy com 866 269 9404 STORING THE MACHINE WHEN NOT IN USE The machine should be stored in such a manner that it is protected against the effects of High humidity heat moisture or with cleani...

Reviews: