background image

19


Trouble Shooting

When  there  is  no  information  displayed  in  the  LCD,  please  check  if  PV 
module/battery/grid connection is correctly connected.

NOTE:  The  warning  and  fault  information  can  be  recorded  by  remote  monitoring 
software.

19.1 Warning List

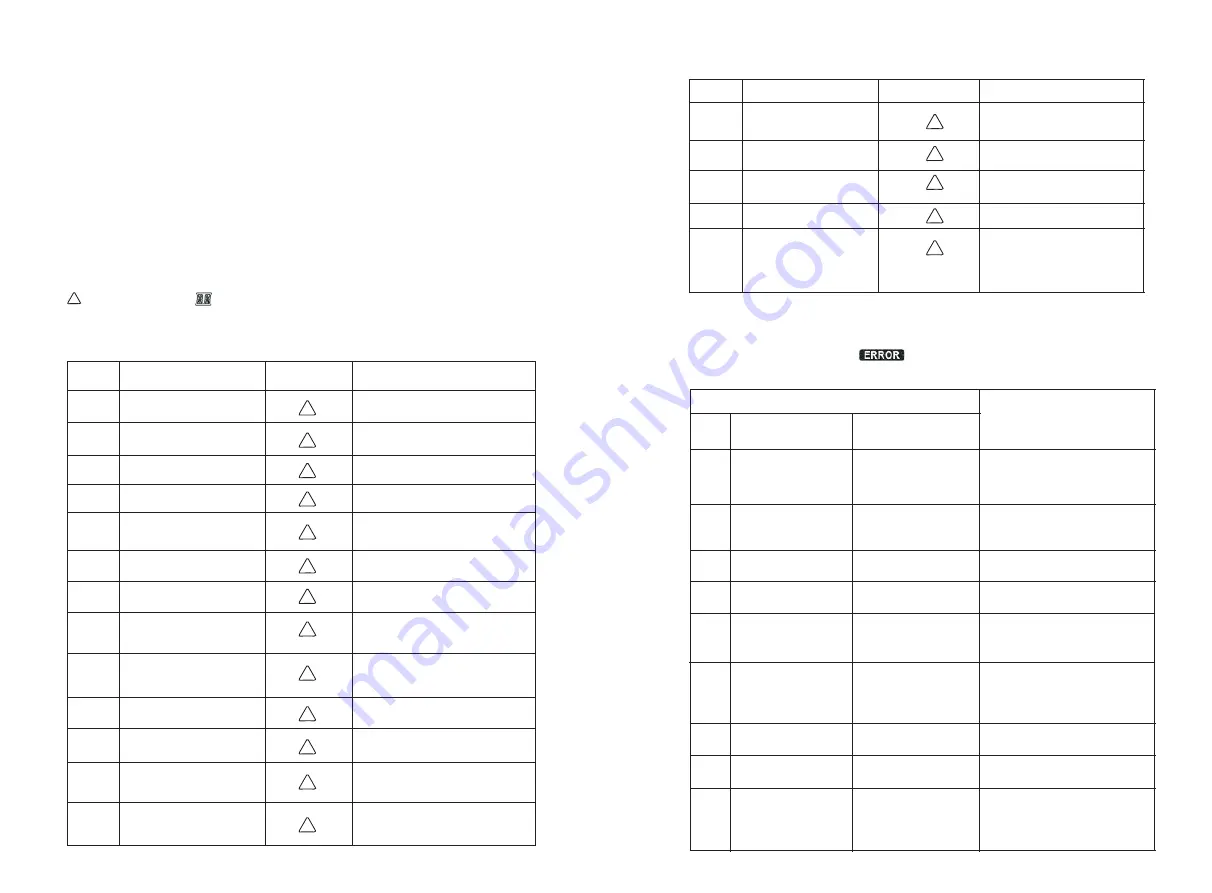
There are 17 situations defined as warnings. When a warning situation occurs,            

      icon will flash and         will display warning code. If there are several codes, it will 
display in sequences. Please contact your installer when you couldn’t handle with the 
warning situations.

!

Code

Warning Event

Icon(flashing)

Description

01

02

03

04

05

06

07

08

09

10

11

12

13

Line voltage high loss

Line voltage low loss

Line frequency high loss

Line frequency low loss

Line voltage loss for long 
time

Ground Loss

Island detect

Line waveform loss

Line phase loss

EPO detected

Overload

Over temperature

Batter voltage low

!

!

!

!

!

!

!

!

!

!

!

!

!

Grid voltage is too high.

Grid voltage is too low.

Grid frequency is too high.

Grid frequency is too low.

Grid voltage is higher than 
253V.

Ground wire is not detected.

Island operation is detected.

The waveform of grid is not 
suitable for inverter.

The phase of grid is not in 
right sequence.

EPO is open.

Load exceeds rating value.

The temperature is too high
 inside.

Battery discharges to low 
alarm point.

14

15

16

17

18

Battery under-voltage 
when grid is loss

Battery open

Battery under-voltage 
when grid is OK

Solar over voltage

Inverter cuts off mains 
output in battery mode

!

!

!

!

!

Battery discharges to 
shutdown point.

Battery is unconnected or 
too low.
Battery stops discharging 
when the grid is OK.

PV voltage is too high.

Inverter will cut off mains 
output and remain power on 
EMS connector in the battery 
mode due to low battery.

19.2 Fault Reference Codes

When a fault occurs, the icon            will flash as a reminder. See below for fault 
codes for reference.

Code

Warning Event

Icon(flashing)

Description

Situation

Fault 

Code

Fault Event

Possible cause

Situation

01

02

03

04

05

06

07

08

09

Bus voltage over

BUS voltage under

BUS soft start time out

INV soft start time out

INV over current

Over temperature

Relay fault

CT sensor fault

Solar input power 

abnormal

Surge

PV or battery 

disconnect suddenly

Internal components 

failed.
Internal components 

failed.

Surge

Internal temperature 

is too high.

Internal components 

failed.

Internal components

 failed.

1. Solar input driver 

damaged.

2. Solar input power is 

too much when voltage 

is more than 850V.

1. Restart the inverter.

2. If the error message still 

remains, please contact your 

installer.
1. Restart the inverter

2. If the error message still 

remains, please contact your 

installer.
Please contact your installer.

Please contact your installer.

1. Restart the inverter.

2. If the error message still 

remains, please contact your 

installer.

1. Check the ambient 

temperature and fans.

2. If the error message still 

remains, please contact your 

installer.

Please contact your installer.

Please contact your installer.

1. Please check if solar input 

voltage is higher than 850V.

2. Please contact your installer.

57

58

Summary of Contents for 5000HYP

Page 1: ...GROWATT NEW ENERGY TECHNOLOGY Co LTD Growatt 5000HYP Installation Operation Manual...

Page 2: ...Module DC Connection 6 Battery Connection 7 Load AC Output Connection 8 9 EMS Connection Communication 10 Dry Contact Signal 11 Relay Control Port 12 Application with Energy Meter 13 Commissioning 14...

Page 3: ...modules to the inverter Do not connect the positive or negative terminal of the solar panel to the ground See Figure 1 for a simple diagram of a typical solar system with this hybrid inverter Note By...

Page 4: ...r injury to persons Use only recommended accessories from installer CAUTION cooling fan To reduce risk of fire hazard do not cover or obstruct the CAUTION been dropped or otherwise damaged in any way...

Page 5: ...lease inspect the unit Be sure that nothing inside the package is damaged You should have received the following items inside of package Inverter unit PV connectors Mounting plate Fixing screws Softwa...

Page 6: ...s dry free of excessive dust and has adequate air flow Do NOT operate it where the temperature and humidity is beyond the specific limits Please check the specs for the limitations Installation positi...

Page 7: ...The reference tightening torque is 35 N m 3 Fix the inverter in position by screwing the supplied two screws M4 12 located on the top two sides of the inverter 2 Raise the inverter and place it over...

Page 8: ...AC wire Nominal Grid Voltage Model Conductor cross section mm2 AWG no 230VAC Growatt 5000HYP 6 10 5 2 Connecting to the AC Utility Overview of AC Connection Socket Step 1 Check the grid voltage and fr...

Page 9: ...les Step 1 Check the input voltage of PV array modules The acceptable input voltage of the inverter is 250VDC 900VDC This system is only applied with two strings of PV array Please make sure that the...

Page 10: ...nal and crimp male terminal as shown below charts Insert assembled cable into male connector housing as shown below charts Then use spanner to screw pressure dome tightly to female connector and male...

Page 11: ...y vented and Gel battery Please check maximum charging voltage and current when first using this inverter If using Lithium iron or Nicd battery please consult with installer for the details NOTE2 Plea...

Page 12: ...and efficient operation to use appropriate cable for AC connection To reduce risk of injury please use the proper recommended cable size as below To prevent further supply to the load via the inverte...

Page 13: ...onnector Otherwise it will damage this inverter It s only allowed to connect load to AC Output Connector Do NOT Please set up mains output in parameter setting of bundled software When Emergency power...

Page 14: ...r power will only charge battery and overload protection will be automatically enabled 24 Communication 10 The inverter is equipped with several communication ports and it is also equipped with a slot...

Page 15: ...ion Description Unit Status Condition Dry contact port NO C NC C Power Off Power On Unit is off and no output is powered Battery voltage is lower than setting battery cut off discharging voltage when...

Page 16: ...ct Pin 1 and Pin 4 shown as below charts 12 2 Function Description Unit status Condition Output voltage from relay control port Power Off Power On Unit is off and no output is powered When the unit is...

Page 17: ...d batter circuit breaker and DC circuit breaker are installed correctly Step 2 Switch on the battery circuit breaker and then switch on PV DC breaker After that if there is utility connection please s...

Page 18: ...ckup IV option is selected in PV energy supply priority the inverter is only operated between two working logics based on defined peak time and off peak time of electricity Only peak time and off peak...

Page 19: ...rid tie with backup II or Grid tie with backup III modes Allow battery to feed in to the Grid when PV is unavailable This option is only valid in all options of Grid tie with backup mode Grid tie with...

Page 20: ...3rd Grid When PV power is not available 1 1st Grid 2nd Battery Grid will provide power to the load at first If grid is not available battery power will provide power backup 2 1st Battery 2nd Grid Bat...

Page 21: ...is sufficient it will charge battery next If there is remaining PV power left it will feed in to the grid Feed in to the grid is default disabled Battery charging source PV only Only after PV power fu...

Page 22: ...t allowed to charge battery no matter it s PV power or grid Load supply source When PV power is available 1 1st PV 2nd Battery 3rd Grid Default PV power will provide power to the load first If it s no...

Page 23: ...wer will back up 1st Battery 2nd Load When PV power is not available 1 1st Grid 2nd Battery Grid will provide power to the load at first If grid is not available battery power will provide power backu...

Page 24: ...id Battery power will provide power to the load at first If battery power is running out grid will back up the load NOTE This option will become ineffective during AC charging time and the priority wi...

Page 25: ...lowed to discharge Icon flashing indicates the battery voltage is too low Indicates AC output for loads is enabled and inverter is providing power to the connected loads Indicates AC output for loads...

Page 26: ...tery mode NOTE error occurs the buzzer will continuously sound You may press any button to mute it If backlight shuts off you may activate it by pressing any button When an 16 4 Query Menu Operation 1...

Page 27: ...ovide power to loads and then feed in to the grid PV power is sufficient to charge the battery first However remaining PV power is not sufficient to back up the load Therefore remaining PV power and t...

Page 28: ...Inverter mode without grid connected This inverter is working with DC INV operation and not connecting to the grid LCD Display Description PV power is sufficient to charge battery and provide power t...

Page 29: ...ia software from 50Vac to 60Vdc It can be adjusted via software from 50Vac to 60Vdc Charging process based on default setting 3 stages First max charging voltage increases to 56V S e c o n d c h a r g...

Page 30: ...er of batteries or battery packs The following precautions should be observed when working on batteries a Remove watches rings or other metal objects b Use tools with insulated handles c Wear rubber g...

Page 31: ...mains output in battery mode Battery discharges to shutdown point Battery is unconnected or too low Battery stops discharging when the grid is OK PV voltage is too high Inverter will cut off mains ou...

Page 32: ...oad fluctuates 1 Restart the inverter 2 If the error message still remains please contact your installer 34 INV voltage high Internal components failed Please contact your installer 35 Wire connection...

Page 33: ...e Maximum Battery Discharging Current Maximum Charging Current PHYSICAL 600 x 460 x 204 2 29 Dimension D X W X H mm Net Weight kgs GENERAL INTERACE RS 232 USB Optional SNMP Modbus and AS 400 cards ava...

Reviews: