background image

12

11

5.1 Safety instructions

4


Unpacking and inspection

Installation 5


The  inverter  is  thoroughly  tested  and  inspected  strictly  before  delivery.  Our  inverters 

leave  our  factory  in  proper  electrical  and  mechanical  condition.  Special  packaging 

ensures safe and careful transportation. However, transport damage may still occur. The 

shipping  company  is  responsible  in  such  cases.  Thoroughly  inspect  the  inverter  upon 

delivery.  Immediately  notify  the  responsible  shipping  company  if  you  discover  any 

damage to the packaging which indicates that the inverter may have been damaged or if 

you discover any visible damage to the inverter. We will be glad to assist you, if required. 

When transporting the inverter, the original or equivalent packaging should be used, and 

the maximum layers for original carton is four, as this ensures safe transport.

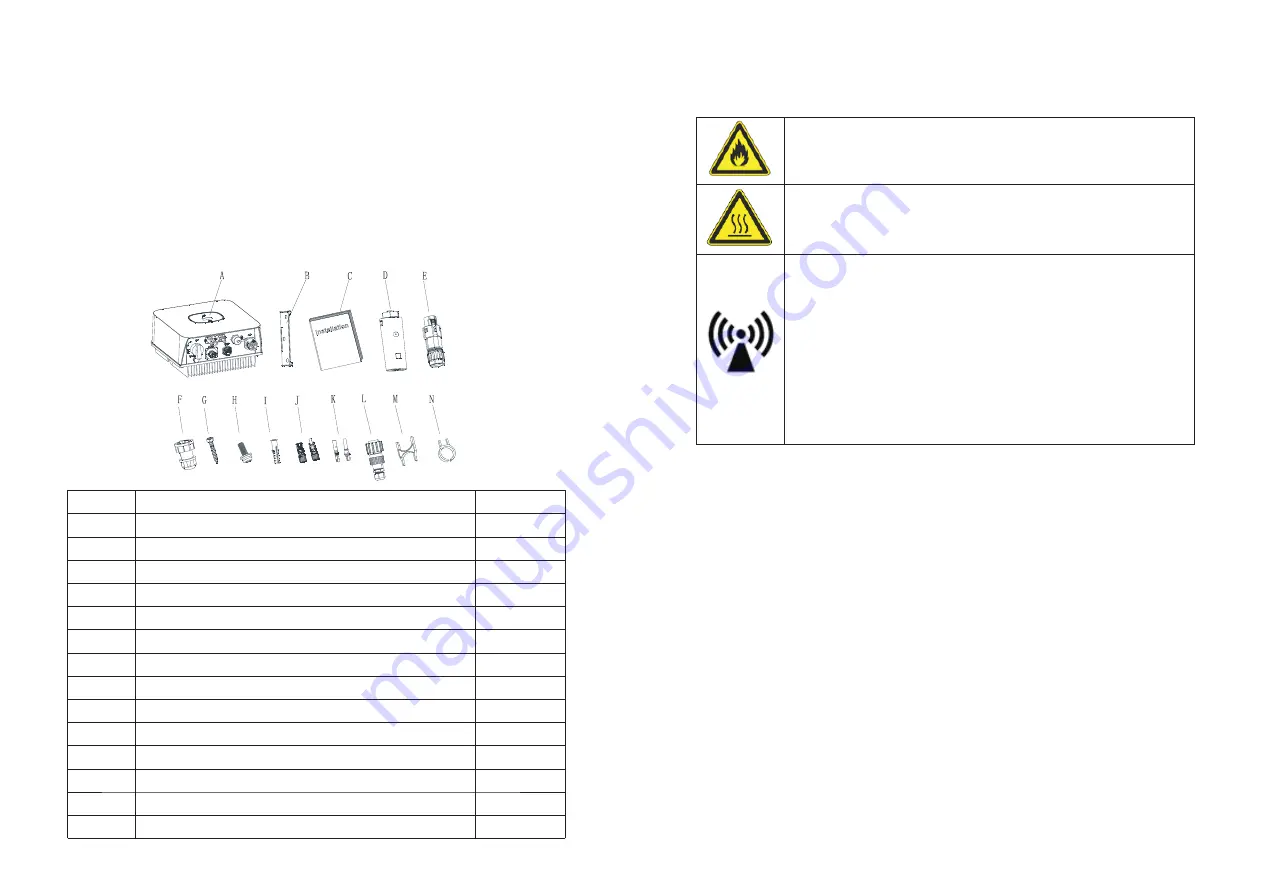
After opening the package, please check the contents of the box. It should contain the 

following, Please check all of the accessories carefully in the carton. If anything missing, 

contact your dealer at once. 

Danger to life due to fire or explosion

Despite careful construction, electrical devices can cause fires.

Do  not  install  the  inverter  on  easily  flammable  materials  and  where 

flammable materials are stored.

Risk of burns due to hot enclosure parts

Mount  the  inverter  in  such  a  way  that  it  cannot  be  touched 
inadvertently.

Possible damage to health as a result of the effects of radiation!

Ø

In special cases, there may still be interference for the specified 

application area despite maintaining standardized emission limit 

values (e.g. when sensitive equipment is located at the setup 

location or when the setup location is near radio or television 

receivers).In this case, the operator is obliged to take proper 

action to rectify the situation.

Ø

Never install the inverter near the sensitive equipment e.g. 

        Radios, telephone, television, etc

Ø

Do not stay closer than 20 cm to the inverter for any length of  

        time unless it is absolutely necessary.

Ø

Growatt assumes no responsibility for compliance to EMC   

        regulations for the complete system

Ø

Ø

Ø

Ø

Ø

Ø

Ø

Ø

Ø

All electrical installations shall be done in accordance with the local and national 

electrical codes. Do not remove the casing. Inverter contains no user serviceable 
parts. Refer servicing to qualified service personnel. all wiring and electrical 

installation should be conducted by a qualified service personnel .

Carefully remove the unit from its packaging and inspect for external damage. If you 

find any imperfections, please contact your local dealer.

Be sure that the inverters connect to the ground in order to protect property and 

personal safety.
The inverter must only be operated with PV generator. Do not connect any other 

source of energy to it.
Both AC and DC voltage sources are terminated inside the PV Inverter. Please 

disconnect these circuits before servicing.

This unit is designed to feed power to the public power grid (utility) only. Do not 

connect this unit to an AC source or generator. Connecting Inverter to external 

devices could result in serious damage to your equipment.

When a photovoltaic panel is exposed to light, it generates a DC voltage. When 

connected to this equipment, a photovoltaic panel will charge the DC link 

capacitors. 

Energy stored in this equipment's DC link capacitors presents a risk of electric shock. 

Even after the unit is disconnected from the grid and photovoltaic panels, high 

voltages may still exist inside the PV-Inverter. Do not remove the casing until at least  

5  minutes after disconnecting all power sources.
Although designed to meet all safety requirements, some parts and surfaces of 

Inverter are still hot during operation. To reduce the risk of injury, do not touch the 

heat sink at the back of the PV-Inverter or nearby surfaces while Inverter is 

operating. 

M

N

                  Uninstall PV tool(except Australia)

1

Quantity

A

B

C

D

E

F

G

H

I

J

K

L

Inverter

Mounting bracket

Quick Guide

Monitor(Optional)

Signal connector

Self-tapping screws 

Plastic expansion pipe

PV+/PV- terminal

PV+/PV- metal terminal

AC connector

Uninstall signal and AC connector tool

1

1

1

1

1

1
3

3

2

1/1

1/1

1

1

Object

Description

Safety-lock screws

DRM PORT

Australia or EU)

Summary of Contents for MIC 1000TL-X

Page 1: ...Manual Growatt New Energy Shenzhen Growatt New Energy Co Ltd 4 13 F Building A Sino German Europe Industrial Park Hangcheng Ave Bao an District Shenzhen China 86 0755 2747 1942 www ginverter com T E...

Page 2: ...on of skilled person 2 3 Safety instruction 2 4 Assembly Warnings 2 5 Electrical Connection Warnings 2 6 Operation Warnings 1 1 Validity 1 2 Target Group 1 3 Additional information 1 4 Symbols in this...

Page 3: ...ion 14 2 DC AC connector info 14 3 Torque 14 4 Accessories 6 Electrical connection 13 Decommissioning 7 Commissioning 14 Technical Data 7 1 Start the inverter 7 2 General setting 7 3 Advanced setting...

Page 4: ...equipment or personal injury This manual describes the assembly installation commissioning and maintenance of the following Growatt Inverter model MIC 600TL X MIC 750TL X MIC 1000TL X MIC 1500TL X MI...

Page 5: ...built according to all required safety rules Nevertheless improper use may cause lethal hazards for the operator or third parties or may result indamage to the units and other property Principle of a...

Page 6: ...20 minutes discharge The components in the inverter are live Touching live components can result in serious injury or death DANGER WARNING Ensure all connectors are sealed and secure during operation...

Page 7: ...uch symbol Touch button We can switch the OLED display and set parameter by touching Inverter status symbol Indicates inverter operation status Red Fault Green Nomal Red leaf flash Warning or DSP Prog...

Page 8: ...4 3A 14 3A 3 6A 4 8A 7 1A 0 8leading 0 8lagging 0 8leading 0 8lagging IP 65 IP 65 with derating above 45 C 113 F 25 60 13 140 F with derating above 45 C 113 F 25 60 13 140 F 282mm 11 1inch 274mm 10 78...

Page 9: ...Growatt assumes no responsibility for compliance to EMC regulations for the complete system All electrical installations shall be done in accordance with the local and national electrical codes Do no...

Page 10: ...horizontal and avoids forward and sideways tilt Be sure that the inverter is out of the children s reach Don t put any things on the inverter Do not cover the inverter Do not install the inverter nea...

Page 11: ...wall Instead leave 2 to 4mm exposed Falling equipment can cause serious or even fatal injury never mount the inverter on the bracket unless you are sure that the mounting frame is really firmly mount...

Page 12: ...X MIC 600TL X 5A 230V 5A 230V 10A 230V 10A 230V 16A 230V 16A 230V 16A 230V 16A 230V MIC 2000TL X MIC 1000TL X MIC 2500TL X MIC 1500TL X MIC 3000TL X MIC 3300TL X The AC wiring step 1 Uninstall the pa...

Page 13: ...ut or unscrew the threaded sleeve then pull it out Wire suggestion length Conductor cross section Conductor cross section Max cable length Max cable length MIC 600TL X MIC 3300TL X MIC 2000TL X MIC 10...

Page 14: ...n circuit voltage Voc of each PV string is less than the maximum input voltage of the inverter Check the design of the PV plant The Max open circuit voltage which can occur at solar panels temperature...

Page 15: ...en up the cap on the terminal Step 3 the inverter Push the threaded sleeve to connection terminal until both are locked tightly on Uninstall signal connector 6 5 Connecting signal cable This series in...

Page 16: ...u can connect smart meter or CT but CT is optional The smart meter model is Eastron SDM230 Modbus The CT Model is TOP 90 S10 SP4 LEM The primary aperture is 10mm output cable length is 5m The arrow on...

Page 17: ...electric arcs AFCI on the PV side 6 9 2 Danger information Danger of fire from electric arc Only test the AFCI for false tripping in the order described below Do not deactivate the AFCI permanently I...

Page 18: ...or confinmation Previous menu Confirm country setting or Number recover default value Information Country setting When the inverter start up we need to select the right country if we don t select any...

Page 19: ...age Double touch to confirm you setting Set the language as described below Set Language English General Advanced Set parameter Set Language English General Set Comaddr Advanced 001 Set parameter The...

Page 20: ...ced Password 123 This series inverter provides two RS485 ports You can monitor one or more inverters by RS485 Another RS485 port is for smart meter Export limitation functionality Information Perform...

Page 21: ...an the enclosure lid the display and the LEDs using only a wet cloth Do not use any cleaning agents e g solvents or abrasives Check for externally visible damage and discoloration of the DC Disconnect...

Page 22: ...the invert 2 If error message still exists contact Growatt PV Isolation Low Error 203 AC V Outrange Error 300 No AC connection Error 302 PE abnormal Error 303 Insulation problem Utility grid voltage...

Page 23: ...sage still exists contact manufacturer 1 Check if the meter is on 2 Check the inverter and the meter connection is normal 11 4 Inverter fault Error code Meanings Suggestion Error 402 Error 404 Error 4...

Page 24: ...sories together with household waste Please accordance with the disposal regulations for electronic waste which apply at the installation site at that time Ensure that the old unit and where applicabl...

Page 25: ...n Interfaces 274 254 138 6 0 kg 25 C 60 C 25 dB A 4000m 0 5W transformerless Natural convection IP65 0 100 VP D4 MC4 Optional AC connector Display RS485 USB WIFI GPRS 4G LAN RF Warranty 5 10 years OLE...

Page 26: ...III General data Dimensions W H D in mm Weight Operating temperature range 274 254 138 6 2kg 6 0kg 25 C 60 C Noise emission typical Altitude Internal consumption at night Topology Cooling Protection d...

Page 27: ...with USB interface 4G monitor with USB interface RF monitor with USB interface LAN monitor with USB interface 15 Compliance Certificates Certificates With the appropriate settings the unit will comply...

Reviews: