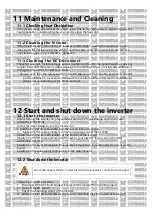
11 Maintenance and Cleaning
11.1
Checking Heat Dissipation
If the inverter regularly reduces its output power due to high temperature, please improve the
heat dissipation condition. Maybe you need to clean the heat sink.
11.2
Cleaning the Inverter
If the inverter is dirty, turn-off the AC breaker and DC switch ,waiting the inverter shut down
,then clean the enclosure lid, the display, and the LEDs using only a wet cloth. Do not use
any cleaning agents (e.g. solvents or abrasives).
11.3
Checking the DC Disconnect
Check for externally visible damage and discoloration of the DC Disconnect and the cables at
regular intervals.If there is any visible damage to the DC Disconnect, or visible discoloration or
damage to the cables, contact the installer.
> Once a year, turn the rotary switch of the DC Disconnect from the On position to the Off
position 5 times in succession. This cleans the contacts of the rotary switch and prolongs
the electrical endurance of the DC Disconnect.
12 Start and shut down the inverter
12.1
Start the inverter
Before turning the inverter on, please make sure the PV input voltage and current are
within the MPPT limits.
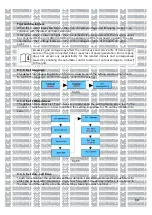
Follow the steps below to turn the inverter on:
1 .Pull the PV and AC cable make sure there is no loose or shaking.
2.
Make sure the cable polarity is correct and voltage is less than 1100V
3.Switch on the build-in DC isolator at the bottom of the inverter.
4.Switch on the PV Array and DC isolator next to your inverter, if you can not find this
switch, skip this step.
5.Switch on the Solar AC isolator if the inverter is more than 3 meters away from your switch-
board.
6.Switch on the solar supply main switch in the switch board.
12.2
Shut down the inverter
Danger
Don't disconnect the DC connector while the inverter is connected to the grid.
Steps to turn off the inverter:
1.
Disconnect the AC circuit breaker to prevent the inverter from starting again;
2.
Turn off the DC switch;
3.
Check the operating status of the inverter;
4.
Wait until the LED and OLED display are off, indicating that the inverter is turned off.
3 7
Summary of Contents for MOD 1 0KTL3-X
Page 1: ...Asennus ja k ytt ohje...
Page 19: ...Kuva 5 9 Kaaviokuva invertterin sein asennuksesta 15...
Page 60: ...Installations och bruksanvisning...
Page 78: ...Figur 5 9 Schema f r v ggmontering av v xelriktaren 15...
Page 119: ...Kontaktuppgifter 19 Suomi Trading Oy Areenakatu 7 37570 Lemp l asiakaspalvelu suomitrading fi...
Page 120: ...Installation Operation Manual...
Page 138: ...Fig 5 9 Schematic diagram of inverter wall mounting 15...
Page 179: ...Contact us 19 Suomi Trading Oy Areenakatu 7 37570 Lemp l asiakaspalvelu suomitrading fi 56...
Page 180: ......

