background image

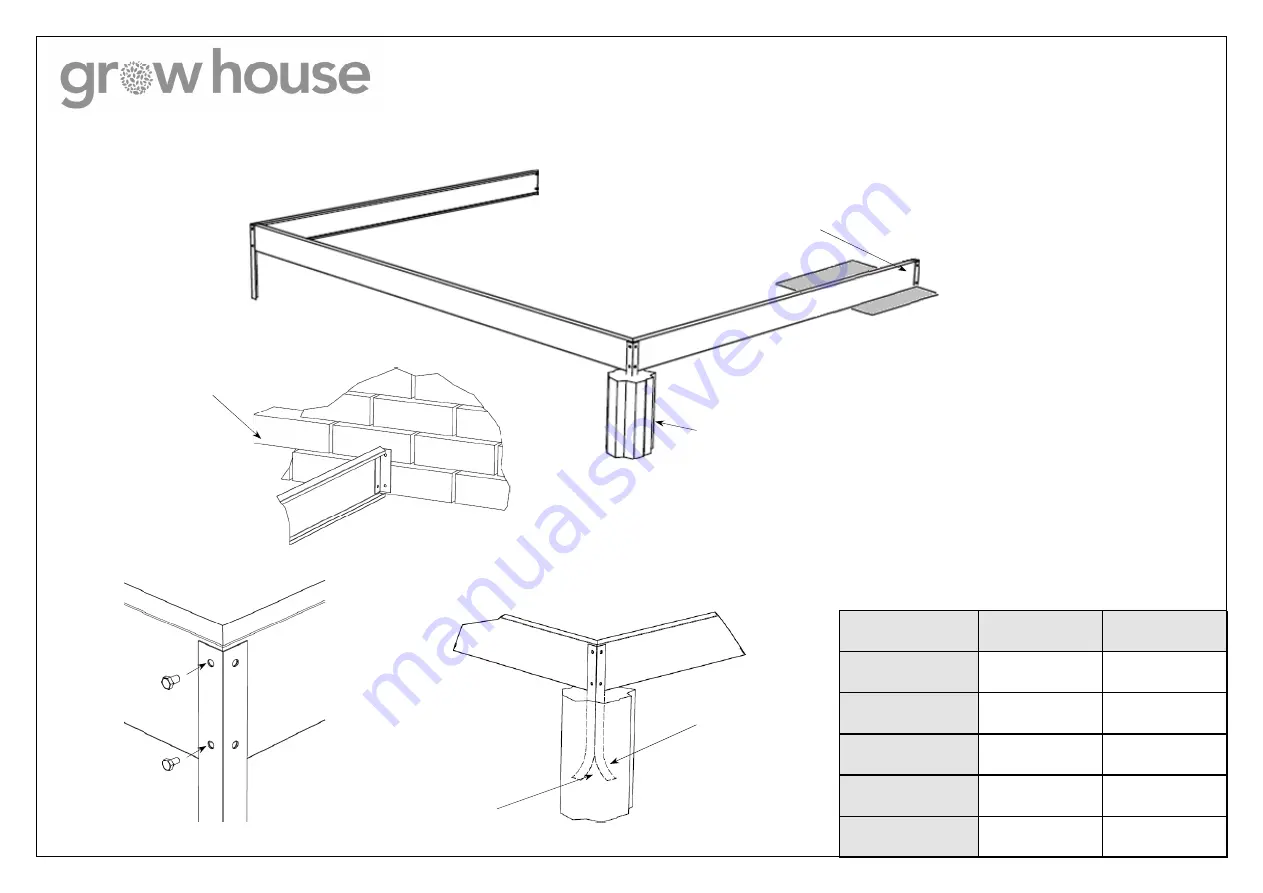
The  sides  and  ends  of  the  base  can 
be  fixed  together  positioning  an 
anchor  leg  or  short  corner  bracket 
on the outside of the sides and fixed 
through  the  pre  drilled  holes  with 
the bolts and nuts supplied (Fig 1). 

The  short  anchor  legs  are  used  only 
when the base is to sit on a concrete 
base.  

To  fix  to  the  base,  drill  through  the 
base  bottom  and  secure  using 
suitable fixings. 

The long anchor legs are used if you 
are  intending  to  secure  the  base  to 
the  ground.  The  ends  of  the  legs 
should be splayed (Fig 2).  

Dig a hole in the ground where each 
anchor  leg  will  be  situated  and  set 
the  legs  into  the  holes  ensuring  the 
steel base is square and level before 
filling  the  holes  with  concrete  or 
postcrete, then leave to set. 

Long Ground Spike in 

Concrete Plug


Short Corner Brackets used 

when sitting on a Solid Base


Fig 1.


Fig 2.


Cut


Bend


a

ssemble 

s

teel 

b

ase


Use suitable screws and 

plugs to fix the steel base 

to the wall.


Le a n To 6 x 8

Le a n to 6 x 10

Long Ground Spi ke s

x4

x4

Short Corne r Bra cke ts

x4

x4

Nuts  a nd Bol ts

x12

x12

Fi xi ng Bra cke t

x10

x12

25mm Pozi  Scre ws

x10

x12

Summary of Contents for Lean To 6 x 10

Page 1: ...6 x 8 and 6 x 10 lean to greenhouse www growhouse co uk erection and glazing instructions...

Page 2: ...Screwdriver Optional Drill 8mm Masonry Drill A Clamp When Fixing Sections Together Recommended Spirit Level Tape Measure Roof Vent Fix casement stays or autovents with screw type SC004 and using the...

Page 3: ...Screw List Parts List PT203 AL3301 PT206 AL3300 PT200 PT201 PT121 PT120 SC004 SC006 SC027 SC058 SC121 SC127 SC156 FX200 WA501 PT205 SA1000 SC125...

Page 4: ...re the base to the ground The ends of the legs should be splayed Fig 2 Dig a hole in the ground where each anchor leg will be situated and set the legs into the holes ensuring the steel base is square...

Page 5: ...8 6 x 10 Dim A 2458mm 3032mm Dim B 1962mm 1962mm Dim C 3111mm 3585mm base plan 200mm MIN 100mm MIN 25mm MIN FIG B DIM A DIM B DIM C FIG A 2276mm to here from top of base Flashing Ridge Abutting Wall 7...

Page 6: ...1 Fix Door Bottom Guide to Your Chosen Door End 2 Fix Gables to Curtain Wall A A A A SC006 x 3 A A SC156 x 4...

Page 7: ...3 Fix Ridge Board to Gables 4 SC156 x 2 Fix PT121 to Roof Spar Ends PT121 SC125 x 2 PT121...

Page 8: ...5 6 Fix Roof Spars to Ridge and Curtain Wall SC156 SC125 Fix Under Vent Rail...

Page 9: ...7 8 Fix Spigot PT200 and Gutter End Caps PT205 PT200 PT205 Fix PT206 and Hook Gutter to Wall PT206 PT206...

Page 10: ...10 Fix Greenhouse to Wall SC057 WA501 FX200 9 Fix Greenhouse to Base Secure to Steel Base 25mm SC058 WA501 FX200 Constructed Base A A SC125 Steel Base SC125 A A...

Page 11: ...hape 2 2 1800 x 680 Gable End Rectangle 1 1 1411 x 545 Gable End Rectangle 4 4 1435 x 545 Side Wall Rectangle 3 4 800 x 545 Side Wall Rectangle 1 1 580 x 477 Side Vent Rectangle 1 1 2058 x 579 Roof Re...

Page 12: ...11 Glaze Roof and Fix Roof Cappings A A PT206 A A I II III V IV SC125...

Page 13: ...12 Fix the Roof Vent Hinge Rail 13 Glaze Roof Vent and Fix into Position SC027 x 3 IV II III SC125 PT120 I...

Page 14: ...14 Glaze the Side I II III IV V VI SC125...

Page 15: ...15 Glaze Both Gable Ends SC125...

Page 16: ...16 Glaze the Side Sash Window 17 Fix the Door Runner PT120 SC125 SC125 x3...

Page 17: ...18 Fix Door Wheel Brackets and Locate Door 19 Adjust Door and Fix Handles SC125 A A A A Adjust and Lock into Position With Screw Type SC125 SC127...

Page 18: ...20 Fix Downpipes and Shoes I PT201 3mm PT203 SC125 SC121 II III IV V VI VII...

Page 19: ...Staging and Shelving Instructions Batten and Screw Chart SC128 SC026 605mm 605mm BL425 NU200 WA002...

Page 20: ...Staging and Shelving Instructions SC128 x 8 BL425 WA002 NU200 SC128 x 2 SC026 x 2 SECTION A A A A...

Page 21: ...Louvre Installation Instructions SC121 SC121 SC125 SC026 SC005...

Page 22: ...Louvre Installation Instructions Continued SC005 x 3 SC026 x 2 SC125 x 4 Views from Inside Views from Outside...

Reviews: