background image

9

GROWSPAN™ CANOPY-TOP COLD FRAME

Revision date: 02.08.18

ANCHOR THE SHELTER

At this point, anchor the shelter. Consult the MUST READ 

document for anchoring information and suggestions. 

Please call customer service at 1-800-245-9881 for 

additional anchoring information.

 CAUTION

: The anchor assembly is an integral part 

of the shelter construction. Improper anchoring may 

cause shelter instability and failure of the shelter to 

perform as designed. Failing to anchor the shelter 

properly will void the manufacturer’s warranty and may 

cause serious injury and damage.

INSTALL OPTIONAL MAIN COVER


Various cover options are available. Purchase the cover 

material suited to your application. 


Gather the parts:
•  Optional cover (additional purchase required) 
•  Tek screws (purchased separately)
•  Fabric clips (purchased separately)

 WARNING: 

To prevent damage to the cover and to 

prevent serious personal injury, DO NOT attempt to 

install the cover on windy days.

1.  Unfold cover material beside the frame.
2.  Pull material over frame and center it end-to-end and 

side-to-side. 

3. 

Determine where to attach cover film to frame and 

divide clips accordingly.

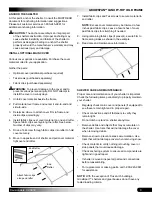
4.  Install fabric clips over cover material on one end rafter. 

Space fabric clips evenly along the rafter. See below.


Number of clips may vary.

5.  Drive a Tek screw through fabric clips into rafter to hold 

cover securely. 

6.  Move to opposite end of shelter and pull cover material 

tight over end rafter.

7.  Install fabric clips and Tek screws to secure material to 

end rafter. 


NOTE:

 Excess cover material may be trimmed a few 

inches past fabric clips. Leave a few inches of cover 

past fabric clips for stretching if needed.

8. 

Using remaining fabric clips (if present), secure film to 

frame along sides as shown in the example. 

9.  Read care and maintenance information. 

SHELTER CARE AND MAINTENANCE

Proper care and maintenance of your shelter is important. 

Check the following items periodically to properly maintain 

your shelter:
•  Regularly check main cover and panels (if equipped) to 

see these remain tight and in proper repair.

•  Check connections and all fasteners to verify they 

remain tight.

•  Do not climb or stand on shelter at anytime.
•  Remove debris and objects that may accumulate on 

the shelter. Use tools that will not damage the cover 

when removing debris.

•  Remove snow to prevent excess accumulation. Use 

tools that will not damage cover when removing snow.

•  Check contents to verify nothing is touching cover or 

side panels that could cause damage.

•  Check anchoring system to ensure all components are 

tight and in good repair.

•  If shelter is moved, inspect all parts and connections 

before reassembling.

•  For replacement or missing parts, call 1-800-245-9881 

for assistance.

NOTE:

 With the exception of Truss Arch buildings,  

GrowSpan™ shelters and greenhouses do not have any 

tested loading criteria.

Attach fabric clips 

along end rafter

End 

Rafter

End Rafter

Summary of Contents for 106018

Page 1: ...8 GrowSpan Canopy Top Cold Frame Photo may show a different but similar model 2018 GrowSpan All Rights Reserved Reproduction is prohibited without permission STK DIMENSIONS 106018 14 W x 4 8 H x 20 L...

Page 2: ...properly will void the manufacturer s warranty and may cause serious injury and damage LOCATION Choosing the proper location is an important step The following suggestions and precautions will help d...

Page 3: ...your shelter Conduit An assembly of pipes used to secure the main cover and end panels if equipped Purlins and some strut assemblies also consist of connected pipes to form a conduit Each pipe joint...

Page 4: ...e shelter 1 Unpack contents of shipment and place where you can easily inventory the parts Refer to the Bill of Materials Spec Sheets 2 Verify all parts listed on Bill of Materials Spec Sheets are pre...

Page 5: ...The following graphics and photos will help identify the different parts Some parts are not shown 102191 3 Way Coupler 102192 4 Way Coupler ADDITIONAL PARTS IDENTIFICATION NOTES In some instances ther...

Page 6: ...n date 02 08 18 NOTE Diagram above may show a shelter that differs in length or width from the actual frame Frame above is used for illustration purposes GrowSpan Canopy Top Cold Frame FRAME DIAGRAM E...

Page 7: ...uick Start section for required number of interior rafters for frame length 5 Repeat previous steps to assemble all remaining interior rafters 6 Assemble end rafters as described in next procedure Com...

Page 8: ...nd tighten the locking screws 5 Insert three 3 purlin pipes into the 4 way couplers on the interior rafter and tighten the locking screws 6 Add another interior rafter and repeat the previous steps un...

Page 9: ...er securely 6 Move to opposite end of shelter and pull cover material tight over end rafter 7 Install fabric clips and Tek screws to secure material to end rafter NOTE Excess cover material may be tri...

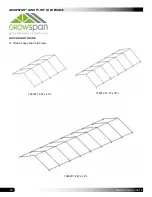
Page 10: ...GROWSPAN CANOPY TOP COLD FRAME 10 Revision date 02 08 18 106018 14 W x 20 L 106019 14 W x 30 L 106020 14 W x 40 L QUICK START GUIDE 14 Wide Canopy Top Cold Frame...

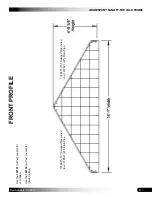
Page 11: ...on date 02 08 18 FRONT PROFILE Use the 102191 3 Way coupler for end rafters Use the 102192 4 Way coupler for interior rafters 131S075 75 Swaged Pipe joined to a 131P021 21 Plain Pipe 131S075 75 Swaged...

Page 12: ...ANOPY TOP COLD FRAME 12 Revision date 02 08 18 CONNECTIONS View 2 Mid Rafter Purlin Connection View 1 End Rafter Purlin Connection 131P060 60 Plain Pipe 131S075 75 Swaged Pipe joined to a 131P021 21 P...

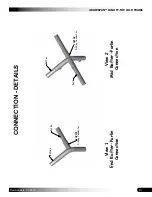
Page 13: ...CANOPY TOP COLD FRAME Revision date 02 08 18 CONNECTION DETAILS 102191 3 Way Connector Purlin Rafter 102192 4 Way Connector Rafter Purlin View 1 End Rafter Purlin Connection View 2 Mid Rafter Purlin...

Reviews: