background image

9

Revision date: 02.17.17

Part Number

Description

Quantity

FAH322

CARR BOLT 5/16X3-1/2 GLV B100

12

FAME51B

FLATWASHER 5/16" GLV /EA BULK

12

FALB32B

NUT HOTDIP GLV 5/16-18 EACH

12

4

Assembly Instructions

ATTACH COVER MATERIAL

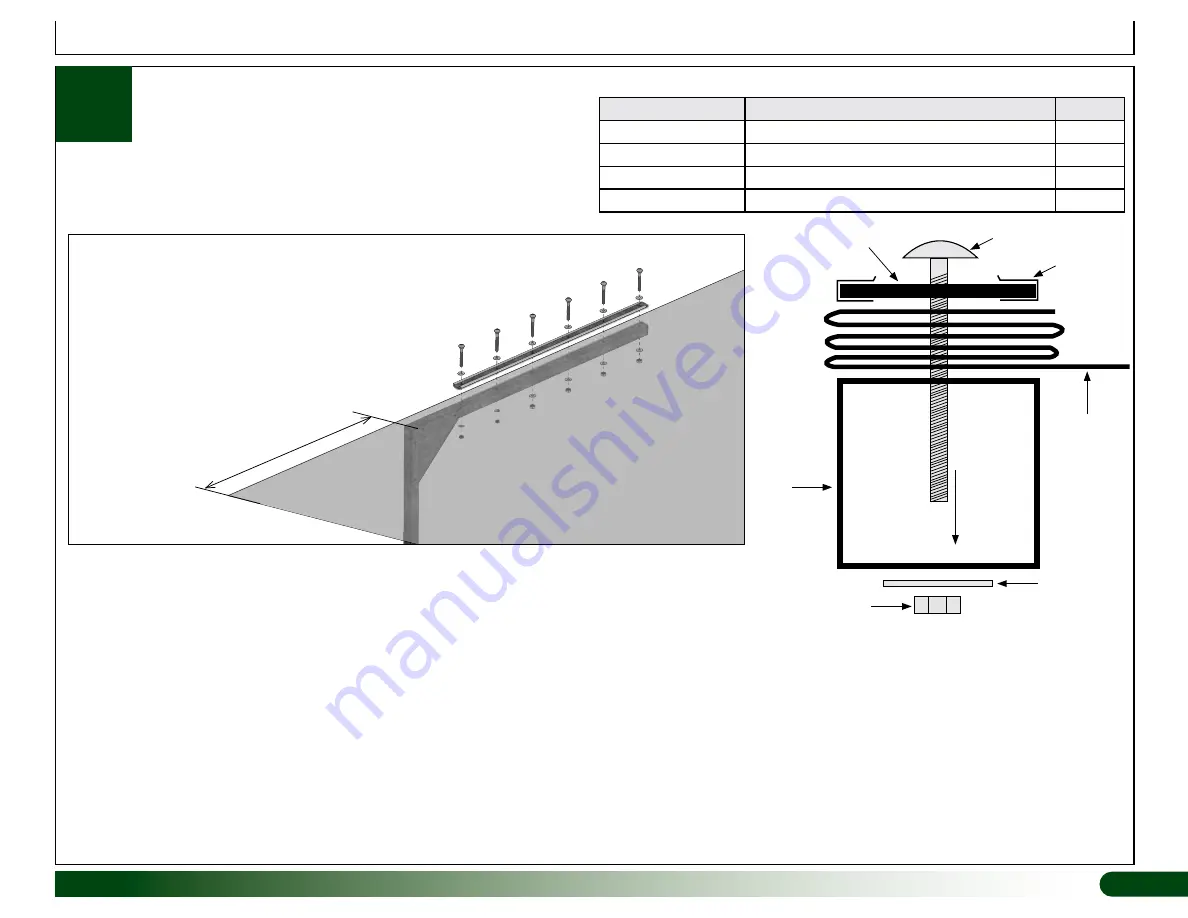
4.  Stretch material out and attach the free edge to the canopy arms. 

Fold the material edge 3-4 times (minimum) and sandwich that edge 

between the canopy arm and the fabric clamp. Use hand clamps (or 

similar tools) to hold fabic and fabric clamp in place to install bolts. 

5.  Take a sharp tool and punch a hole in the materail at each bolt location.
6.  Insert the 5/16" carriage bolts throught the fabric clamp and install the flat washers and nuts. 

Tighten all fasteners.

7.  Repeat steps to secure cover material to the remaining canopy arm at the other end of the shelter.
8.  With assistance, test the system as shown on the following page.

Amount of material that extends 

beyond the edge of canopy arm 

depends on shelter width and height.

END VIEW—CANOPY ARM AND 

SHADE MATERIAL CONNECTION: 

Diagram above shows edge of cover 

folded and sandwiched between the 

canopy arm tube and the fabric clamp.

FAH322

111948

FAME51B

FALB32B

113171

Material

Canopy 

Arm

Summary of Contents for 113170

Page 1: ...rved Reproduction is prohibited without permission EZ Shade Tarp Arm 113170 Finished Grade Features Description Adjustable Arm Extends from 8 to 12 in 4 increments when anchored to base plate Maximum...

Page 2: ...customer contractor Concrete for concrete piers Minimal pier dimensions Diameter 12 Height 24 Equipment to dig holes for piers and wrench to tighten anchor bolts Cover material to cover shelter Faste...

Page 3: ...tarp arms are installed at each end of the frame and are anchored to customer supplied concrete piers Consult the remainder of this guide for additional details WARNING NEVER LEAVE THE PIVOT ARMS IN...

Page 4: ...odes for the region Minimum dimensions Diameter 12 Height 24 See diagram at the right Align piers with the center of the frame at each end 3 While concrete sets continue with the assembly ATTENTION Fo...

Page 5: ...struct the 113170 canopy arm assemblies Use these fasteners to attach the 113166 brackets Part Number Description Quantity FAG363B HEX CAP 3 8X3 ZINC EACH 8 FAME08B BULK FLATWASH 3 8 ZINC ea 16 FALB04...

Page 6: ...n Quantity FAG363B HEX CAP 3 8X3 ZINC EACH 4 FAME08B BULK FLATWASH 3 8 ZINC ea 8 FALB04B NUT 3 8 16 ZNC EACH 4 113165 TUBE CLAMP BUSHING 4 4 Continue with the next procedures Finished Grade Step 2 Fra...

Page 7: ...m of grease 2 Verify that concrete has set and mark the anchor bolt locations on the pier Use the pivot arm assembly to position the base correctly See diagram below 3 After marking the anchor bolt lo...

Page 8: ...lding then attach the other edge to the canopy arms 2 Take both pieces of the 8 u channel 111948 and cut each one in half Shade Material Step 1 Finished Grade Customer supplied baseboard to secure mat...

Page 9: ...ll bolts 5 Take a sharp tool and punch a hole in the materail at each bolt location 6 Insert the 5 16 carriage bolts throught the fabric clamp and install the flat washers and nuts Tighten all fastene...

Page 10: ...ting 3 IMPORTANT Anchor both pivot arms to the ground to prevent damage and injury when material is pulled over shelter With assistance lift one pivot arm with attached cover 1 WARNING NEVER LEAVE THE...

Page 11: ...11 Revision date 02 17 17 Customer Note Page...

Reviews: