background image

GRT Avionics, Inc. 


May 2019 


Sport EX/Horizon EX Install. Manual 

20 

Rev. A 

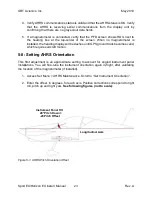
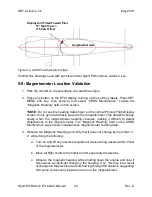
SECTION  5:  Initial  Checkout,  Basic  Configuration 
Settings and Calibration 


5-1: Display Unit Checkout 


1.  Apply power to the display unit. The LCD may flicker, and within 20 seconds, the 

display should show the 

“Accept” page if on the ground. (If in-flight, the “Accept” 

page will not be displayed.) 


2.  If  multiple  power  buses  connect  to  the  display  unit,  apply  power  from  each  bus 

individually to test. 


5-2: Configuring the Serial Ports 

 
When  wiring  the  airplane,  it  is  likely  that  serial  ports  were  used  to  send  and  receive 
information with other equipment. Each serial port, input and output, must be configured 
to allow successful communication with these devices. This configuration includes setting 
both the function and baud rate. A serial counter is provided to show when data is being 
detected at a serial input to the display unit to help validate a new installation. 

Note

 that 

this counter will advance regardless of whether or not the data being transmitted is at the 
correct baud rate or even matches the serial port

’s configuration.  

 
The configuration data is 

accessed by finding the “Set Menu” softkey that appears on the 

PFD,  MAP  and  Engine  pages.  Pressing  this  button  brings  up  the  Settings  Menu. 
Categories, and the settings within them, are selected by rotating the knob to choose an 
item. Clicking the knob selects the item and allows a setting to be changed. Clicking the 
knob again enters the setting and allows another setting to be selected. 
 
The 

Equipment Supplements

 on the GRT website should be used to  configure serial 

ports and other required settings. Fro

m the website home page, select the “Support” drop 

down, followed by 

the “Compatible Equipment” page to see the list of the most up-to-date 

equipment  supplements.  Alternatively,  the  page  can  be  accessed  directly  by  entering 
(

www.gratavionics.com/home/compatible-equipment/

)  into  your  web  browser’s  address 

bar. These supplements will also describe a post-installation checkout procedure. 
 
Once all settings are configured, the settings should then be backed up to a USB memory 
stick, 

using  the  “User  Setting  Backup”  function  on  the  “Display  Unit  Maintenance”  set 

menu.  This  will  allow  you  to  restore  these  setting  if  they  ever  become  altered.  It  also 
allows you to review the settings when away from the airplane by viewing the backup file 
with a text editor. 


Summary of Contents for Horizon EX

Page 1: ...Sport EX Horizon EX Installation Manual Revision A May 2019 GRT Avionics Inc 3133 Madison Avenue SE Wyoming MI 49548 616 245 7700 support grtavionics com grtavionics com...

Page 2: ...ensure that the information in this manual is accurate and complete Visit the GRT website www grtavionics com for the latest manuals software updates and supplemental information concerning the operat...

Page 3: ...T Avionics Inc May 2019 Sport EX Horizon EX Install Manual II Rev A RECORD OF REVISIONS Revision Date Sport SW Revision Description A May 2019 All Re issue as a standalone manual for Sport EX Horizon...

Page 4: ...cs Display Units the Inter Display Unit Link 7 2 2 2 AHRS 8 2 2 3 Autopilots 8 2 2 4 Autopilot Using GRT Avionics Servos 8 2 2 5 Trio Avionics and TruTrack Flight Systems External Autopilots 8 2 2 6 A...

Page 5: ...rts 20 5 3 Trig TT22 RS 422 Port 21 5 4 Required Setup for the Internal GPS 21 5 5 Multiple AHRS Inputs 21 5 6 Defining Magnetometer Connections 22 5 7 AHRS Air Data Computer Test 22 5 8 Setting AHRS...

Page 6: ...ck AOA Installation and Calibration 38 A 7 1 Sensed AOA Installation 38 A 7 2 Calculated AOA Installation 39 A 7 3 Calibration of the AOA Calculated and Sensed 39 A 8 Basic Engine Monitoring Wiring 40...

Page 7: ...the EFIS display unit and screen although it may seem like there are all interchangeable terms it is important to note that they all refer to different aspects of the Sport EX Horizon EX system EFIS...

Page 8: ...of another EFIS display unit except for unique data that may be coming from other display units This allows multiple screens to provide redundancy Multiple screens are normally linked together via a...

Page 9: ...This includes equipment like Comm Nav radios transponders ADS B transponders receivers and many other devices The addition of a second or third display unit doubles or triples the number of available...

Page 10: ...creen swap Engine Page and Moving Map overlays Up to six high speed serial ports Three standard an additional three serial ports may be optionally added Optional ARINC 429 expansion module allows full...

Page 11: ...s CO Guardian Series CO Detector TIS Traffic Datalink GTX 330 Zaon Flight Systems PCAS XRX and MRX BF Goodrich WX 500 Stormscope Vertical Power VP X Series Electronic Circuit Breaker System Serial Dat...

Page 12: ...pening in the canopy during flight especially the vents an over voltage condition that can occur if the battery becomes disconnected loss of charging etc Electrical connections to the EFIS display uni...

Page 13: ...eed meaning that any serial port can be used with any device regardless of the baud rate the connection may require 2 2 Common Equipment Interfaces This section is an overview of the typical interconn...

Page 14: ...e that are not flown cross country If you have chosen not to install an autopilot but may do so in the future we recommend installing the servo wiring at the very least and possibly installing the ser...

Page 15: ...l and highly recommend its integration into your airplane s avionics systems ADS B receivers can be purchased for as little as a few hundred dollars 2 2 7 ADS B GPS Output The GPS output from the Spor...

Page 16: ...splay and use the VOR bearing data provided by the SL30 Nav Com Localizer and glide slope deviation data is also displayed on the DU from this radio This data is transmitted to the radio via an RS 232...

Page 17: ...SB device Alternatively you may attach a USB hub to connect up to three devices Software updates are also delivered to the DU via USB simply install the software update files onto a USB thumb drive fr...

Page 18: ...th your ignition system The audio output provides a method of alerting the pilot when limits are exceeded gives altitude call outs on approach traffic alerts and much more The audio output is wired th...

Page 19: ...ystem design The Aeroelectric Connection by Bob Nuckolls is a great place to start It covers everything from the very basics of electricity to the proper design and installation of sophisticated IFR c...

Page 20: ...ay unit in the panel 6 socket cap stainless steel screws are recommended 2 For radio rack style display units the 6 screws on the side of the unit two per side should be used to attach the display uni...

Page 21: ...pitot static system Connections on the display unit take a 1 8 27 NPT male fitting To facilitate installation and removal of the display unit quick disconnect fittings may be helpful Connections and...

Page 22: ...t should be done carefully to avoid breaking it When routing the wiring the following guidelines should be considered Good practices for physical installation of the wiring should be followed such as...

Page 23: ...er switch If a power switch is desired for the DU the 12V power should be controlled with the switch not the ground The display units include internal thermally activated fuses This protects the equip...

Page 24: ...netometer to operate The digital magnetometer serial output may be shared between any number display units with Adaptive AHRS or stand alone Adaptive AHRS 4 5 Specific Equipment Interconnect Details M...

Page 25: ...t is provided on the D sub connector to drive an external warning light This output provides a path to ground when active thus the indicator should be wired with one of its terminals to aircraft power...

Page 26: ...nfiguration The configuration data is accessed by finding the Set Menu softkey that appears on the PFD MAP and Engine pages Pressing this button brings up the Settings Menu Categories and the settings...

Page 27: ...nu within the Set menu Internal GPS None GPS1 GPS2 Default is GPS1 This setting is used to assign the internal GPS to one of the two EFIS GPS inputs If None is selected up to 2 external GPS inputs may...

Page 28: ...HRS connections This setting is accessed in the General Setup submenu within the Set menu AHRS 1 2 Has Magnetometer Yes No Auto Default is Auto Set to match your installation If it is unknown use the...

Page 29: ...be dashes until GPS ground track becomes valid which requires aircraft motion 5 8 Setting AHRS Orientation This first adjustment is an approximate setting to account for angled instrument panel instal...

Page 30: ...gyro data that is slaved to the magnetometer This data will change slowly when the magnetometer heading changes making it difficult to detect disturbances to the magnetometer The Magnetic Heading fie...

Page 31: ...rference set the orientation of the magnetometer 1 Go to Set Menu AHRS Maintenance Set Magnetometer Orientation Answer the prompts on the screen to begin automatic orientation of the magnetometer For...

Page 32: ...th in an area without magnetic disturbances such as a compass rose A simple means of pointing the airplane toward magnetic north is to taxi the airplane slowly and use the GPS ground track to determin...

Page 33: ...mode and will show Calibration INVALID Maximum correction exceeded if a correction of greater than 127 is required Invalid OVERLIMIT will be displayed on the AHRS maintenance page next to the Magneto...

Page 34: ...can also be observed on the PFD screen although the heading data on this screen is slaving the yaw gyro and thus will respond slowly to the difference between the displayed heading and that of the mag...

Page 35: ...linder S N 22A2663 and Newer 6 6 Jabiru 6 Cylinder 6 6 Rotax 2 Cycle with CDI Ignition 6 6 Hirth 6 6 HKS 6 1 25 5 Cylinder 4 Stroke with Magneto 17 1 75 7 Cylinder 4 Stroke with Magneto 18 2 25 9 Cyli...

Page 36: ...ttings described in this section above All settings described in equipment supplements applicable to other equipment connected to the EFIS All settings in the following table Setting Set Menu Notes Sp...

Page 37: ...oad Navigation Database Display Unit Maintenance New databases are provided every 28 days on the GRT website Altimeter Calibration Altimeter Calibration Adjust BIAS as necessary so altimeter is correc...

Page 38: ...EX Horizon EX The Wiring and Pinout Diagrams included in this Appendix show the function of each D sub connection and its associated wire color Functions labeled NC have no connection Functions with...

Page 39: ...GRT Avionics Inc May 2019 Sport EX Horizon EX Install Manual 33 Rev A A 1 Sport EX Horizon EX Mounting Template Figure A 1 Sport EX Horizon EX Mounting Template...

Page 40: ...External GPS Module RAIM GPS Module ARINC Module Magnetometer NOTE Drawing shows height of module mounting platform only GPS and ARINC modules are 9 16 taller than mount Figure A 2 External Module Top...

Page 41: ...GRT Avionics Inc May 2019 Sport EX Horizon EX Install Manual 35 Rev A Figure A 4 Digital Magnetometer Installation A 3 Digital Magnetometer Installation Diagram...

Page 42: ...or added with the Serial Option NOTE OAT and Magnetometer connections apply to Sport EX ONLY Connections are NC for Horizon EX Figure A 5 25 Position Female D sub Connector Insertion View Pin Function...

Page 43: ...onal Analog Inputs and Audio Alerts are both added with the Analog Input Option NOTE Engine Sensor Inputs are a factory added option set that must be specified when ordering Figure A 6 25 Position Mal...

Page 44: ...ure A 7 9 Position Female D sub Connector Insertion View A 7 Angle of Attack AOA Installation and Calibration A 7 1 Sensed AOA Installation The sensed version of the angle of attack option uses a two...

Page 45: ...and vertical speed Note that this method although not requiring any sensors or additional pressure connections degrades in accuracy while in rising or falling air A 7 3 Calibration of the AOA Calcula...

Page 46: ...Avionics Inc May 2019 Sport EX Horizon EX Install Manual 40 Rev A A 8 Basic Engine Monitoring Wiring Requires purchase of Basic Engine Monitoring Option Figure A 9 Sport EX Basic Engine Monitoring Wir...

Page 47: ...GRT Avionics Inc May 2019 Sport EX Horizon EX Install Manual 41 Rev A A 9 Common Tachometer Connections Figure A 10 Common Tachometer Connections Basic Engine Monitoring Option Only...

Page 48: ...Rev A A 10 Trim Flap Position Sensor Wiring This diagram illustrates the use of an EIS Engine Monitor auxiliary input for sensing trim or flap position A Sport EX may use this method or one of its opt...

Page 49: ...eous Pitch Roll Angles Range Unlimited Operating Temperature Range 15 to 160 F 25 to 70 C Storage Temperature Range 25 to 185 F 30 to 85 C Max Rate of Change of Temperature Unlimited Long Term Referen...

Page 50: ...iagrams 34 A 4 Digital Magnetometer Installation A 3 Digital Magnetometer Installation Diagram 35 A 5 25 Position Female D sub Connector Insertion View A 4 Sport EX Horizon EX Connector A Pinout Diagr...

Page 51: ...Sport EX Horizon EX Connector A Pinout Diagram A 4 Sport EX Horizon EX Connector A Pinout Diagram 36 Sport EX Horizon EX Connector B Pinout Diagram A 5 Sport EX Horizon EX Connector B Pinout Diagram 3...

Reviews: