Mini-X Installation, Setup & User Manual GRT Avionics
Revision A9 24
Section 4: General Setup and Calibration
NOTE:
Each subsection in this section represents a step in the setup and calibration of the Mini
and optional external magnetometer. Perform each step in the order presented here for the most
efficient setup procedure.
4.1 Boot-Up Check
Apply power to the Mini. The display backlight should come on and show the boot page within 30
seconds. A warning, “Magnetometer Orientation Not Set,” will be generated if you have a
magnetometer connected. Ignore this for now. Note device communications, installed software
version, and navigation database effective date, and whether there are any other errors, then press
ACCEPT.
4.2 Explore the Set Menu Pages
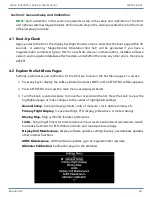
Settings, preferences and calibration for the Mini are found on the Set Menu pages. To access:
1. Press any key to display the softkey labels, then press NEXT until a SET MENU softkey appears.
2. Press SET MENU to access the main menu, as displayed below.
3. Turn the knob counterclockwise to move the cursor down the list. Press the knob to view the
highlighted page or make changes to the values of highlighted settings.
General Setup-
Serial port assignments, units of measure, clock, data recording, etc.
Primary Flight Display-
V-speed settings, PFD display preferences, G-meter settings
Moving Map-
Map symbol & features preferences
Limits-
Set up flight timers for total endurance minus reserve and interval reminders to switch
fuel tanks. Set limits for EFIS (Mini) minimum and maximum bus voltage.
Display Unit Maintenance-
Display software updates, settings backup, nav database updates,
other internal functions
AHRS Maintenance-
AHRS software updates, gyro & magnetometer raw data
Altimeter Calibration-
Calibration page for the altimeter

