


Mini-X Installation, Setup & User Manual GRT Avionics
Revision A9 85
8.4 Data Recording
There are three basic types of files that you can record off the Mini:
�
A simple “snapshot” is a still shot of the screen. This is saved as a PNG file on your USB drive.
Snapshots are nice for times when you want to record things like a high ground speed or unusual
performance. We use customer-supplied snapshots almost exclusively for the graphics in our
new manuals.
�
A “demo file” recording of the flight data for later playback on the display unit itself or for
displaying in a spreadsheet format. This includes all of the serial data as well as a recording of
flight instrumentation, AHRS data, GPS position, and map features. You can play back the demo
file recordings directly on your Mini to debrief a flight or review flight testing performance
information.
�
The USB Flight Data Logger samples data at a user selected interval and writes that to a CSV file
at the save interval. It's designed as an always-on continuous data recorder that requires less
data than a DEMO, and stores it in a more compact and easy-to-use format. Data is always added
to the end of the "GRT Flight Data Log.CSV" file on the USB flash drive.
Keep in mind that data on the USB stick can be recovered and analyzed by NTSB authorities after
a wreck, similar to a “black box.” Because demo files record all the data from the AHRS,
magnetometer, and other sensors during flight, they are also useful for our techs to help
customers solve problems.
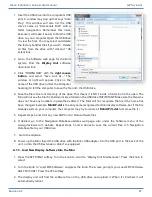
8.4.1 How to Take a Snapshot:
1. Go to SET MENU > General Setup.
2. Scroll to the bottom of the screen and find “SNAP Button.” Highlight it and select YES.
3. “SNAP Button Saves Menu”- Select YES to always display the softkey labels and NO to never
display softkey labels in the screenshots.
4. To imprint the PNG filename on the snapshot image, select YES for “Show DEMO Filename.”
5. Save all settings. Your display unit will now have a “SNAP” button on many screens where
there is an empty softkey. Notice that it will also display a SNAP button on menu screens. This
can be very useful for recording settings in picture form to share with your friends (ie. Autopilot
gain settings, etc) or sending them to us for troubleshooting.
6. To take the picture, simply press SNAP to save the screen image to the installed USB stick