4
English (US)
3.3 Applications
Grundfos Comfort System is intended for indoor
residential potable drinking water use only; to be
considered where there is no hot water return
line available.
The pump is lubricated and cooled by the liquid
being pumped. Therefore, the pumped liquid
must always be allowed to circulate through the
pump while it is in operation.
3.4 Identification
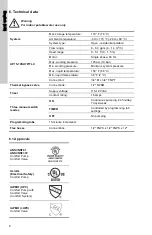
The pump's nameplate shows information about
the pump's electrical requirements. Verify that
the pump will be supplied with the proper
voltage, phase, and frequency during operation.
This pump's motor is designed to run on ± 10 %
of the voltage shown on the nameplate.
4. Installation
4.1 Pre-installation checklist
Before beginning installation, review all
installation procedures in this document to
insure proper and safe installation. Failure to
follow procedures described in this document
could have impact upon warranty and may
cause inadvertent property damage.
4.2 Electrical requirements
The operating voltage and other electrical data
are marked on the motor label. Make sure that
the motor is suitable for the electrical supply on
which it will be used.
4.3 Three-step installation procedure
4.3.1 Pump installation (step one)
1. Close the supply water valve to the water
heater (located, in most cases, above the hot
water heater on the cold water inlet to the hot
water heater).
2. Drain the water from the hot water pipe by
opening a hot water faucet in the house.
Let the water run until it stops flowing.
Then drain remaining water from the hot
water heater spigot.
Leave the faucet open until pump
installation is complete. If water does not
stop flowing, check to make sure the water to
the hot water heater has been completely
shut off.
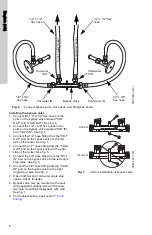
3. Disconnect the hot water piping from the
water heater hot water discharge; see fig.
4. Install pump onto the water heater
discharge, using the 3/4" female fitting and
gasket supplied on the pump. Ensure that
the pump shaft is horizontal. The pump
should be installed so that the pump is
pumping away from the hot water heater,
towards the house. Confirm the direction of
pumping by observing the flow arrow on the
side of the pump housing. Be sure that the
pump is not touching the exhaust vent piping
(chimney) of a gas or oil fired hot water
heater. See fig. 3.
5. Connect the hot water line to the 3/4" NPT
discharge of the pump. Use pipe joint
compound/pipe dope or Teflon
®
tape to seal
threads when connecting to a 3/4" female
NPT connection. If a gasketed flexible
copper water heater connector is used, pipe
joint compound/pipe dope or Teflon
®
tape is
not required.
6. Reopen the supply valve to the hot water
heater and allow the water to run until all the
air has been purged from the piping.
7. Close faucet inside the house.
8. Plug the line cord of pump into a 115 V
outlet. Be sure to route the power cord so
that it does not touch the exhaust vent piping
of a gas or oil fired hot water heater.
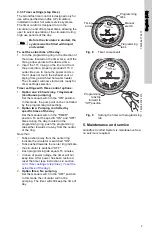
9. Using the timer, set the pump to operate
around your peak use times (such as
30 minutes before the first shower until
15 minutes after the last shower. See section
4.3.3 Timer settings (step three)
.
Warning
The pump must not be used for the
transfer of flammable liquids such
as diesel oil, gasoline, and similar
liquids.
Pump not for pool or marine use.
Warning
For indoor use only.
Warning
Do not energize pump until
properly installed.
Warning
Risk of electric shock - this pump is
supplied with a grounding
conductor. To reduce the risk of
electric shock, be certain that it is
connected only to a properly
grounded grounding type
receptacle. The safe operation of
this pump requires that it be
grounded in accordance with
national, state, and local governing
codes and regulations.
Warning
Do not energize pump until
properly installed.
Caution
Warning
When making piping connections,
be sure to follow piping
manufacturer's recommendations
and all code requirements for
piping material.
Summary of Contents for Comfort 595916
Page 10: ...10...


