background image

10

6. EMC-correct installation

The CU 361 is normally mounted in a panel which 
also contains an IO 351 module, frequency 
converters, contactors and other power equipment.

In order to ensure a faultless function, it is very 
important to install the electronic modules in an 
EMC-correct way:

Ensure a sufficient earth connection between the 
CU 361 and the frame. See fig. 7.

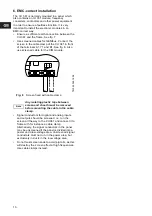
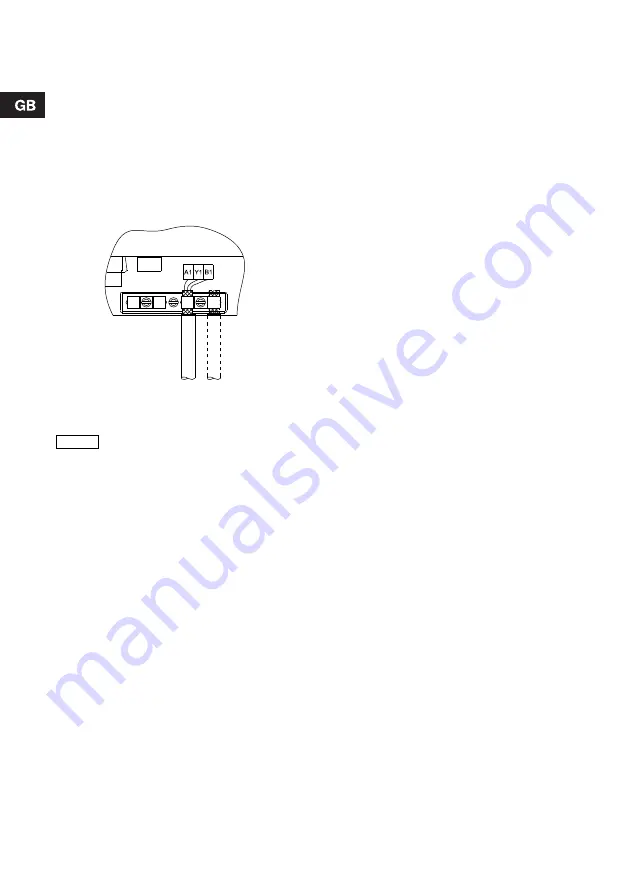
Use screened cables for GENIbus. Connect the 
screen to the cable clamp of the CU 361 in front 
of the terminals A1, Y1 and B1. See fig. 8. Also 
use screened cable for the CIM module.

Fig. 8

Screen fixed with cable clamp

Signal conductors for digital and analog inputs 
and outputs should be screened, i.e. run the 
screen all the way to the CU 361 and connect it to 
frame with for instance a cable clamp.
Alternatively, the signal conductors in the panel 
may be unscreened if the panel is divided into a 
power and a low-voltage area. Unscreened signal 
conductors must not run in the power area, but 
exclusively in ducts in the low-voltage area.

Do not twist screen ends to avoid pig tails, as this 
will destroy the s creen effect at high frequencies. 
Use cable clamps instead.

T

M

04

 20

65

 19

08

Note

Any isolating plastic tape between 
screen and sheath must be removed 
before mounting the cable in the cable 
clamp.

Summary of Contents for CU 361

Page 1: ...4 Digital inputs 13 9 5 Analog inputs 13 9 6 Digital outputs relay outputs 13 9 7 Conductors 13 9 8 Battery backup UPS 14 9 9 Terminal groups 14 10 Overview of inputs and outputs 15 11 Maintenance 16...

Page 2: ...Description 1 LCD display 2 Changes to next column in menu structure 3 Changes to help text 4 Goes up in lists 5 Goes down in lists 6 Increases the value of a selected parameter 7 Reduces the value of...

Page 3: ...ear week 5 Rated voltage frequency and power TM04 2367 2408 TM00 5827 3408 Type Made in Thailand 96161750 Product No UN Serial No P c OPEN TYPE PROCESS CONTROL EQUIPMENT 100 240 Vac 50 60Hz Max 22W CU...

Page 4: ...ating 1 2 3 3R 5 12 12K or 13 4 3 Terminals All terminals are suitable for conductors of 0 5 to 2 5 mm2 or AWG 20 13 4 4 Cables Cables must be rated min 70 C 5 Mechanical installation Fasten the CU 36...

Page 5: ...e CIM module Fig 8 Screen fixed with cable clamp Signal conductors for digital and analog inputs and outputs should be screened i e run the screen all the way to the CU 361 and connect it to frame wit...

Page 6: ...s will be available in the future The CIM modules must be ordered separately The connection of the CIM module is described in the installation and operating instructions supplied with the module 6 3 F...

Page 7: ...upplied with the CIM module on the back cover See fig 13 Fig 13 Placing the new labels on the back cover 5 Refit the back cover to the CU 361 and secure it with the mounting screw See fig 14 Fig 14 Re...

Page 8: ...rcuit breakers must be done in accordance with local and national regulations 9 4 Digital inputs 9 5 Analog inputs 9 6 Digital outputs relay outputs 9 7 Conductors Warning Prior to start up read the i...

Page 9: ...e terminals of the groups 2 3 5 and 6 are insulated from all other terminal groups by reinforced insulation 2224 VAC All control terminals in groups 2 3 5 and 6 are supplied with SELV voltage Safety E...

Page 10: ...ut 11 GND 12 DI2 13 GND 14 DI3 All terminals except mains terminals must only be connected to voltages not exceeding 16 Vrms and 22 6 Vpeak or 35 VDC 6 Ethernet RJ45 External computing devices connect...

Page 11: ...ff the power supply to the CU 361 2 Switch off the power supply to components with external supply 3 Mark the individual conductors with the numbers of the corresponding terminals 4 Remove the screws...

Reviews: