English (GB)
22
6.7 Adjusting the Servomotor (option)
In case of repairs or exchange, it may be possible to readjust the
servomotor.
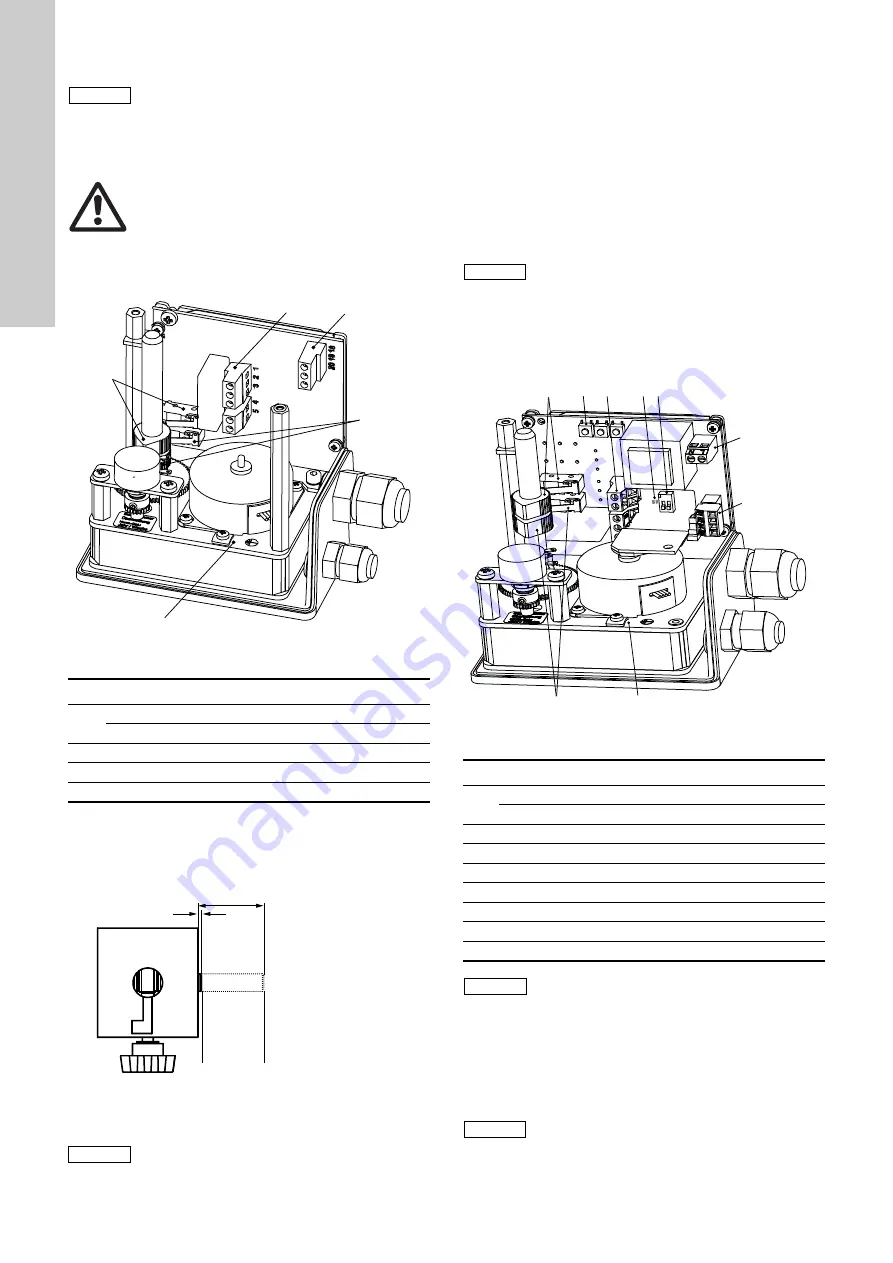
6.7.1 Servomotor with reversing potentiometer
Fig. 39
Servomotor with reversing potentiometer
• Take off the cover of the servomotor.
• With the connected controller, move the servomotor to 0 %
dosing flow (as indicated at the measuring tube). The gear
rack at the rate valve must jut out for at least 1 mm.
Fig. 40
Setting the limit switches
• Set this position on the controller as the zero point. Set the
upper limit switch (SR, see fig.
) to the equivalent
servomotor position.
• Set the controller to 10 %.
• Check the dosing flow indicated at the measuring tube. If it is
not 10 %:
• Adjust the zero point again. Possibly the floater reaches the
end stop at a dosing flow of more than 0 %.
• With the connected controller, move the servomotor to 100 %
dosing flow (as indicated at the measuring tube).
• The gear rack at the rate valve must jut out for maximum
31 mm.
• Set the lower limit switch (SL, see fig.
) to the equivalent
servomotor position.
• Remount the cover of the servomotor.
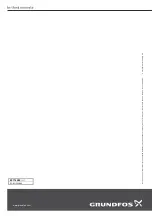
6.7.2 Servomotor with analogue control
Fig. 41
Servomotor with analogue control
• Take off the cover of the servomotor.
• Connect the 4-20 mA current sensor to terminals 51 and 52
and set it to 4 mA.
• Use programming buttons R and SET to set the servomotor to
0 % dosing flow (as indicated by the measuring tube).
• The gear rack at the rate valve must jut out for at least 1 mm.
• Set the lower limit switch (SR) to a value slightly below 0 %.
Note
The servomotor is already adjusted by works if
ordered together with the system.
Warning
The servomotor may only be adjusted by qualified
personnel, as the mains power has to be switched
on.
Danger!
Do not touch bare wires or clamp screws!
TM
04 09
56 400
9
Item Description
1
SR, limit switch cam min.
SL, limit switch cam max.
2
Mains voltage input
3
Potentiometer input/output
4
Earth terminal
TM
04 08
26 090
8
Caution
In case of undershoot: The rate valve may get
damaged!
2
1,
3
4
SL
SR
1,
min.
(ST1)
max.
(ST2)
+0,5
31 mm
+0,5
1 mm
Caution
In case of exceeding: The rate valve may get
damaged!
TM
04
09
56
40
09
Item Description
1
SR, limit switch cam min.
SL, limit switch cam max.
2
Programming buttons
3
Alarm output
4
LEDs
5
DIP switch
6
Mains connection terminals
7
Analogue signal connection terminals
8
Earth terminal
Note
For exact adjustment, a current source 4-20 mA is
necessary
Caution
In case of undershoot: The rate valve may get
damaged!
2
3
5
4
6
7
8
1 2
L
R
SET
on
1,
SR
SL
1,


