background image

18

ENGLISH

OPERATION _______________________________

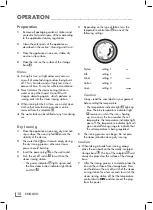
Preparation

Remove all packaging material, stickers and 

protective foil and dispose of them according 

to the applicable statutory regulations.

Clean the outer parts of the appliance as  

described in the section 

“Cleaning and Care“.

Place the appliance on an even, stable, dry 

and non-slip surface.

Place the iron on the surface of the storage 
base 

E

 .

Notes


During first use, a slight odour may occur as 

a result of manufacturing residues being burnt 

off. This is harmless and will only last a short 

amount of time. Ensure for sufficient ventilation.


Never immerse the steam ironing station in 

water or any other liquid. Do not fill with 

vinegar, descaling agents, starch, perfume or 

ironing aids into the steam ironing station.


When ironing for the first time, use an old, clean 

cloth so that manufacturing residues can be 

removed from the soleplate 

D

 . 


The water tank can be refilled at any time during 

use.

Dry Ironing

Place the appliance on an even, dry and non-

slip surface. The non-slip feet 

U

 ensure the 

stability of the device. 

The water tank 

C

 must remain empty during 

the dry ironing process; otherwise steam 

pressure could build up.

Insert the power plug 

B

 on the wall socket. 

Push the on/off switch 

S

 to switch on the 

steam ironing station. 
-   The power indicator 

N

 lights up red and 

the blue steam button indicator light blinks 
on LOW 

P

 .

 Depending on the type of fabric, turn the 

temperature control dial 

G

 to one of the 

following settings:


Nylon,  

setting 1   


Silk   

setting 1


Wool  

setting 2   




Cotton 

setting 3


Linen  

setting 3   



Caution


Always read the care label on your garment 

before setting the temperature.
-  The temperature indicator light 

K

 lights up 

blue. The blue temperature indicator light 

K

 remains on whilst the iron is heating 

up. As soon as the iron reaches the set 

temperature, the temperature indicator light 

goes off. The temperature indicator light will 

go on and off during usage to indicate that 

the set temperature is being regulated.

The ironing process can begin. Do not press 

the steam jet button during dry ironing.

Caution


When taking a break from ironing, always 

place the iron back on the thermally insulated 

storage base 

E

. The tip of the soleplate 

D

 must 

always be placed on the surface of the storage 

base.

After the ironing process is complete, place the 

iron on the surface of the storage base. Press 

and hold down the on/off switch of the steam 

ironing station for a few seconds to switch the 

steam ironing station off. Set the temperature 

control dial to 

MIN

 and disconnect the plug 

from the power.

Summary of Contents for 1806802

Page 1: ...STEAM STATION de en Product code 1806802 SIS 7040 ...

Page 2: ...void any danger Faulty or unqualified repair work may cause danger and risk to the user Never use this appliance with damp or wet hands Only use the original accessories or those that are recommended by the manufacturer Danger of suffocation Keep all packaging materials away from children Dispose of the packaging materials properly Please contact your local authority in regard to disposal and recy...

Page 3: ...ppers metal buttons or other metal parts as this could damage the soleplate To guarantee the safety of the appliance do not alter the safety features in any way When walking away or leaving the appliance for only a brief amount of time ensure you always place the iron on the storage base and switch it off An unsupervised hot iron can result in burn injuries Never point the hot soleplate towards pe...

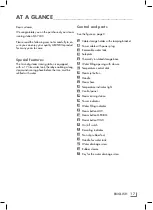
Page 4: ...d with water Control and parts See the figure on page 3 A Cable storage holder with clamping bracket B Power cable with power plug C Removable water tank D Soleplate E Thermally insulated storage base F Water filling opening with closure G Temperature control dial H Steam jet button I Handle J Steam hose K Temperature indicator light L Control panel M Steam ironing station N Power indicator O Wate...

Page 5: ... 3 Insert the power plug B on the wall socket 4 Push the on off switch S to switch on the steam ironing station The power indicator N lights up red and the blue steam button indicator light blinks on LOW P 5 Depending on the type of fabric turn the temperature control dial G to one of the following settings Nylon setting 1 Silk setting 1 Wool setting 2 Cotton setting 3 Linen setting 3 Caution Alwa...

Page 6: ...nsure the stability of the device 2 Fill the water tank as described in the section Filling the water tank 3 Insert the power plug into the wall socket 4 Push the on off switch S to switch on the steam ironing station The power indicator N lights up red and the blue steam button indicator light blinks on LOW P 5 Adjust the temperature control dial to the desired temperature The temperature indicat...

Page 7: ...tarting the steam ironing station again it could cause spluttering of the unit and water droplets at the soleplate In order to avoid these droplets falling onto your garments we recommend to use an old clean cloth in the beginning Press the steam jet button until the droplets disappear and normal steam will be produced If dirt particles escape from the soleplate clean the steam ironing station acc...

Page 8: ... deposits from the steam ironing station when the desca ling indicator lights up Never hold the steam ironing station under running water and never submerge it in water or any other liquid Never clean the soleplate with chemicals steel wool wood or other abrasive cleaning agents 1 Prior to each cleaning turn the device off and disconnect the power plug from the power outlet 2 Let the steam iron co...

Page 9: ...appliance is always kept out of the reach of children Environmental note This product has been manufactured with high quality parts and materials which can be reused and are suitable for recycling Therefore do not dispose of the product with normal domestic waste at the end of its service life Take it to a collection point for the recycling of elec trical and electronic equipment This is indicated...

Page 10: ...ENGLISH 23 www grundig com ...

Reviews: