TP CHASSIS / TELEVISION
28 September 2011
»V« or »
Λ
« and confirm with »
●
«
– »NETWORK APPS« menu will be displayed.
3 Select »Connection« option with »V« or »
Λ
« and select »Wired« with »<« or »>«.
4 Select »Connection Type« option with »V« or »
Λ
« and select »Auto« with »<« or
»>«.
5 Select »Connect« with »« (red) button to establish the modem connection.
– »Connecting ... Please wait« message will be displayed.
6 Press » « (green) button to make sure that the network connection is established
with the current settings.
– »Testing ... Please wait« message will be displayed and if it is connected
successfully, »Connection to Gateway : Success«, »Internet Connection: Success«
message will be displayed. Press »i« to end the setting.
Note: If you do not have a dynamic network, follow the instructions in manual
connection section.
5.3.4. Manual Connection
Certain networks require Static IP address. If your network requires a Static IP
address, you must enter the »IP Address«, »Netmask«, »Gateway« and »DNS«
values manually. You can obtain your »IP Address«, »Netmask«, »Gateway« and
»DNS« values from your Internet Service Provider (ISP).
1 Open the menu with »i« button.
2 Select »NETWORK APPS« menu with »V« or »
Λ
« and confirm with »
●
«
»NETWORK APPS« menu will be displayed.
3 Select »Connection Type« option with
»V« or »
Λ
« and select »Wired« with »<«
and »>«.
4 Select »Network Configuration« option
with »V« or »
Λ
« and select »Manual«
with »<« and »>«.
- »IP Address«, »Netmask«, »Gateway«
and »DNS« options are active.
5 Select »IP Address« with »V« and
press »
●
«. Enter the IP address with
»1…0« and press » « (green) to save
the value.
6 Select »Netmask« with »V« and press
»
●
«. Enter the Netmask address with
»1…0« and press » « (green) to save
the value.
7 Select »Gateway« with »V« and press
»
●
«. Enter the Gateway address with
»1…0« and press » « (green) to save
the value.
8 Select »DNS« with »V« and press »
●
«. Enter DNS address with »1…0« and press
» « (green) to save the value.
9 Select »Connect« with » « (red) button to establish the modem connection.
– »Connecting ... Please wait« message will be displayed.
Summary of Contents for 40VLE630BH
Page 1: ...TP CHASSIS TELEVISION 1 September 2011 TP CHASSIS TELEVISION SERVICE MANUAL_V2 ...
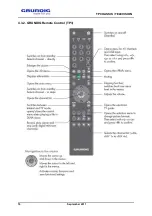
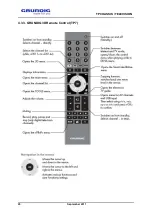
Page 19: ...TP CHASSIS TELEVISION 19 September 2011 4 3 2 GRUNDIG Remote Control TP3 ...
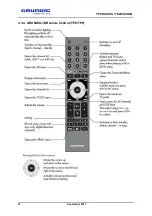
Page 20: ...TP CHASSIS TELEVISION 20 September 2011 4 3 3 GRUNDIG 3D Remote Control TP7 ...
Page 21: ...TP CHASSIS TELEVISION 21 September 2011 4 3 4 GRUNDIG 3D Remote Control TP8 TP9 ...
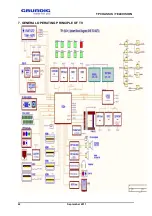
Page 42: ...TP CHASSIS TELEVISION 42 September 2011 7 GENERAL OPERATING PRINCIPLE OF TV ...
Page 65: ...TP CHASSIS TELEVISION 65 September 2011 ...
Page 89: ...TP CHASSIS TELEVISION 89 September 2011 12 3 No Sound ...
Page 90: ...TP CHASSIS TELEVISION 90 September 2011 13 CHASSIS DIAGRAMS ...
Page 91: ...TP CHASSIS TELEVISION 91 September 2011 ...
Page 92: ...TP CHASSIS TELEVISION 92 September 2011 ...
Page 93: ...TP CHASSIS TELEVISION 93 September 2011 ...
Page 94: ...TP CHASSIS TELEVISION 94 September 2011 ...
Page 95: ...TP CHASSIS TELEVISION 95 September 2011 ...
Page 96: ...TP CHASSIS TELEVISION 96 September 2011 ...
Page 97: ...TP CHASSIS TELEVISION 97 September 2011 ...
Page 98: ...TP CHASSIS TELEVISION 98 September 2011 ...
Page 99: ...TP CHASSIS TELEVISION 99 September 2011 ...
Page 100: ...TP CHASSIS TELEVISION 100 September 2011 ...
Page 101: ...TP CHASSIS TELEVISION 101 September 2011 ...
Page 118: ...TP CHASSIS TELEVISION 118 September 2011 19 SIGNIFICANT OSCILLOSCOPE OUTPUTS ...
Page 119: ...TP CHASSIS TELEVISION 119 September 2011 ...
Page 120: ...TP CHASSIS TELEVISION 120 September 2011 ...
Page 122: ......
Page 123: ......
Page 124: ......

