background image

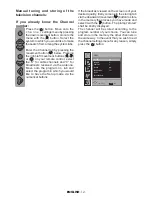
Manual tuning and storing of the
television channels:

If you already know the Channel
number:

Press the 

( )

 button. Move onto the

c h a n n e l settings menu by pressing
the down movement button. Go onto the
menu with the 

( )

 button. Select the

system in which you would like to make
the search from among the system tabs.

Enter the Channel tab by pressing the
movement button 

(

)

 below. Pressing

the right-left movement buttons 

( )/( )

or (

)

 on your remote control, select

the “S” for cable channels and “C” for
broadcasts received via the antenna.
Move onto the program no. tab and
select the program in which you would
like to have the Setup made via the
numerical buttons.

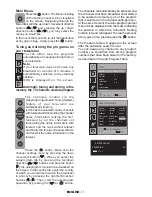
If the broadcast viewed on the screen is of your
desired quality, firstly come onto the storing tab
via the downward movement 

(

)

 button to store

in the memory the process you have made and
select it with the 

( )

 button. The prompt ‘stored’

shall be briefly displayed.
The channel will be stored according to the
program number of your choice.  You can tune
and store in the memory the other channels in
the same way. In the event that you wish to exit
the channel settings menu for any reason, simply
press the 

( )


button.

ENGLISH

 -12-

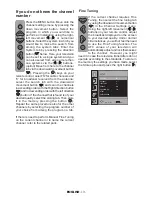
SETUP

EXIT

MENU

SYSTEM

CHANNEL

FINE TUNE

SEARCH

PROGRAM NO

STORE

AUTOPROGRAM

BG

C - -

0


P 01

SELECT

Summary of Contents for AMIRA26HDBLK

Page 1: ...AMIRA26HDBLK COLOUR TELEVISION ENGLISH ...

Page 2: ...power on and settings performance 10 Setting up the television 11 Automatic search 11 Manual search 12 13 Lining up the program positions naming the programs changing their locations removing and skipping 14 The settings on your new television 15 Sound Menu 15 Setting up the sound features 15 Picture menu 16 Features menu 17 Using the PIP PAP PAT features 18 Teletext features 19 20 External equipm...

Page 3: ...abinet After turning off the power clean the screen and the cabinet with a soft dry cloth We recommend that you do not use any proprietary polishes or solvents on the screen or cabinet as this may cause damage Disposal The cold cathode fluorescent lamp in the LCD panel contains a small amount of mercury when the set reaches the end of its useful life please dispose of it in accordance with Local G...

Page 4: ...nd system connection S VHS and Cinch inputs for S Video connection PC connection Low energy consumption AVL ATS Programmable power off Graphic equalizer The feature of sharpness in Colour Transitions CTI Sharpness feature and picture resolution LTI in the black white transitions A clear Picture made possible by the Digital Comb Filter On screen viewing of all settings program numbers and all the p...

Page 5: ...lug If you have any doubts as regards the installation operation or safety of the device please REFER to the vendor BE CAREFUL about the glass panels and covers on the device Things not to be Done Since that will expose the components loaded with dangerous voltage DO NOT REMOVE any fixed covers ENGLISH 6 DO NOT COVER the ventilation openings of the device with items such as newspapers table clothe...

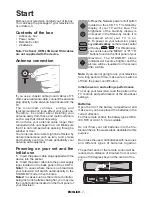
Page 6: ... angle of 30 degrees beyond the centre of the TV Start Remove your television carefully out of its box You can keep the package of your television to use it later on Contents of the box Accessory box Power cable Remote Control 2 batteries Note The Scart HDMI VGA and RCA cables are not supplied with the device Antenna connection If you use a coaxial cable round cable of 75 Ohms as an antenna cable ...

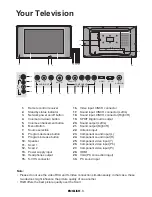
Page 7: ... quality of one another RGB offers the best picture quality over the Scart Your Television 1 Remote control receiver 2 Standby status indicator 3 Network power on off button 4 Volume turn down button 5 Volume enhancement button 6 Menu Button 7 Source selection 8 Program decrease button 9 Program increase button 10 Speaker 11 Scart 1 12 Scart 2 13 Power supply input 14 Headphones output 15 S VHS co...

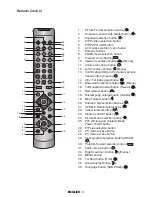
Page 8: ... button Menu 13 Confirmation OK and Temporary picture freeze button Freeze 14 Info Txt index page button 15 Downward movement button Menus 16 Txt Question Answer button Reveal 17 Red teletext button 18 Teletext page enlarge button Double 19 Blue Teletext button 20 Teletext Mix selection buttons 21 UPDATE Button Teletext time 22 Yellow teletext button 23 Stand by On Off button 24 Picture Mode selec...

Page 9: ...ht hand side of your remote control of your television when it is switched on the sound and the picture will go off In the stand by function the power indicator of your television will glow more To switch your television back on either press the same button any of the digital buttons or the buttons Caution If you are not going to use your television for a long period of time make sure to switch it...

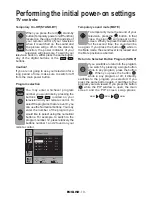
Page 10: ...ettings menu by pressing the down movement button When you select the autoprogram tab by pressing the Up down direction buttons and pres the button the autoprogram menu will be visualized on the screen In the country tab select the country of which you would like to watch the broadcast in priority by pressing the right left direction buttons Then start the autoprogram operation by pressing the or ...

Page 11: ... the program no tab and select the program in which you would like to have the Setup made via the numerical buttons If the broadcast viewed on the screen is of your desired quality firstly come onto the storing tab via the downward movement button to store in the memory the process you have made and select it with the button The prompt stored shall be briefly displayed The channel will be stored a...

Page 12: ...t the system in which you would like to make the search from among the system tabs Enter the System tab by pressing the direction button below Here your television can be set to a single system and you can also select from among more than one systems via the buttons option Move from here to the channel tab via the downward movement button Pressing the keys on your remote control select S for cable...

Page 13: ...her programs simply repeat the above procedure In the event that you wish to exit the application simply press the button If the program is not renamed then the channel number of that program shall be automatically displayed Program Table Press the button Move onto the Program Menu by pressing the downward movement button When you press the button the program table will appear on the screen Switch...

Page 14: ...gram to program Select the option Off to cancel it Headphones By connecting the headphone unit to your television you can listen to the program sounds independently from your television To turn up and down the headphone sound level you can adjust the sound level by using the Right left movement buttons in the Sound tab When you want to hear the sound from the headphone only just press the button o...

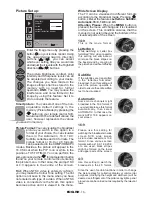
Page 15: ... laws Picture Set up Enter the Image menu by pressing the button on your remote control Using the upwards downwards direction buttons you can select whichever setting title you would like and adjust their levels with the Right left direction buttons The picture brightness contrast color intensity and Sharpness levels can all be adjusted according to your desire The changes you have made in the ima...

Page 16: ...the Zoom mode for any reason simply press the button By pressing the button you may return to the normal mode after the three stages Note The Zoom mode does not operate while there is a PIP picture in the screen and in the COMP HDMI PC inputs The Zoom mode is aborted once the program has been switched Teletext is entered or PIP is activated Features Press the button on your remote control Select t...

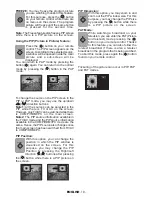
Page 17: ...rol The PIP screen appears on the screen According to the selected source a window will be opened inside the main picture and a sub screen will be displayed You can return to PAP mode by pressing the button again You can return to the normal mode by pressing the button in the PAP mode To change the source on the PIP screen in the PIP or PAP mode you may use the up down direction buttons Note1 All ...

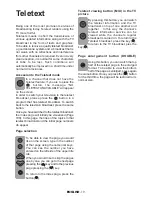
Page 18: ...reflections and interference from other channels are required Even in a very clear reception it is normal for some characters or tabs to be lost Such conditions will automatically be improved in a short time under normal circumstances Accession to the Teletext mode In a channel that does not have the Teletext feature if you are to press the button the message NO TELETEXT UNAVAILABLE will appear on...

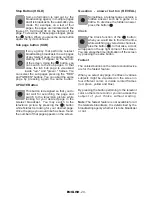
Page 19: ...tton HOLD Some information is laid out by the broadcasting agency in multiple pages and it is broadcast in the automatic cycle mode For example on a text of four pages the pages are indicated with the figures 01 02 03 and 04 on the bottom of the page To view one of these pages longer press the button When you press the same button again the cycle continues Sub page button SUB If any agency that pe...

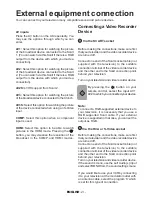
Page 20: ...f the sound is mono use the Left Audio L input and select MONO from the sound settings menu If you would like to use your VCR by connecting it to your television at the modulator outlet with an antenna cable select the program 0 which is set for this type of connection AV External equipment connection You can connect to your television many compatible sound and picture devices AV inputs Press the ...

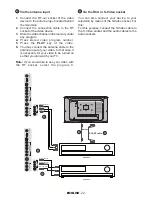
Page 21: ...to the antenna input located behind the television 2 Connect the connection cable to the RF socket of the video device 3 Store the video channel in the memory under any program 4 Press stored video program number 5 Press the PLAY key of the video 6 You may connect the antenna cable to the antenna input of your video In that case it is necessary for your video to be turned on so that you can watch ...

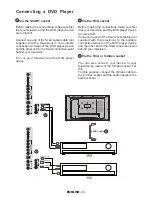
Page 22: ...with the television to the suitable connection terminal of the DVD player device and the other end to the Scart connection point behind your television Via the RCA or S Video socket You can also connect your device to your television by means of the S Video socket For this For this purpose connect the S Video cable to the S Video socket and the audio cables to the audio sockets ENGLISH 23 Sound In...

Page 23: ...e connections make sure first that your television and the decoder device are turned off Connect one end of the Scart socket cable not supplied with the television to the suitable connection terminal of the decoder device and the other end to the Scart connection point behind your television Note It is necessary that the decoder device be equipped with a tuner so that you can connect a decoder thr...

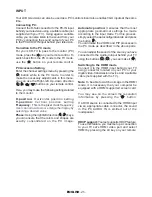
Page 24: ...d value Phase Using the right left direction keys you can ensure that the colors and shapes are exactly consolidated on the PC image Automatic position It ensures that the most appropriate geometrical settings be made according to the input mode For this process simply select the Autoconfiguration tab and press the button You can make the ZOOM and PIP processes in the PC mode as described in the a...

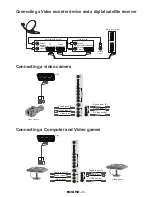
Page 25: ...ideo Camera Sound Input R Sound Input L Video Input Sound Input R Sound Input L S Video output Antenn a output Antenn a input Sound Input R Sound Input L Video Input Sound Input R Sound Input L S Video output ENGLISH 26 Connecting a Computer and Video games S VHS V L R AV3 S VHS V L R AV3 ANT IN COMPONENT VIDEO INPUT L PC IN R Y Pb Pr PC AUDIO IN SPDIF L AUDIO OUT HDMI AUDIO ANT IN COMPONENT VIDEO...

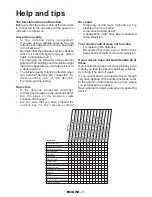
Page 26: ...r device does not work despite all of these If your television does not work properly even though you tried the above mentioned solutions try turning it on and off again If you cannot start your television even though you have applied all the written methods refer to the dealer or authorized service from where you purchased the product Never attempt to repair yourself a non operating device Sympto...

Page 27: ...is product has been made from high quality parts and materials which can be re used and recycled Therefore do not throw the product away with normal household waste at the end of its life Take it to a collection point for devices This is indicated by this symbol on the product in the operating manual and on the packaging Please find out about collection points operated by your local authority Help...

Page 28: ...AUA 801 ...
Reviews: