background image

ENGLISH

3

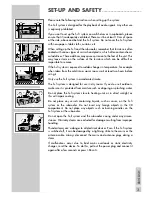
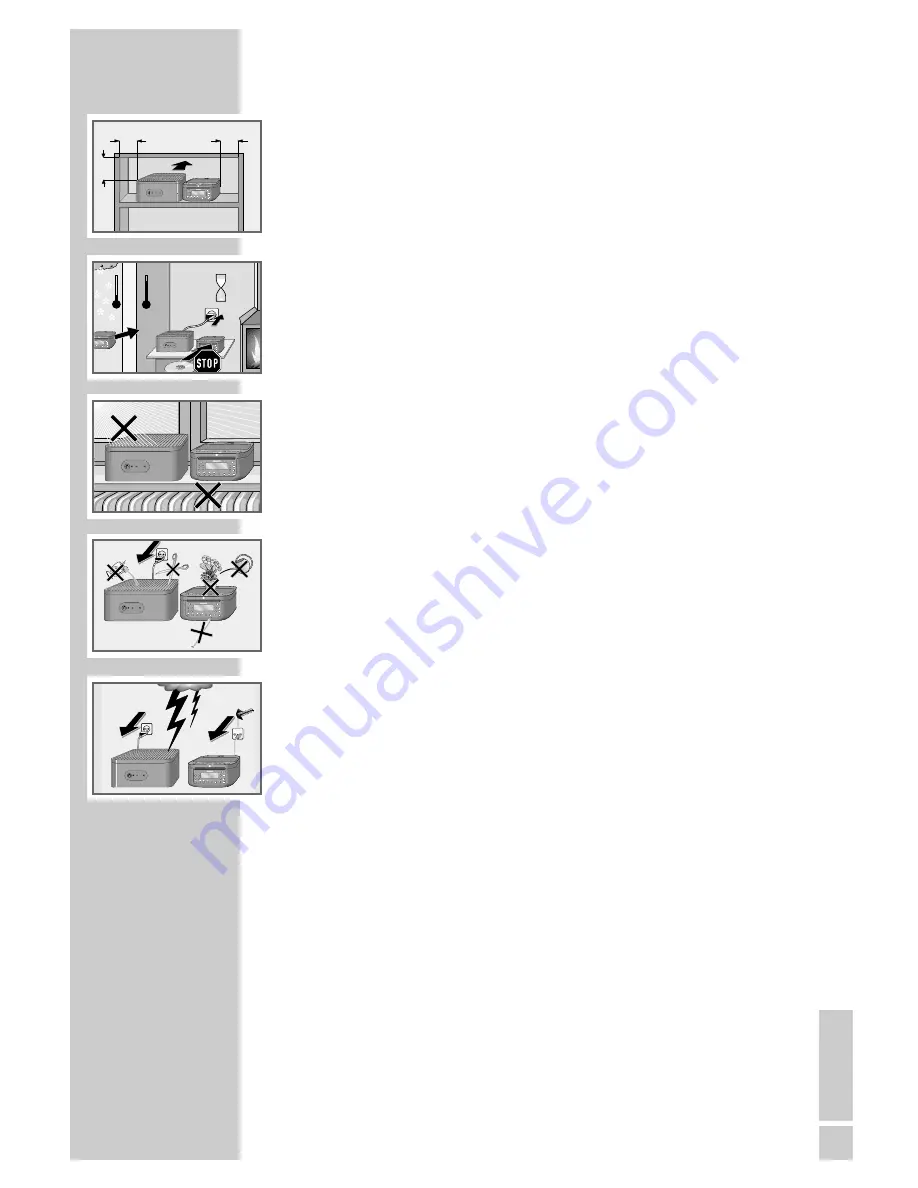
Please note the following instructions when setting up the system:

The hi-fi system is designed for the playback of audio signals. Any other use
is expressly prohibited.

If you want to set up the hi-fi system on wall shelves or in cupboards, please
ensure that it is adequately ventilated. There must be at least 10 cm of space
at the side, above and behind the hi-fi system. Do not cover the hi-fi system
with newspapers, table cloths, curtains, etc.

When setting up the hi-fi and the subwoofer, remember that furniture is often
coated with various types of varnish and plastic, which often contain chemi-
cal additives. These additives may cause corrosion to the feet of the unit. This
may leave stains on the surface of the furniture which can be difficult or
impossible to remove.

If the hi-fi system is exposed to sudden changes in temperature, for example
when taken from the cold into a warm room, wait at least two hours before
using it.

Only use the hi-fi system in a moderate climate.

The hi-fi system is designed for use in dry rooms. If you do use it outdoors,
make sure it is protected from moisture such as dripping or splashing water.

Do not place the hi-fi system close to heating units or in direct sunlight, as
this will impair cooling.

Do not place any vessels containing liquids, such as vases, on the hi-fi 
system or the subwoofer. Do not insert any foreign objects in the CD 
compartment. Do not place any objects such as burning candles on the 
hi-fi system or the subwoofer.

Do not open the hi-fi system and the subwoofer casing under any circum-
stances. Warranty claims are excluded for damage resulting from improper
handling.

Thunderstorms are a danger to all electrical devices. Even if the hi-fi system
is switched off, it can be damaged by a lightning strike to the mains or the
antenna cable. Always disconnect the mains and antenna plugs during a
storm.

If malfunctions occur due to brief mains overloads or static electricity
charges, reset the device. To do this, pull out the power plug and connect it
again after a few seconds or press »

Reset

«.

SET-UP AND SAFETY

___________________________

10

cm

10

 cm

10

cm

10

cm

TO MAIN UNIT

POWER

ON/OFF

CD

FLASH

TUNER

AUX

PROG

RESET

EQ

ST/MO

°

C

2h

°

C

TO MAIN UNIT

POWER

ON/OFF

CD

FLASH

TUNER

AUX

PROG

RESET

EQ

ST/MO

PROG

RESET

EQ

ST/MO

TO MAIN UNIT

POWER

ON/OFF

CD

FLASH

TUNER

AUX

PROG

RESET

EQ

ST/MO

TO MAIN UNIT

POWER

ON/OFF

CD

FLASH

TUNER

AUX

PROG

RESET

EQ

ST/MO

! SER

VICE !

! SER

VICE !

! SER

VICE !

TV

R

TO MAIN UNIT

POWER

ON/OFF

CD

FLASH

TUNER

AUX

PROG

RESET

EQ

ST/MO

Summary of Contents for CDS 3000 DEC

Page 1: ...HIFI MICRO SYSTEM CDS 3000 DEC...

Page 2: ...de Selecting the tuner input source Selecting a preset Stereo mono reception RDS information 23 CD mode Selecting the CD input source Inserting a CD Playing back a CD Display information MP3 only Sele...

Page 3: ...the hi fi system close to heating units or in direct sunlight as this will impair cooling Do not place any vessels containing liquids such as vases on the hi fi system or the subwoofer Do not insert...

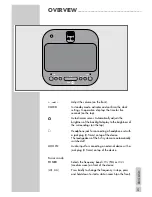
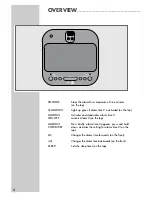
Page 4: ...nput source USB Switches the hi fi system from standby mode on the front TUNER Selects the tuner input source Switches the hi fi system from standby mode on the front AUX Selects the AUX input source...

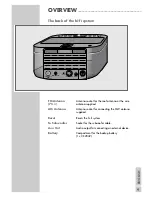
Page 5: ...h a jack plug 3 5 mm on top of the device The loudspeakers of the hi fi system are automatically switched off AUX IN Audio input for connecting an external device with a jack plug 3 5 mm on top of the...

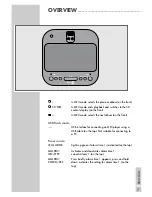
Page 6: ...back on the front s 6 In MP3 and CD DA mode press briefly to select the next track press and hold down to search forwards for a particular passage on the front 5 a In MP3 and CD DA mode press briefly...

Page 7: ...cable on the top Not suitable for connecting to a PC Timer mode Z ALARM1 Lights up green if alarm time 1 is activated on the top ALARM1 Activates and deactivates alarm time 1 ON OFF cancels Alarm 1 on...

Page 8: ...the top ALARM2 Press briefly alarm time 2 appears press and hold CHECK SET down activates the setting for alarm time 2 on the top s 6 Changes the alarm time forwards on the front 5 a Changes the alar...

Page 9: ...cket for connecting the MW antenna supplied Reset Resets the hi fi system To Subwoofer Socket for the subwoofer cable Aux Out Audio output for connecting an external device Battery Compartment for the...

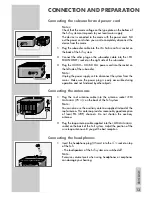
Page 10: ...T 1 25 A Fuse switch on the left side 230 V 50 60 Hz Power cord on the left side TO MAIN UNIT Connection socket for the hi fi system cable on the right side ON Z Mode indicator Lights up green when th...

Page 11: ...station TUNER Selects the tuner input source selects the frequency band FM FM or MW medium wave DISPLAY In MP3 mode switches between the different display modes In standby mode activates and confirms...

Page 12: ...the flat pop rock and jazz sound settings MUTE Switches the hi fi speakers to and from mute mode z Adjust the volume ALARM1 Activates and deactivates alarm time 1 ON OFF cancels Alarm 1 ALARM1 Press b...

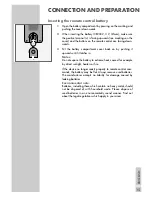
Page 13: ...ther objects Connecting the antennas 1 Plug the roof antenna cable into the antenna socket FM Antenna 75 on the back of the hi fi system Note You can also use the auxiliary antenna supplied instead of...

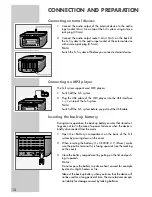
Page 14: ...ored set tings are not lost in the case of a power failure or when the device is briefly disconnected from the mains 1 Open the Battery compartment on the back of the hi fi system by pressing down on...

Page 15: ...it latches in Notes Do not expose the battery to extreme heat caused for example by direct sunlight heaters or fire If the device no longer reacts properly to remote control com mands the battery may...

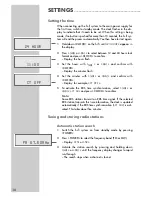
Page 16: ...with 5 a or s 6 and confirm with CLOCK Display for example CT OFF 5 To activate the RDS time synchronisation select 5 a or s 6 CT ON and press CLOCK to confirm Note Some RDS stations transmit an RDS t...

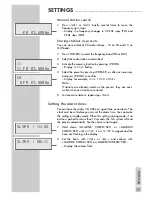
Page 17: ...ets they are over written when new stations are stored 5 To store more stations repeat steps 2 to 4 Setting the alarm times You can have the radio CD USB or a signal tone as an alarm The clock must be...

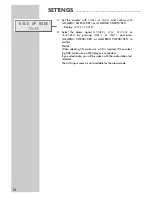
Page 18: ...or s 6 and press ALARM1 CHECK SET or ALARM2 CHECK SET to confirm Notes When selecting CD make sure a CD is inserted When select ing USB make sure an MP3 player is connected If you select radio you wil...

Page 19: ...tch off the hi fi system by pressing ON OFF on the sub woofer Note The device is connected to the mains with the power cord Pull out the power plug when you want to completely disconnect the device fr...

Page 20: ...ch the sound on and off Display MUTE for muting Displaying the time You can display the time briefly in radio CD USB or AUX modes 1 To display the time press CLOCK on the hi fi system or on the remote...

Page 21: ...ono reception 1 Press ST MO to switch to mono reception Display ST disappears 2 Press ST MO to switch back to stereo reception Display ST Note If the hi fi is switched on from standby it automatically...

Page 22: ...have selected the CT ON option Time synchronisation can take several minutes and even with good reception the accuracy depends on the time signal being transmit ted The automatic setting is always act...

Page 23: ...omer services of your CD burner or software manufacturer or look for relevant information for example on the Internet When you are making audio CDs observe all legal guidelines and ensure that the cop...

Page 24: ...P3 s the number of the current track and the elapsed playing time of the track ID3 tag infor mation is above as ticker text Display in CD DA mode CD s the number of the current track and the elapsed p...

Page 25: ...or s 6 Playback of the track starts automatically after a short time Note You can only select an album if it actually contains MP3 tracks Selecting playback modes 1 Press PLAY MODE on the remote contr...

Page 26: ...OG to confirm Display for example MEM 006 000 P 01 MP3 the track display flashes 3 Press 5 a or s 6 to select the track and press PROG to confirm Display for example MEM 000 000 P 02 MP3 the album dis...

Page 27: ...Checking the playlist 1 In stop mode ST MO press PROG repeatedly The stored tracks are displayed Changing the playlist 1 In stop mode ST MO press PROG repeatedly until the station number appears 2 Pr...

Page 28: ...ossible to create a playlist Notes The USB interface of this hi fi system is a standard interface All currently known MP3 chip concepts were taken into account when it was developed Due to rapid devel...

Page 29: ...e The full duration of the alarm is 60 minutes 2 To deactivate the alarm function briefly press ALARM1 ON OFF or ALARM2 ON OFF The green LED Z ALARM1 or Z ALARM2 disap pears The alarm is deactivated t...

Page 30: ...ample SLEEP 30 followed by the input source with the switch off time such as SLEEP 24 The hi fi system switches off after the selected time has elapsed Ending the sleep timer prematurely 1 To stop the...

Page 31: ...regulation IEC 60065 Do not open the hi fi casing under any circumstances No warranty claims are accepted for damage caused by incorrect handling INFORMATION_____________________________________ Syst...

Page 32: ...___ CLASS 1 LASER PRODUCT Problem No sound The hi fi system does not react when the buttons are pressed The remote control does not work Poor radio reception Tracks on a CD are skipped CD Rs or CD RWs...

Page 33: ...ld waste at the end of its service life Take it to a collection point for recycling electrical and electronic devices This is indicated by this symbol on the product in the operating manual and on the...

Page 34: ...Grundig Multimedia B V Atrium Strawinskylaan 3105 NL 1077 ZX Amsterdam http www grundig com 07 06...

Reviews: