background image

ENGLISH

15

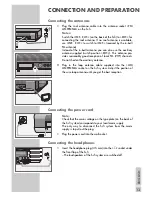
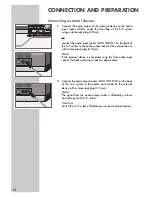
Inserting a memory card

The hi-fi player supports SD and MMC memory cards.

1

Switch off the hi-fi system.

2

Insert the card carefully into the card slot »

SD/MMC

« (under

the front flap) with the contacts facing downwards until it 
latches into place.

Caution:

– Do not use excessive force when inserting the card. Only

apply slight pressure.

– The memory cards are resistant to dirt and moisture, but may

only be inserted into the hi-fi system in a dry and clean 
condition.

– Never remove memory cards during operation. This can

damage the memory card. This type of damage will invali-
date your warranty.

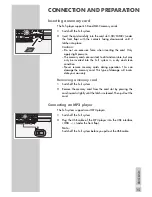
Removing a memory card

1

Switch off the hi-fi system.

2

Remove the memory card from the card slot by pressing the
card inwards slightly until the latch is released. Then pull out the
card.

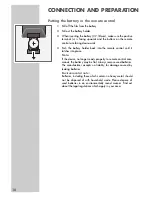
Connecting an MP3 player

The hi-fi system supports most MP3 players.

1

Switch off the hi-fi system.

2

Plug the USB cable of the MP3 player into the USB interface
»

USB 

« (under the front flap).

Note:

Switch off the hi-fi system before you pull out the USB cable.

(

CONNECTION AND PREPARATION

ARCH

INTRO

ALBUM

PEAT

2

3

4

6

7

8

JOG

POWER

SD/MMC

USB

AUX

TONE

MUSIC

MUSIC

TONE

SEARCH

INTRO

ALBUM

REPEAT

2

3

4

6

7

8

JOG

POWER

SD/MMC

USB

AUX

Summary of Contents for CDS 5000 DEC

Page 1: ...HIFI MICRO SYSTEM CDS 5000 DEC de en fr it pt es ...

Page 2: ... Inserting a CD Playing back a CD Displaying other information Selecting another track Searching for a passage within a track Selecting albums and tracks MP3 only Viewing the name of the album or tracks MP3 only MP3 search functions Repeating a track Repeat One Repeating all the tracks on an album MP3 only Playing back tracks in random order Playing the start of each track Intro 29 SD MMC and USB ...

Page 3: ...ent Do not place any objects such as burning candles on the hi fi system Do not open the hi fi system casing under any circumstances Warranty claims are excluded for damage resulting from improper handling Thunderstorms are a danger to all electrical devices Even if the hi fi system is switched off it can be damaged by a lightning strike to the mains or the antenna cable Always disconnect the main...

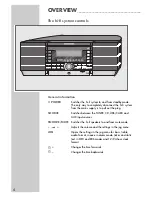
Page 4: ...o and from mute mode z Adjusts the volume and the settings in the jog menu JOG Opens the settings in the jog menu for bass treble audio format snooze in alarm mode ticker and static text in MP3 and RDS modes and 12 24 hour clock format Ȅ Changes the time forwards Ȅ Changes the time backwards OVERVIEW____________________________________________ BAND SOURCE SLEEP SNOOZE MUTE 1 2 ALARM2 TONE ALARM2 M...

Page 5: ...AUX Audio input for connecting an external device with a jack plug 3 5 mm under the front flap Tuner mode BAND Selects the frequency band FM 1 FM 2 or AM medium wave 8 9 Press and hold down to start the station search Press briefly to change the frequency in small steps 1 8 Stores radio stations Selects stored radio stations OVERVIEW____________________________________________ BAND SOURCE SLEEP SN...

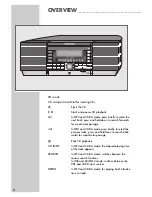
Page 6: ...ular passage 7 Ends CD playback CD INFO In MP3 and CD DA mode the elapsed playing time of the track appears SEARCH In MP3 and CD DA mode switches between the various search functions In USB and SD MMC mode switches between the USB and CARD input sources INTRO In MP3 and CD DA mode for playing brief introduc tions to tracks OVERVIEW____________________________________________ BAND SOURCE SLEEP SNOO...

Page 7: ...ntire CD A S In MP3 mode forward or reverse album selection USB and SD MMC mode USB USB interface for connecting an MP3 player using a USB cable under the front flap Not suitable for connecting to a PC SD MMC Card slot for inserting a memory card SD or MMC under the front flap OVERVIEW____________________________________________ BAND SOURCE SLEEP SNOOZE MUTE 1 2 ALARM2 TONE ALARM2 MUSIC ALARM1 MUS...

Page 8: ...larm time 2 on or off Ȅ Sets the alarm time forwards Ȅ Sets the alarm time backwards SLEEP Sets the sleep timer SNOOZE MUTE Depending on the setting in the jog menu the alarm function comes on in intervals of between 5 and 22 minutes OVERVIEW____________________________________________ BAND SOURCE SLEEP SNOOZE MUTE 1 2 ALARM2 TONE ALARM2 MUSIC ALARM1 MUSIC ALARM1 TONE WIDE STEREO MONO CD INFO SEAR...

Page 9: ... tone for alarm time 1 Z ALARM 1 Lights up red if the alarm is switched to MUSIC radio station CD or USB for alarm time 1 Z WIDE Lights up red if the audio format WIDE has been set in the jog menu Z STEREO Lights up red if the audio format STEREO has been set in the jog menu Z MONO Lights up red if the audio format MONO has been set in the jog menu OVERVIEW_________________________________________...

Page 10: ...l built in FM antenna FM ANTENNA Antenna socket for the roof antenna or the wire antenna supplied AM ANTENNA Antenna socket for connecting the MW antenna supplied AUX INPUT Audio input for connecting an external device AUX OUTPUT Audio output for connecting an external device OVERVIEW____________________________________________ FM ANTENNA AM ANTENNA AUX AUX INPUT INPUT OUTPUT 75 OHMS EXT INT ...

Page 11: ... in alarm mode ticker and static text in MP3 and RDS modes and 12 24 hour clock format Adjust the volume and the settings in the jog menu 8 9 In tuner mode press and hold down to start the frequency search press briefly to change the frequency step by step In MP3 and CD DA mode press briefly to select the previous next track press and hold down to search backwards or forwards for a particular pass...

Page 12: ...D MODE In MP3 and CD DA mode plays back tracks in random order REPEAT In MP3 mode repeats a track all the tracks on the CD or all the tracks on the current album In CD DA mode repeats a track or the entire CD A S In MP3 mode forward or reverse album selection DISPLAY In tuner mode displays different RDS information such as station name PS programme type PTY frequency and RDS time PTY In tuner mode...

Page 13: ... wire loop antenna until you get the best reception Connecting the power cord Note Check that the mains voltage on the type plate on the back of the hi fi system corresponds to your local mains supply The only way to disconnect the hi fi system from the mains supply is to pull out the plug 1 Plug the power cord into the wall socket Connecting the headphones 1 Insert the headphone plug 3 5 mm into ...

Page 14: ...sing the front audio input socket the back audio input socket is deactivated 2 Connect the audio output socket AUX OUTPUT on the back of the hi fi system to the audio input socket of the external device with a stereo jack plug 3 5 mm Note The signal from the audio output socket is affected by volume and settings on the hi fi system Caution Switch the hi fi system off before you connect external de...

Page 15: ...operation This can damage the memory card This type of damage will invali date your warranty Removing a memory card 1 Switch off the hi fi system 2 Remove the memory card from the card slot by pressing the card inwards slightly until the latch is released Then pull out the card Connecting an MP3 player The hi fi system supports most MP3 players 1 Switch off the hi fi system 2 Plug the USB cable of...

Page 16: ...l until it latches into place Note If the device no longer reacts properly to remote control com mands the battery may be flat Always remove used batteries The manufacturer accepts no liability for damage caused by leaking batteries Environmental note Batteries including those which contain no heavy metal should not be disposed of with household waste Please dispose of used batteries in an environ...

Page 17: ...e even if the power plug has been pulled out Setting and storing radio stations Automatic station search 1 Switch on the hi fi system by pressing Ǽ ON OFF 2 Press SOURCE to select TUNER as the input source 3 Select the frequency band FM1 FM2 or AM with BAND Display FM1 FM2 or AM 4 Activate the station search by pressing and holding down 8 or 9 until the frequency display changes to rapid run throu...

Page 18: ... and hold down 1 8 until you hear a signal Note If stations are already stored on the presets they are overwrit ten when new stations are stored 4 To store more stations repeat steps 2 to 3 Note The hi fi system has an integrated lithium cell If the hi fi is dis connected from the mains for a long time all the presets are retained SETTINGS ______________________________________________ ...

Page 19: ...d stereo mono ADJUST SNOOZE sets the snooze in the alarm mode scale 05 MIN to 22 MIN DISC TEXT MODE sets the display for CD text or MP3 text STATIC TEXT SCROLLING TEXT and NO TEXT i e static text ticker text or no text RADIO TEXT MODE sets the display for RDS radio text STATIC TEXT SCROLLING TEXT and NO TEXT i e static text ticker text or no text ADJUST 12 24 HR sets the time in 12 hour or 24 hour...

Page 20: ...briefly vol scale 0 to 45 Sound settings The wide surround sound sound setting affects all the input sources whereas the stereo and mono settings only affect the radio reception 1 Press JOG to open the jog menu Display ADJUST BASS 2 Select the ADJUST setting e g WIDE by pressing JOG as many times as necessary 3 Make the setting using on the remote control or z on the hi fi system The Z WIDE Z STER...

Page 21: ... menu Display ADJUST BASS 2 Select the ADJUST setting by pressing JOG as many times as necessary 3 Make the MONO setting using on the remote control or z on the hi fi system The red Z MONO LED lights up RDS information RDS Radio Data System is an information system which is trans mitted additionally by most FM stations When the hi fi system receives an RDS station the station name appears in the d...

Page 22: ... The current RDS time appears in the display provided it is transmitted by the station 4 Press DISPLAY on the remote control one last time The station name is displayed continuously Programme types PTY 1 Press and hold down PTY on the remote control Display the current programme type e g News 2 Select the programme type for example Classics by pressing on the remote control 3 Press PTY briefly to ...

Page 23: ...services of your CD burner or software manufacturer or look for relevant information for example on the Internet When you are making audio CDs observe all legal guidelines and ensure that the copyright of third parties is not infringed Do not attach adhesive labels to CDs Keep the surfaces of CDs clean Caution The CD drive in the hi fi system is only suitable for 12 cm CDs Selecting the CD input s...

Page 24: ...lay in MP3 mode MP3 and the number of the current track Display in CD DA mode CD and the number of the current track Note If available the track information appears as ticker text in the jog menu at DISC TEXT MODE when SCROLLING TEXT has been set 2 Press ı II to pause playback Display e g II T2 3 Press ı II to resume normal playback 4 Press 7 to end playback Display 7 T1 Note When playing back fro...

Page 25: ...layback keep pressing 5 a or s 6 until the number of the track you want to hear appears in the display Playback of the selected track starts automatically Searching for a passage within a track 1 During playback press and hold down 5 a or s 6 The search begins in the direction you select 2 Press ı II at the position you want Playback starts Note During the search the volume is reduced Selecting al...

Page 26: ...You can select the number using on the remote control or z on the hi fi system 3 Use 5 a or s 6 to move to the next position 4 Press ı II to start searching for the track Searching for tracks by name 1 Press SEARCH to select search mode Display FILE SEARCH 2 You can select the letter using on the remote control or z on the hi fi system 3 Use 5 a or s 6 to move to the next position 4 Press ı II to ...

Page 27: ... a or s 6 3 Press ı II to open the album 4 Scroll through the tracks with 5 a or s 6 5 Press ı II to start playing back the track Note The following applies to all the search functions except folder browser If the object cannot be found CAN T FIND appears in the display Repeating a track Repeat One 1 Press ı II to start playback 2 Select the track by pressing 5 a or s 6 3 Select the repeat functio...

Page 28: ...briefly Random Play then Rn 2 Press ı II to start playback All the tracks on the CD are played back in random order 3 To quit this function press CD MODE Display briefly Random Off Rn disappears Playing the start of each track Intro 1 Press ı II to start playback 2 Press INTRO to select the function The first ten seconds of each track on the CD are played 3 MP3 only press INTRO again The first ten...

Page 29: ...ont flap 2 Switch on the hi fi and select USB CARD as the source by pressing SOURCE Display briefly Reading then MP3 mode with ID3 tag information Playback starts with the first track of the first album Notes Only MP3 format can be read using the USB interface For MP3 operation with an MP3 player the same playback and search functions are available as for CD operation see pages 23 to 27 However it...

Page 30: ... the hi fi system The time moves forwards or backwards at rapid run through 3 Press BAND for radio stations to select the input source radio station CD or USB CARD or SOURCE for CD and USB Notes When selecting CD make sure a CD is inserted When selecting USB make sure a memory card is inserted or an MP3 player is connected If you select tuner press the number buttons 1 8 to select the preset AUX i...

Page 31: ...play Alarm 1 Off or Alarm 2 Off The red LED Z ALARM1 TONE or Z ALARM2 TONE disappears The alarm is deactivated the alarm settings remain the same Interrupting the alarm 1 During the alarm press SNOOZE MUTE on the hi fi system The alarm signal signal tone radio station CD or USB stops The alarm goes off again at five minute intervals alarm interval is between 5 and 22 minutes depending on the setti...

Page 32: ...le SLEEP DELAY 30 MIN followed by the input source with the switch off time such as SLEEP 28 The hi fi system switches off after the selected time has elapsed Ending the sleep timer prematurely 1 To deactivate the sleep timer press ON OFF to switch off the hi fi system or keep pressing SLEEP until SLEEP DELAY OFF appears in the display The hi fi system remains switched on TIMER MODE ______________...

Page 33: ...e hi fi casing under any circumstances No warranty claims are accepted for damage caused by incorrect handling Caution Bi directional data transfer as defined for ITE devices in EN 55022 EN 55024 is not possible USB transfer is not in itself an operating mode It is only an additional function INFORMATION_____________________________________ System Power supply Operating voltage 230 V Mains frequen...

Page 34: ..._____ CLASS 1 LASER PRODUCT Problem No sound The hi fi system does not react when the buttons are pressed The remote control does not work Poor radio reception Tracks on a CD are skipped CD Rs or CD RWs are not played back or are played back incorrectly Possible cause remedy The volume setting is too low increase the volume The headphones are plugged in disconnect the head phones The power cord is...

Page 35: ...usehold waste at the end of its life Take it to a collection point for recycling electrical and electronic devices This is indicated by this symbol on the product in the operating manual and on the packaging Please find out about collection points operated by your local authority Help protect the environment by recycling used products INFORMATION_____________________________________ ...

Page 36: ...Grundig Multimedia B V Atrium Strawinskylaan 3105 NL 1077 ZX Amsterdam http www grundig com 06 30 72011 407 2000 ...

Reviews: