background image

12

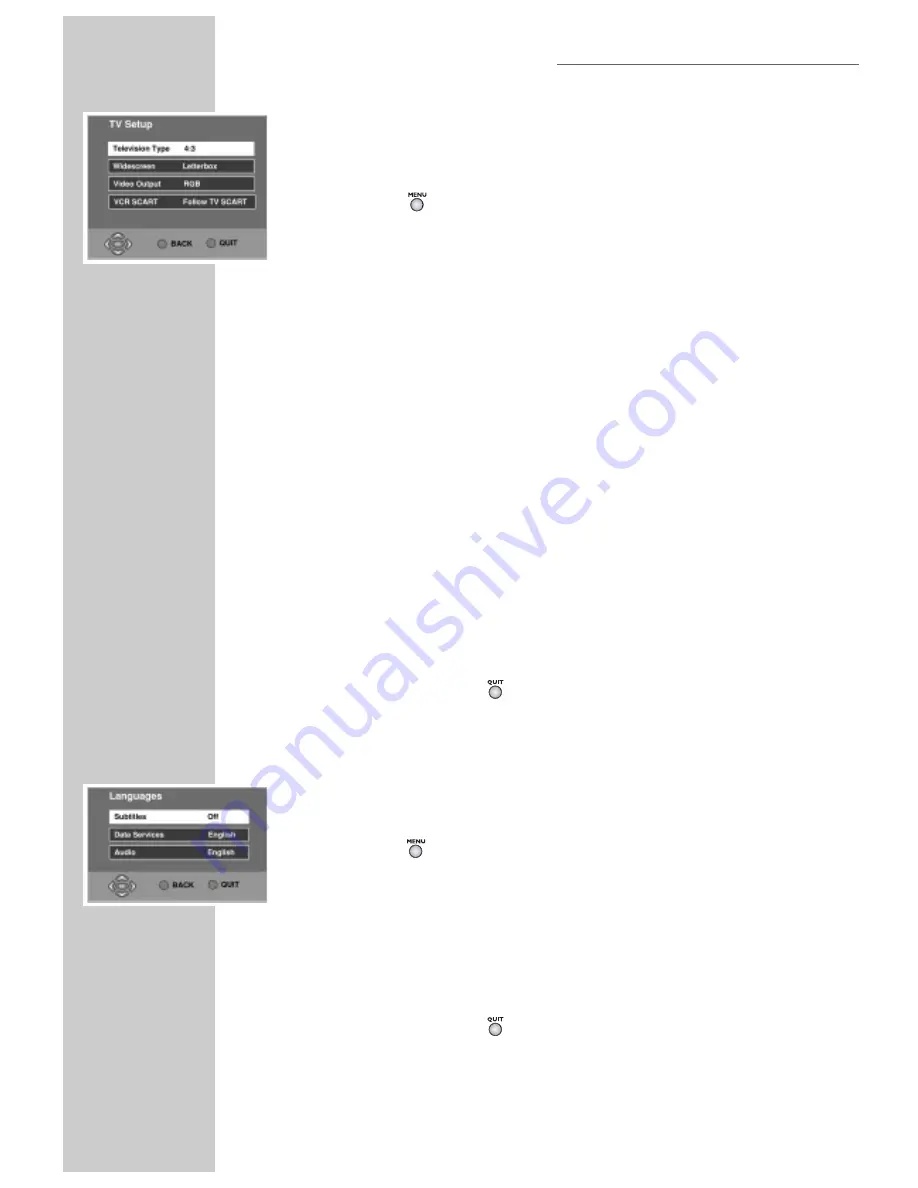
TV Setup

You can choose how pictures are displayed on your TV.

1

Press »      «, select the »

SETUP

« menu and press »

OK

«

2

Now select »

TV SETUP

« and press »

OK

«.

3

Now choose the type of TV screen you have. Use »

#

«/»

$

« and choose

»

16:9

« for a widescreen TV or »

4:3

« for a conventional one.

4

The »

Widescreen

« option chooses how widescreen images are shown on

a conventional (4:3) TV. Use »

#

«/»

$

« and choose from »

Letterbox

«

»

Centre Cutout

« (centre action only shown) or »

Full Frame

« (stretched).

5

Now choose the »

Video Output

« mode. Use »

#

«/»

$

« to choose from

»

RGB

« (best quality pictures for TVs that support it) or »

PAL

« (suitable for all

other TV sets).

6

Now choose how the VCR scart socket and RF outputs are to behave. Use
»

#

«/»

$

« to choose from »

Follow TV SCART

« (Same output as the TV 

socket) or »

Don’t Follow TV

« (independent output).

CAUTION:

If you have not connected your main TV with a scart lead, 

DO

NOT

select »

Don’t Follow TV

« as you may lose control of your

Receiver/Player. Should this happen accidentally, turn off the power to the
Receiver/Player and switch on again. Then switch the VCR scart back to
»

Follow TV scart

«.

7

To exit menu press »     «.

Languages

You can choose your desired languages for Sound, Subtitles and Interactive (data)
Services, where more than just English is being transmitted.

1

Press »     «, select the »

SETUP

« menu and press »

OK

«.

2

Select »

LANGUAGES

« and press »

OK

«.

3

Select »

Subtitles

«, »

Data Services

« or »

Audio

« using »

#

«/»

$

«.

4

Use »

#

«/»

$

« to choose the desired language or »

Off

« to suppress

Subtitles

.

5

To exit menu press »     «.

ADVANCED SET-UP

TV MODE

Summary of Contents for DUO GRP6000

Page 1: ...Digital TV Receiver with built in DVD Player DUO GRP6000...

Page 2: ...e remote control 11 TV mode setup Tuning the receiver Auto tune Manual tune TV setup Languages Connecting a 2nd TV PIN number 14 TV mode operation TV guide Information banner Service list Favourite li...

Page 3: ...ings Surround sound settings Selecting surround sound effects Selecting intensity of the surround sound effects 33 Picture settings Selecting the picture format for your television Selecting filter fu...

Page 4: ...n equipment If you wish to confirm the coverage in your area by postcode please contact your retailer or visit the following recognised website for more information www freeview co uk Packing contents...

Page 5: ...er open the Receiver Player casing under any circumstances The manufacturer accepts no liability for damage resulting from improper handling Do not place any vessels such as vases on the Receiver Play...

Page 6: ...Press once to activate the RESUME function Press twice to switch to STOP mode Opens and closes the disc compartment and switch to DVD Playback mode Stand by indicator Display Compartment for DVDs CDs...

Page 7: ...V 50 60 Hz 20W Socket for power cord Caution Do not connect any devices while the Receiver Player is switched on Never touch the inside of the sockets and plugs of the connecting cables An electrostat...

Page 8: ...CDs or tracks on audio CDs Selects various camera angles for certain scenes or passages on the DVD during playback Calls up the disc menu of the DVD video CD during playback Calls up the title menu f...

Page 9: ...f you wish to connect the Receiver Player to your HiFi system for improved sound plug standard phono cables into the AUDIO OUT L R sockets and into the appropriate sockets on your HiFi system using a...

Page 10: ...battery compartment 3 Point the remote control at the Receiver Player and press the STB button The TV key has no effect for this product If pressed accidentally press STB again to restore operation of...

Page 11: ...l the available services this may take a few minutes The receiver will place the services in numerical order 6 Press OK or to exit the menu Alternatively see later in the guide how to sort your Servic...

Page 12: ...nd RF outputs are to behave Use to choose from Follow TV SCART Same output as the TV socket or Don t Follow TV independent output CAUTION If you have not connected your main TV with a scart lead DO NO...

Page 13: ...avoid any interference from other TV channels Choose a channel between 21 and 69 using 6 Choose the output standard for the RF modulator Use to choose between PAL I for the UK or PAL G for the rest o...

Page 14: ...bout to start press OK to select the program or to cancel If you are playing a disc at the time the reminder occurs playback will stop and the Receiver Player will switch to TV mode If you choose not...

Page 15: ...using the Pr Pr keys So for the example below when watching ITV1 pressing Pr would select five To reorder the list 1 Press select FAVOURITE LIST and press OK 2 Select the service you wish to move wit...

Page 16: ...5 Press to select the time and enter the start time directly using 0 9 or use to choose 6 Press to select the duration and enter the length of the program using 0 9 or use to choose 7 Press to select...

Page 17: ...AGE 18 TOTAL BLOCK Lock services From the PARENTAL CONTROL menu select LOCK UNLOCK SERVICES and press OK To Lock Unlock services scroll through the list of services with and Lock Unlock the highlighte...

Page 18: ...on It is highly recommended that you keep your receiver up to date Check for download You can manually check to see if new software is available for download If there is one available you will see th...

Page 19: ...Player will always switch on in TV mode To switch to Disc mode press or The SVHS output will always provide a signal in TV mode but must be correctly set up for Disc mode See Selecting the video outp...

Page 20: ...ing 1 Press to call up the main menu 2 Select the Installation menu and press OK 3 Select the TV format line and press OK 4 Select the screen format required 4 3 or 16 9 wide screen and confirm with O...

Page 21: ...tracks recorded in up to eight languages This enables you to select the language you prefer Many DVDs are recorded by the manufacturer with subtitles in several languages You can select subtitle supe...

Page 22: ...his DVD video CD Playing back a title 1 After the disc compartment closes and the DVD is scanned playback starts automatically 2 To pause playback freeze frame press 3 Press again to resume playback 4...

Page 23: ...selected Note Incorrect entries can be deleted by pressing step by step 1 To select the next chapter press during playback 2 Return to the beginning of the chapter by pressing once 3 To select the pr...

Page 24: ...ifferent speeds forwards or reverse 1 During playback select the desired playback speed with or You can select a speed which is two four eight or twenty times faster forwards or reverse 2 Resume playb...

Page 25: ...ar scenes or passages Many DVDs contain scenes or passages which were filmed several times from different camera angles You can choose from among these different angles If the DVD offers this function...

Page 26: ...il appears in the display or press and hold down Selecting and playing scenes You can mark a scene on the DVD which you can then select directly during playback The bookmark is retained when you remov...

Page 27: ...2 Start track playback with The number of the tracks and the playing time appears in the display on the DVD receiver Note For information about the MP3 CD press To see the contents of the MP3 CD press...

Page 28: ...1 Press on the Receiver Player The disc tray opens 2 Insert the audio CD in the disc tray with the labelling facing upwards 3 Press The CD is loaded The receiver player displays the number of tracks...

Page 29: ...once only 2 Resume playback at the same point by pressing Ending playback Playback of the CD stops automatically at the end of the last track You can stop playback at any point by pressing twice Repe...

Page 30: ...ge The Child lock menu is displayed the parental lock status On or Off is shown 4 Select Player lock and press OK 5 Lock the Receiver Player with or On and confirm with OK 6 Press to quit the menu Not...

Page 31: ...and press OK 3 Enter your PIN with the number keys The Child lock menu is displayed the parental lock status On or Off is shown 4 Select Content control with OK 5 Select Country with OK 6 Select the c...

Page 32: ...enu 2 Select Sound and press OK 3 Select Surround Sound and press OK 4 Select the Effects and press OK 5 Select the desired surround sound setting Action Drama Theatre Virtual Dolby with or and press...

Page 33: ...the picture format automatically by the player receiver Original for 4 3 playback with black bars on the left and right edges of the screen Cinema zoom where the picture is enlarged to the width of t...

Page 34: ...hen playing back 1 Select Horizontal filter and press OK 2 Select the desired setting Crisp Medium or Soft with or and press OK to confirm Vertical filter This setting optimises the flicker reduced re...

Page 35: ...mation and press OK 4 Press to quit the menu Setting the TV standard The colour norm of the Receiver Player s screen menus has to be adapted to the format of the television Select NTSC for televisions...

Page 36: ...ou have selected for the subtitles is not on the DVD the first language available is automatically selected 1 Select Subtitle and press OK 2 Select the desired dubbed language with or and activate wit...

Page 37: ...Laboratories Inc All rights reserved Connecting to a HiFi system with digital two channel stereo sound PCM 1 Plug a standard phono cable into the DIGITAL AUDIO OUT sockets on the receiver player and i...

Page 38: ...1 Select Output format and press OK 2 Select the required output format DOLBY MPEG or PCM with or and confirm with OK 3 Select the audio signal type Original or PCM with or and then press OK to confir...

Page 39: ...for DVDs with a 48 kHz sound signal The signal is output at the AUDIO OUT L R socket and at the DIGITAL AUDIO OUT socket 96 kHz sound signal is converted into 48 kHz Setting the digital output level...

Page 40: ...from Step 1 Setting the output level 1 Select Output level and press OK 2 Change the output level step by step from 0dB to 20 dB with or or with and in increments of 10 and press OK to confirm Selecti...

Page 41: ...consumption Analogue Stereo sound Dolby Pro Logic Operating approx 24W Low power stand by 1W Audio Signal Analogue Ambient temperature DVD 48 96 kHz 4Hz 22 44 kHz 10 C to 35 C Video CD 44 1 kHz 4Hz 20...

Page 42: ...reo outputs To avoid possible damage to the audio system the consumer should take proper pre cautions when the analog stereo outputs of the DVD player is connected to an amplification sys tem To enjo...

Page 43: ...of unit Select AV Channel on TV set Distorted picture Disc mode Make sure that there are no fingerprints on the DVD CD follow the cleaning instructions on this page Disrupted Picture TV mode Check RF...

Page 44: ...51 1 4 19 75 70 GRUNDIG ESPA A S A Solson s 2 planta baja B3 Edificio Muntadas Mas Blau E 08820 El Prat De Llobregat Barcelona 34 93 4 79 92 00 GRUNDIG Deutschland Ihre regionale Kundendienst Stelle...

Page 45: ...45 NOTES...

Page 46: ...46 NOTES...

Page 47: ......

Page 48: ...Grundig AG Beuthener Str 41 D 90471 N rnberg http www grundig com 267109417002...

Reviews: