background image

11

3.2 Reversing The Doors

We recommend that you reverse 

the door before switching on for the 

first time.

Tools required: Small and medium 

size flat and cross-headed 

screwdrivers, a pair of pliers. 

Spare Parts supplied in the plastic 

bag: The following parts, which are 

exclusively for left hand side fitted 

hinge operation are supplied in a 

plastic bag with the appliance:

- Door top trim hinge covers – there 

are 2 different parts, one for each 

side of top trim. 

We suggest you keep all the parts 

supplied in the plastic bag and also 

parts, which have been removed 

when reversing the door, in a safe 

place for possible future, re-use.
Important: 

We suggest you ask somebody 

to help you when moving the 

appliance around and to hold the 

door when removing / re-fitting 

hinges and the door to avoid any 

injury and damage to the product.

Please refer to diagrams supplied. 

To follow numbers in brackets 

below, refer to the main diagram.

1. 

Switch  off the appliance at 

the socket outlet and pull 

out the mains plug.

2. 

Remove all loose items and 

fittings and food inside the 

appliance.

3. 

Gently prise off plastic hin-

ge covers on both sides 

of front top panel using a 

small flat-headed screwdri-

ver. (1-2)

4. 

Unscrew the bolts of the top 

hinge and remove top hin-

ge. (3)

5. 

Remove door carefully off the 

bottom hinge and stand door up-

right in a safe place.(4)

6. 

Gently prise off plastic hinge co-

ver on door top trim. Fit the ot-

her door top trim plastic off hin-

ge cover supplied in the plastic 

bag.(5)

7. 

Gently tilt the appliance back 

against a strong wall on its rear 

side sufficiently to allow the lo-

wer hinge to be removed. Take 

care to protect the appliance, 

your wall and floor coverings. 

You can utilise the original pac-

kaging to do this.  


Once you tilt the appliance back, 

check to make sure the applian-

ce is completely stable and safe 

before you carry  


on. (6)

8. 

Unscrew and remove the front 

feet and 1 bolt. (7)

9. 

Unscrew and remove the bottom 

hinge. (8)

10. 

Unscrew and remove the bottom 

hinge door stopper and bushing 

and reposition them on the other 

side while rotating  

the bus-

hing 180°. (9)

11. 

Fit the bottom hinge and tigh-

ten the screws as shown in figu-

re. (10)

12. 

Fit the other front feet as shown 

in figure. (11)

13. 

Rotate the top hinge 180°. 

Unscrew the hinge pin and re-

tighten it to the opposite side. 

(12) 

14. 

Fit the top hinge on the left hand 

side bushing of the door. (13) 

15. 

Locate and re-fit door to bottom 

hinge pin. (14)

16. 

Re-fit  the upper hinge on the 

opposite side by using a flat hea-

ded screwdriver. (15)

Summary of Contents for GFN1671N

Page 1: ...ENG www grundig co uk USER INSTRUCTIONS GFN1671N Freezer...

Page 2: ......

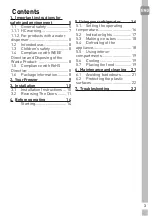
Page 3: ...1 6 Package information 8 2 Your Freezer 9 3 Installation 10 3 1 Installation Instructions 10 3 2 Reversing The Doors 11 4 Before operating 14 Starting 14 5 Using your refrigerator 16 5 1 Setting the...

Page 4: ...nual before installing and operating your product Follow the instructions especially those for safety Keep the manual in an easily accessible place as you may need it later Also read any other documen...

Page 5: ...ct has a failure it should not be operated unless it is repaired by an Authorised Service Agent There is the risk of electric shock Connect the product to a grounded outlet protected by a fuse complyi...

Page 6: ...since it would get into contact with the electrical parts in the refrigerator Do not use mechanical devices or other methods to accelerate the defrosting process other than those recommended by the ma...

Page 7: ...is dangerous with respect to electrical safety Do not overload the product It may fall when the door is opened and cause injury or damage Similar problems may occur in case of putting things on top of...

Page 8: ...with EU WEEE Directive 2012 19 EU This product bears a classification symbol for waste electrical and electronic equipment WEEE This product has been manufactured with high quality parts and materials...

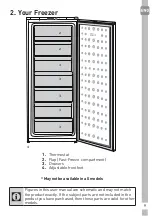
Page 9: ...the product exactly If the subject parts are not included in the product you have purchased then those parts are valid for other models May not be available in all models 1 2 2 3 3 3 3 3 4 MAX 1 2 3 4...

Page 10: ...spa cers supplied onto the con denser at the back of the appliance by rotating them 1 4 turn 5 The appliance should be lo cated on a smooth surfa ce The two front feet can be adjusted as required To e...

Page 11: ...sing a small flat headed screwdri ver 1 2 4 Unscrew the bolts of the top hinge and remove top hin ge 3 5 Remove door carefully off the bottom hinge and stand door up right in a safe place 4 6 Gently p...

Page 12: ...feet if ne cessary 23 Check that door opens and clo ses easily it is aligned correctly and there are no gaps allowing air into the cabinet If there are gaps between the door seal and the cabinet adju...

Page 13: ...13 7 45 180 3 2 1 5 4 8 6 9 10 13 11 15 15 12 14 Reversing the doors Proceed in numerical order...

Page 14: ...fro zen food See Storing Frozen Food 7 If you are going to freeze fresh food you must switch the thermostat knob to ma ximum position The amber light will come on and you must wait at least three ho...

Page 15: ...device in the electronics wait for about 5 minutes 14 If the freezer door is left open Or ajar the door open alarm will be activa ted in a few minutes You will hear the audible alarm beep warning to m...

Page 16: ...hich the door is opened and the amount of foods kept inside Frequently opening the door causes the interior temperature to rise For this reason it is recommended to close the door again as soon as pos...

Page 17: ...r this period of time the red LED indicator is switched on in the following situations If the appliance is overloaded with fresh food If the door is left open for a long time by mistake In these situa...

Page 18: ...quite normal Fast freeze If large amounts of fresh food are going to be frozen adjust the control knob to max 24 hours before putting the fresh food in the fast freeze compartment It is strongly recom...

Page 19: ...gerator The bottom compartment is the salad crisper meat is best kept in the super fresh zone which is the drawer above the salad crisper Allow hot foods and beverages to cool to room temperature prio...

Page 20: ...in the freezer will not defrost even if the ambient temperature falls as low as 15 C So you may then install your appliance in a garage or an unheated room without having to worry about frozen food i...

Page 21: ...body shelves remove all of its contents Remove the door shelves by pulling them up After cleaning slide them from top to bottom to install Never use cleaning agents or water that contain chlorine to c...

Page 22: ...liquid oils or oil cooked meals in your Freezer in unsealed containers as they damage the plastic surfaces of the Freezer If oil is spilled or smeared onto the plastic surfaces clean and rinse the rel...

Page 23: ...taining liquid is stored in open containers Store food with liquid content in closed containers Door of the Freezer is left ajar Do not leave the doors of your Freezer open for a long time Thermostat...

Page 24: ...run for longer periods Do not open the doors frequently Freezer or fridge compartment door might be left ajar Check if the doors are closed completely The Freezer is adjusted to a very low temperatur...

Page 25: ...Freezer rocks when moved slowly balance it by adjusting its feet Also make sure that the floor is strong enough to carry the Freezer and level The items put onto the Freezer may cause noise Remove the...

Page 26: ...xpired best before dates and spoiled from the Freezer The door is not closing Food packages are preventing the door from closing Replace the packages that are obstructing the door The Freezer is not c...

Page 27: ...acturing defects Functional replacement parts to repair a product The costs of a Grundig Approved Engineer to carry out the repair What is not covered Transit and delivery damage Cabinet or appearance...

Page 28: ...y for the cost of repairing the product Gas Cookers must be professionally installed by a Gas Safe or Gas Networks Ireland for Republic of Ireland registered gas installer This guarantee is given in r...

Page 29: ...e to carry out a repair because a convenient appointment cannot be arranged Will there be any charge for the repairs It is your responsibility to provide evidence to the Engineer that your product is...

Page 30: ...uarantee simply telephone the appropriate number below UK Mainland Northern Ireland 0333 207 9920 or customerservice support grundig co uk Republic of Ireland 01 691 0203 Register your appliance at gr...

Page 31: ...31 Notes...

Page 32: ...32 Notes...

Page 33: ...58 0597 0000 AA www grundig co uk...

Reviews: