background image

36

DISCLAIMER / WARNING

Some (simple) failures can be adequately 
handled by the end-user without any 
safety issue or unsafe use arising, 
provided that they are carried out within 
the limits and in accordance with the 
following instructions (see the “Self-
Repair” section).

Therefore, unless otherwise authorized 
in the “Self-Repair” section below, 
repairs shall be addressed to registered 
professional repairers in order to avoid 
safety issues. A registered professional 
repairer is a professional repairer that has 
been granted access to the instructions 
and spare parts list of this product by the 
manufacturer according to the methods 
described in legislative acts pursuant to 
Directive 2009/125/EC. 

However, only the service agent (i.e. 
authorized professional repairers) 
that you can reach through the phone 
number given in the user manual/
warranty card or through your 
authorized dealer may provide service 
under the guarantee terms. Therefore, 
please be advised that repairs by 
professional repairers (who are not 
authorized by Grundig) shall void the 
guarantee.

Self-Repair

Self-repair  can  be  done  by  the  end-user 
with  regard  to  the  following  spare  parts: 
door  handles,door  hinges,  trays,  baskets 
and door gaskets (an updated list is also 
available in support.grundig.com as of 1st 
March 2021).

Moreover, to ensure product safety and to 
prevent risk of serious injury, the mentioned 
self-repair  shall  be  done  following  the 
instructions  in  the  user  manual  for 
self-repair  or  which  are  available  in 

support.grundig.com.  For  your  safety, 
unplug the product before attempting any 
self-repair.

Repair  and  repair  attempts  by  end-users 
for  parts  not  included  in  such  list  and/
or  not  following  the  instructions  in  the 
user manuals for self-repair or  which are 
available in support..com, might give raise 
to safety issues not attributable to Grundig, 
and will void the warranty of the product.

Therefore,  it  is  highly  recommended  that 
end-users refrain from the attempt to carry 
out  repairs  falling  outside  the  mentioned 
list  of  spare  parts,  contacting  in  such 
cases  authorized  professional  repairers 
or  registered  professional  repairers.  On 
the contrary, such attempts by end-users 
may  cause  safety  issues  and  damage 
the  product  and  subsequently  cause  fire, 
flood,  electrocution  and  serious  personal 
injury to occur.

By  way  of  example,  but  not  limited  to, 
the  following  repairs  must  be  addressed 
to  authorized  professional  repairers 
or  registered  professional  repairers: 
compressor, 

cooling 

circuit, 

main 

board,inverter board, display board, etc.

The  manufacturer/seller  cannot  be  held 
liable in any case  where end-users do not 
comply with the above.

The spare part availability of the refrigerator 
that you purchased is 10 years. 
During this period, original spare parts will 
be available to operate the refrigerator 
properly
The minimum duration of guarantee of 
the refrigerator that you purchased is 24 
months.

Summary of Contents for GKN 27960 BIO

Page 1: ...Refrigerator User Manual K hlschrank Gefrierschrank Bedienungsanleitung GKN27960FHXPN GKN27960FHXRN GKN 27960 BIO EN DE BG 58 5364 0000 AC 1 2...

Page 2: ......

Page 3: ...ond crisper of the product 21 5 7 Moving door rack 22 5 8 Sliding storage box 22 This feature is optional 22 5 9 Moisture controlled vegetable bin 22 This feature is optional 22 5 10 Automatic ice mac...

Page 4: ...eep the manual in an easily accessible place as you may need it later Besides read also the other documents provided with your product Please note that this manual may be valid for other models as wel...

Page 5: ...ts in hotels motels and other residential type environments bed and breakfast type environments catering and similar non retail applications 1 1 General safety This product should not be used by perso...

Page 6: ...n bottles and cans into the freezer compartment They may explode Place liquids in upright position after tightly closing the lid Do not spray flammable substances near the product as it may burn or ex...

Page 7: ...o check your water pressure ask for the help of a professional plumber If there is risk of water hammer effect in your installation always use a water hammer prevention equipment in your installation...

Page 8: ...ose of the waste product with normal domestic and other wastes at the end of its service life Take it to the collection center for the recycling of electrical and electronic equipment Please consult y...

Page 9: ...nt door shelf 2 Water dispenser filling tank 3 Egg section 4 Water dispenser reservoir 5 Bottle shelf 6 Sliding storage containers 7 Adjustable legs 8 Deep freezer compartment 9 Quick freeze compartme...

Page 10: ...such as hobs heater cores and stoves and at least 5 cm away from electrical ovens Product must not be subjected to direct sun light and kept in humid places Appropriate air ventilation must be provide...

Page 11: ...rface Warning Side walls of your product is equipped with refrigerant pipes to improve the cooling system Refrigerant with high temperatures may flow through these areas resulting in hot surfaces on t...

Page 12: ...13 DE BG SK PL CZ 3 5 Reversing the doors Proceed in numerical order 45 11 10 3 9 9 2 1 5 6 7 8 12 13 14 15 17 18 19 16 21 4 20 20...

Page 13: ...14 3 6 Reversing the doors Proceed in numerical order 1 1 7 1 20 11 13 9 2 10 5 3 20 20 8 18 17 19 45 180 8 13 14 6 4 12 16 15...

Page 14: ...cooler ice tray and upper drawers in a way that will enable maximum storage Using the below drawer when storing is strongly recommended Energy saving function should be activated for best energy consu...

Page 15: ...e cooling system C Front edges of the product might heat up This is normal These areas are designed to warm up in order to prevent condensation C In some models indicator panel turns off automatically...

Page 16: ...odels May not be available in all models 5 Operating the product 1 4 5 6 7 10 11 12 8 3 2 9 1 Error status indicator 2 Energy saving function display off indicator 3 Quick fridge key 4 Vacation functi...

Page 17: ...ndicator value is displayed as 1 when the quick fridge function is activated To cancel this function press the Quick fridge button again Quick fridge indicator will be off and the refrigerator will be...

Page 18: ...re of the freezer compartment to 18 19 20 21 22 23 and 24 9 Quick freeze button Press button no 9 for quick freeze the quick freeze indicator will be activated When the quick freeze function is on the...

Page 19: ...ing time based on the need for cooling 5 4 Vegetable bin This feature is optional Product s vegetable bin is designed to keep vegetables fresh by preserving humidity For this purpose the overall cold...

Page 20: ...crisper up to the first stopper as shown in Figure 3 In the case that the drawer is more open first of all open the door by at least 135 degrees After that as shown in Figure 4 lift the second crisper...

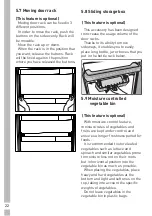
Page 21: ...enables you to easily place long bottle jar or boxes that you put in the bottle rack below 5 9 Moisture controlled vegetable bin This feature is optional With moisture control feature moisture rates o...

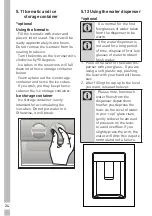
Page 22: ...ure faster and rot in a shorter period of time 5 10 Automatic ice machine This feature is optional Automatic ice machine enables you to easily make ice in your refrigerator In order to obtain ice from...

Page 23: ...not put water in it Otherwise it will break 5 12 Using the water dispenser optional C It is normal for the first few glasses of water taken from the dispenser to be warm C If the water dispenser is n...

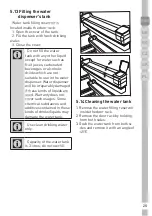
Page 24: ...ble to use in the water dispenser Water dispenser will be irreparably damaged if these kinds of liquids are used Warranty does not cover such usages Some chemical substances and additives contained in...

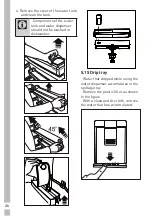
Page 25: ...water tank and water dispenser should not be washed in dishwasher 5 15 Drip tray Water that dripped while using the water dispenser accumulates in the spillage tray Remove the plastic filter as shown...

Page 26: ...automatically on a periodic basis To maintain efficient performance it is recommended to have the filter in the deodorising module by the authorised service provider every 5 years Due to the fan integ...

Page 27: ...d before putting them in the freezer Use freezer containers foils and moisture proof papers plastic bags and other packing materials instead of traditional packing papers Label each pack of food by ad...

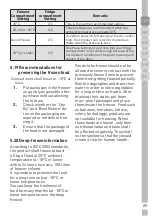
Page 28: ...sure that the package of the food is not damaged 5 20 Deep freeze information According to IEC 62552 standards the product shall freeze at least 4 5 kg of food at 25 C ambient temperature to 18 C or l...

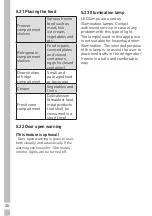
Page 29: ...ducts that shall be consumed in a short time 5 22 Door open warning This feature is optional Door open warning is given to user both visually and acoustically If the warning continues for 10 minutes i...

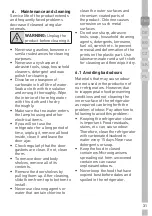
Page 30: ...m top to bottom to install Never use cleaning agents or water that contain chlorine to clean the outer surfaces and chromium coated parts of the product Chlorine causes corrosion on such metal surface...

Page 31: ...erial damage Keeping the glass clean becomes too difficult despite the regular cleaning Consequently the appearance and the transparency of the glass deteriorates Harsh and corrosive cleaning methods...

Page 32: ...case of sudden power failure or pulling the power plug off and putting back on the gas pressure in the product s cooling system is not balanced which triggers the compressor thermic safeguard The pro...

Page 33: ...a very low degree Set the freezer compartment temperature to a higher degree and check again The food items kept in cooler compartment drawers are frozen The cooler compartment temperature is set to a...

Page 34: ...warm water and carbonated water Certain holders and packaging materials may cause odour Use holders and packaging materials without free of odour The foods were placed in unsealed holders Keep the fo...

Page 35: ...k of serious injury the mentioned self repair shall be done following the instructions in the user manual for self repair or which are available in support grundig com For your safety unplug the produ...

Page 36: ...age 20 5 7 Verschiebbarer Vorratsbeh lter 20 5 8 Feuchtigkeitskontrolliertes Gem sefach 20 5 9 Automatischer Eisbereiter 21 5 10 Eisbereiter und Eisbeh lter21 5 11 Wasserspender 22 5 12 So benutzen Si...

Page 37: ...itte beachten dass diese Bedienungsanleitung f r unterschiedliche Modelle geschrieben wurde Unterschiede zwischen den verschiedenen Modellen werden nat rlich in der Anleitung erw hnt Die Symbole In di...

Page 38: ...Fr hst ck Bei Catering und hnliche Non Retail Anwendungen 1 1 Allgemeine Sicherheitshinweise Dieses Produkt darf nicht von Personen mit k rperlichen sensorischen oder mentalen Einschr nkungen einem M...

Page 39: ...tel nicht mit feuch ten H nden Sie k nnen an Ihren H nden festfrieren Geben Sie keine Fl ssigkeiten in Flaschen oder Dosen in den Tiefk hlbereich Sie k nnen plat zen Geben Sie Fl ssigkeiten in aufrech...

Page 40: ...es K hlschranks gibt die Art des im Ger t verwendeten Gases an 1 1 2 Modelle mit Wasserspender Der Druck f r die Kaltwasserzufuhr sollte maximal 90 psi 620 kPa betragen Wenn der Wasserdruck in Ihrem H...

Page 41: ...Altger teentsorgung Dieses Ger t erf llt die Vorgaben der EU WEEE Direktive 2012 19 EU Das Ger t wurde mit einem Klassifizierungssymbol f r elektrische und elektronische Altger te WEEE gekennzeichnet...

Page 42: ...en sie f r andere Modelle 1 K hlbereich T rablage 2 Wasserspender Bef llung 3 Eierhalter 4 Wasserspender Tank 5 Flaschenablage 6 Verschiebbarer Vorratsbeh lter 7 Einstellbare F e 8 Tiefk hlbereich 9 S...

Page 43: ...uf halten Sie einen Mindestabstand von 5 cm zu elektrischen fen ein Setzen Sie das Ger t keinem direkten Sonnenlicht und keinen feuchten Umgebungen aus Damit das Ger t effizient arbeitet ist eine ange...

Page 44: ...e Netzkabel m ssen vom autorisierten Kundendienst ausgetauscht werden C Wenn Sie zwei K hlger te nebeneinander aufstellen halten Sie einen Mindestabstand von 4 cm zwischen den Ger ten ein Unser Untern...

Page 45: ...alen Stauraums ermittelt Beim Einlagern wird die Verwendung der unteren Schublade dringend empfohlen F r optimalen Energieverbrauch sollte die Energiesparfunktion aktiviert werden Platzieren Sie Leben...

Page 46: ...en Hinweise zu Sicherheit und Umwelt und Installation getroffen wurden Lassen Sie den K hlschrank etwa 6 Stunden lang leer arbeiten verzichten Sie in dieser Zeit m glichst vollst ndig auf das ffnen de...

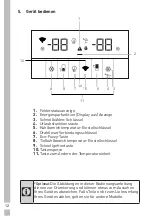
Page 47: ...el 6 Drahtloser Verbindungsschl ssel 7 Eco Fuzzy Taste 8 Tiefk hlbereichtemperatur Einstellschl ssel 9 Schnellgefriertaste 10 Tastensperre 11 Taste zum ndern der Temperatureinheit C Optional Die Abbil...

Page 48: ...n nicht deaktiviert werden 3 Schnellk hlen Schl ssel Die Schnellk hlenanzeige leuchtet und der Temperaturanzeigewert des K hlfachs wird bei aktivierter Schnellk hlschrankfunktion als 1 angezeigt Zum A...

Page 49: ...aktiviert ist beginnt der Gefrierschrank nach mindestens 6 Stunden im Eco Modus zu laufen und die Anzeige f r die wirtschaftliche Nutzung leuchtet Um die Eco Fuzzy Funktion zu deaktivieren dr cken Si...

Page 50: ...t auf Tastenbet tigungen Halten Sie die Tasten f r das drahtlose Netzwerk und Eco Fuzzy gleichzeitig 3 Sekunden lang gedr ckt Die Tastensperre wird deaktiviert Verwenden Sie die Tastensperrfunktion we...

Page 51: ...en fertig Nehmen Sie den Eisbeh lter aus dem Tiefk hlbereich und biegen Sie ihn leicht ber dem Gef das Sie servieren m chten Das Eis gelangt in den Beh lter 5 4 0 Grad Fach bei bestimmten Modellen Bew...

Page 52: ...Sie das zweite Gem sefach wie in Abbildung 3 gezeigt bis zum ersten Stopper wenn die T r um 90 Grad ge ffnet ist Falls die Schublade weiter ge ffnet ist ffnen Sie zun chst die T r um mindestens 135 G...

Page 53: ...rtsbewegung k nnen Sie m helos lange Flaschen Gl ser oder Kartons im Flaschenhalter darunter verstauen 5 8 Feuchtigkeitskontrolliertes Gem sefach bei bestimmten Modellen Dank der Feuchtigkeitsregelun...

Page 54: ...e Eis vom Eisbereiter erhalten nehmen Sie den Wassertank aus dem K hlbereich f llen ihn mit Wasser und setzen ihn wieder ein Nach etwa zwei Stunden liegen die ersten Eisw rfel in der Eisbereiter Schub...

Page 55: ...tes nicht h ufig ffnen m ssen sparen Sie eine Menge Energie 5 12 So benutzen Sie den Wasserspender Dr cken Sie mit dem Glas gegen den Hebel des Wasserspenders Die Wasserausgabe stoppt sobald der Hebel...

Page 56: ...sser Die Kapazit t des Wassertanks betr gt 3 Liter f llen Sie nicht mehr hinein Dr cken Sie mit einem haltbaren Glas gegen den Hebel des Wasserspenders Falls Sie Einwegbecher verwenden bet tigen Sie d...

Page 57: ...dem Beutel und legen Sie es wie auf der Abbildung angezeigt in das Foliengeh use Schlie en Sie das Geh use und legen Sie es wieder in die HerbBox HerbFresh Die HerbBox HerbFresh F cher sind besonders...

Page 58: ...hende unerw nschte Ger che beseitigt bevor sie in die Lebensmittel eindringen Dies wird durch das Gebl se die LED und den im Modul integrierten Geruchsfilter erzielt Im t glichen Einsatz wird das Geru...

Page 59: ...e nicht zu gro e Mengen auf einmal ein Tiefk hlbereich temperatureinstellung K hlbereich temperatureinstellung Details 18 C 4 C Dies ist die allgemein empfohlene Einstellung 20 C 22 C oder 24 C 4 C Di...

Page 60: ...mittel die eingefroren werden sollen d rfen keine bereits eingefrorenen Lebensmittel ber hren da diese andernfalls antauen k nnten Gekochtes Gem se und gefiltertes Wasser k nnen l nger im Tiefk hlberi...

Page 61: ...lag Ihres K hlschranks je nach Aufstellungsort wechseln Wenden Sie sich in diesem Fall an den autorisierten Kundendienst in Ihrer N he Die obige Erkl rung ist allgemeiner Natur Sie sollten das Warnsch...

Page 62: ...rf reinigen Entnehmen Sie zum Entfernen von T r und Hauptablagen zun chst s mtliche darin darauf abgelegten Lebensmittel Ziehen Sie die T rablagen heraus Nach der Reinigung setzen Sie die Ablage wiede...

Page 63: ...her Fleckenbildung und physikalischen Sch den f hren In diesem Fall l sst sich das Glas auch bei regelm iger Reinigung nur mit M he sauber halten Dadurch werden Klarheit und Aussehen der Glasscheibe b...

Page 64: ...t Strom versorgt verbundene Sicherung oder die Hauptsicherung ist durchgebrannt Sicherungen pr fen Kondensation an den Seitenw nden des K hlbereiches Multizone K hlkontrolle und FlexiZone Die T r wird...

Page 65: ...in Vorg nger Gr ere Produkte arbeiten l nger Die Umgebungstemperatur ist sehr hoch Das Ger t arbeitet bei h heren Umgebungstemperaturen normalerweise l nger Das Ger t wurde erst vor Kurzem angeschloss...

Page 66: ...emperatur im K hl oder Tiefk hlbereich ist zu hoch Die K hlbereichtemperatur ist sehr hoch eingestellt Die K hlbereichtemperatur beeinflusst die Tiefk hlbereichtemperatur Warten Sie bis die entspreche...

Page 67: ...t macht windartige Ger usche Das Produkt nutzt einen L fter zur K hlung Dies ist v llig normal und keine Fehlfunktion Es befindet sich Kondenswasser an den Innenw nden des Produktes Bei hei en oder fe...

Page 68: ...dass die T r nicht blockiert wird Das Ger t steht nicht vollst ndig aufrecht auf dem Boden F e zum Ausgleichen des Ger tes anpassen Der Boden ist nicht eben oder stabil Darauf achten dass der Untergru...

Page 69: ...rt grundig com verf gbar Um die Produktsicherheit zu gew hrleisten und das Risiko schwerer Verletzungen zu vermeiden muss die erw hnte Selbstreparatur gem den Anweisungen im Benutzerhandbuch zur Selbs...

Page 70: ...it des von Ihnen gekauften K hlschrank betr gt 10 Jahre W hrend dieser Zeit stehen Originalersatzteile zur Verf gung um den K hlschrank ordnungsgem zu betreiben Die Mindestgarantiedauer f r den von Ih...

Page 71: ...1 12 4 2 13 5 14 5 1 18 18 5 2 18 5 3 18 5 4 18 18 5 5 18 18 5 6 19 5 7 20 5 8 20 20 5 9 20 20 5 10 21 21 5 11 Icematic 22 5 12 22 5 13 23 5 14 23 5 15 24 5 16 HerbBox HerbFresh 25 5 17 25 5 18 26 5 1...

Page 72: ...C C B...

Page 73: ...3 DE BG EN SK PL CZ C A B...

Page 74: ...4 1 A A A A 1 1 5...

Page 75: ...5 DE BG EN SK PL CZ 1 1 1...

Page 76: ...6 1 1 1 HC R600a C 1 1 2 90 psi 620 kPa 80 psi 550 kPa...

Page 77: ...7 DE BG EN SK PL CZ 33 F 0 6 C 100 F 38 C 1 2 10 1 3 1 4 2012 19...

Page 78: ...8 1 5 2011 65 1 6...

Page 79: ...9 DE BG EN SK PL CZ C 2 1 2 3 4 5 6 7 8 9 10 11 12 13 14 15 16 17 1 2 3 4 5 5 6 8 9 7 11 12 13 15 16 17 14 10 4...

Page 80: ...10 3 3 1 B B A 30 5 5 5 C 5 5 5...

Page 81: ...11 DE BG EN SK PL CZ B C 4 C 3 2 1 2 2 3 3 3 4 A...

Page 82: ...12 4 4 1 A 3...

Page 83: ...13 DE BG EN SK PL CZ 4 2 6 C C C 5...

Page 84: ...14 C 5 1 4 5 6 7 10 11 12 8 3 2 9 1 2 3 4 5 6 7 Eco fuzzy 8 9 10 11...

Page 85: ...15 DE BG EN SK PL CZ 1 1 2 3 2 3 1 1 4 3...

Page 86: ...16 5 8 7 6 5 4 3 2 1 6 3 HomeWhiz HomeWhiz HomeWhiz 7 Eco fuzzy eco fuzzy eco fuzzy 6 eco fuzzy eco fuzzy eco fuzzy 6 8 18 19 20 21 22 23 24 9 9 27 24 Quick freeze...

Page 87: ...17 DE BG EN SK PL CZ 10 eco fuzzy 3 eco fuzzy 3 11 3...

Page 88: ...18 5 1 5 3 5 4 5 5 5 2 A...

Page 89: ...19 DE BG EN SK PL CZ 5 6 1 K70560 2 3 90 3 135 4 5 mm 4 2 2 5...

Page 90: ...20 5 7 3 5 8 5 9...

Page 91: ...21 DE BG EN SK PL CZ 5 10 2 60 70 2 3 C...

Page 92: ...22 5 11 Icematic Icematic Icematic 2 Icematic 90 5 12 C C 1 2 C...

Page 93: ...23 DE BG EN SK PL CZ 5 13 1 2 3 C C C 3 5 14 1 2 3 45 C...

Page 94: ...24 4 C 5 15...

Page 95: ...25 DE BG EN SK PL CZ 5 16 HerbBox HerbFresh HerbBox HerbFresh HerbBox HerbFresh HerbBox HerbFresh 5 5 17 OdourFresh...

Page 96: ...26 5 18 C...

Page 97: ...27 DE BG EN SK PL CZ 18 C 4 C 20 22 24 C 4 C 30 C 4 C 18 C 2 C 5 19 18 1 2 3 5 20 IEC 62552 4 5 25 C 18 C 24 100 18 C 18 C...

Page 98: ...28 5 21 5 22 10 5 23...

Page 99: ...29 DE BG EN SK PL CZ 6 B 6 1...

Page 100: ...30 15 6 2 6 3 OH Li Na K Rb Cs Fr...

Page 101: ...31 DE BG EN SK PL CZ 7 FLEXI ZONE 6...

Page 102: ...32...

Page 103: ...33 DE BG EN SK PL CZ A...

Page 104: ...34 2009 125 Grundig support grundig com 1 2021 support grundig com support grundig com Grundig...

Page 105: ...35 DE BG EN SK PL CZ 10 24...

Page 106: ...37 DE BG SK PL CZ Notes...

Page 107: ...38 Notes...

Reviews: