background image

7

PL

*2

*3

4

5

6

7

*8

9

1

10

5

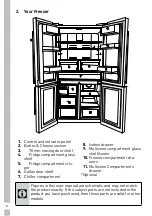
2. 

Your Freezer

C

Figures in this user manual are schematic and may not match 
the product exactly. If the subject parts are not included in the 
product you have purchased, then those parts are valid for other 
models.

1. 

Control and indicator panel

2. 

Butter & Cheese section

3. 

  70 mm moving door shelf

4. 

  Fridge compartment glass 

shelf

5. 

  Fridge compartment cris

-

per

6. 

Gallon door shelf

7. 

Chiller compartment

8. 

Icebox drawer

9. 

Multizone compartment glass 
shelf/cooler

10. 

Freezer compartment dra

-

wers

*Optional

Summary of Contents for GQN21235XN

Page 1: ...GWN21210X GQN22220X GQN21235XN Refrigerator User Manual Kühlschrank Bedienungsanleitung 58 0774 0000 AC EN DE 1 2 EN DE ...

Page 2: ......

Page 3: ...dicator panel 20 5 3 Freezing fresh food 22 5 4 Recommendations for preserving the frozen food 23 5 5 Deep freeze information 23 5 6 Placing the food 24 5 7 Door open warning 24 5 8 Chiller compartment 24 5 9 Crisper 24 5 10 Humidity controlled crisper 25 FreSHelf 25 5 11 Egg tray 25 5 12 Movable Middle Section 25 5 13 Cool Control Storage Compartment 26 5 14 Blue light Vitamin Care Technology 26 ...

Page 4: ...e applicable safety instructions Keep the user manual in an easily accessible place for further use Please read all the other documents provided with the product Please keep in mind that this manual may apply to several product models This manual expressly indicates the differences between various models C Important information and useful hints ARisk of injury and property damage BRisk of electric...

Page 5: ... in shops offices and other working environments farm houses and by clients in hotels motels and other residential type environments bed and breakfast type environments catering and similar non retail applications 1 1 General safety This product should not be used by persons with physical sensory and mental disabilities without sufficient knowledge and experience or by children The device can only...

Page 6: ...od with wet hands It may adhere to your hands Do not place liquids in bottles and cans into the freezer compartment They may explode Place liquids in upright position after tightly closing the lid Do not spray flammable substances near the product as it may burn or explode Do not keep flammable materials and products with flammable gas sprays etc in the refrigerator Do not place containers holding...

Page 7: ...r hammer prevention equipment in your installation Consult Professional plumbers if you are not sure that there is no water hammer effect in your installation Do not install on the hot water inlet Take precautions against of the risk of freezing of the hoses Water temperature operating interval shall be 33 F 0 6 C minimum and 100 F 38 C maximum Use drinking water only 1 2 Intended use This product...

Page 8: ...t the end of its service life Take it to the collection center for the recycling of electrical and electronic equipment Please consult your local authorities to learn about these collection centers 1 5 Compliance with RoHS Directive This product complies with EU WEEE Directive 2011 65 EU It does not contain harmful and prohibited materials specified in the Directive 1 6 Package information Packagi...

Page 9: ...se parts are valid for other models 1 Control and indicator panel 2 Butter Cheese section 3 70 mm moving door shelf 4 Fridge compartment glass shelf 5 Fridge compartment cris per 6 Gallon door shelf 7 Chiller compartment 8 Icebox drawer 9 Multizone compartment glass shelf cooler 10 Freezer compartment dra wers 11 Multizone Compartment s drawer Optional 2 3 4 5 6 7 8 9 1 10 11 5 ...

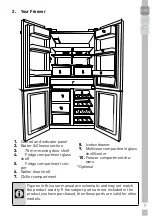
Page 10: ... in the product you have purchased then those parts are valid for other models 1 Control and indicator panel 2 Butter Cheese section 3 70 mm moving door shelf 4 Fridge compartment glass shelf 5 Fridge compartment cris per 6 Gallon door shelf 7 Chiller compartment 8 Icebox drawer 9 Multizone compartment glass shelf cooler 10 Freezer compartment dra wers Optional ...

Page 11: ...work contact the authorized service 3 2 Attaching the plastic wedges Plastic wedges are used to create the distance for the air circulation between the product and the rear wall 1 To install the wedges remove the screws on the product and use the screws supplied toget her with the wedges 2 Insert the 2 plastic wedges onto the rear ventilation cover as illustrated in the figure 3 3 Electrical conne...

Page 12: ...g the stands Iftheproductisnotinbalancedposition adjustthefrontadjustablestandsbyrotating rightorleft Ifyourproductdoesnothaveawine compartmentorisnotaglassdoor your productdoesnothaveadjustablestands theproducthasfixedstands To adjust the doors vertically Loosen the fixing nut located at the bottom Rotate the adjusting nut according to the position of the door clockwise counter clockwise Tighten ...

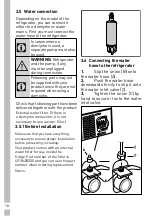
Page 13: ...red together with the product External water filter If there is a demijohn connection it is not necessary to use a water filter 3 5 1 Before Installation Make sure that you have everything necessary to ensure proper installation before proceeding including Your product comes with an internal water filter for use inside the fridge Part number of the filter is 4918450200 and you can use this part nu...

Page 14: ...there is a leakage 3 7 Connecting the water line to the water supply Connect the water line to a water supply valve If a valve is not present or you are not sure consult a qualified plumber Upper hinge group is fixed with 3 screws The hinge cover is attached after the sockets are installed Then the hinge cover is fixed with two screws ...

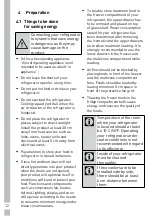
Page 15: ...ch as compressor fan heater defrost lighting display and so on will operate according to the needs to consume minimum energy under these circumstances To be able store maximum food in the freezer compartment of your refrigerator the upper drawer has to be removed and placed on top of glass shelf Power consumption stated for your refrigerator has been determined after removing the icematic and the ...

Page 16: ...tor for 6 hours without placing any food in it and do not open its door unless it is necessary C You will hear a noise when the compressor starts up The liquids and gases sealed within the refrigeration system may also give rise to noise even if the compressor is not running and this is quite normal C Front edges of the refrigerator may feel warm This is normal These areas are designed to be warm ...

Page 17: ...els Select Quick Freeze Quick Cool FN OK 3 3 1 2 3 4 5 6 9 1011 12 13 14 15 16 17 18 19 20 27 28 29 30 31 32 33 34 1 34 2 Select Quick Freeze Quick Cool FN OK 3 3 7 8 22 21 23 24 25 26 5 1 Indicator panel Touch control indicator panel allows you to set the temperature and control the other functions related to the product without opening the door of the refrigerator Just press the relevant buttons...

Page 18: ...functionindicator It turns on when the quick fridge function is activated 2 Fridge compartment temperature indicator Temperature of the fridge compartment is shown it can be set to 8 7 6 5 4 3 2 1 3 Fahrenheit indicator It is a Fahrenheit indicator When the Fahrenheit indication is activated the temperature set values are shown in Fahrenheit and the relevant icon turns on 4 Key lock Press key lock...

Page 19: ... button After navigating the functions using the FN button when the function is cancelled via the OK button the relevant icon and the indicator flashes When the function is activated it remains on The indicator continues to flash in order to show the icon it is on 17 Temperature change cabin icon Indicates the cabin whose temperature is to be changed When the temperature change cabin icon starts f...

Page 20: ...ndicator they start flashing Thus you can understand whether the eco fuzzy function will be activated or deactivated When you press the OK button the eco fuzzy function icon lights continuously and the Indicator continues to flash during this process If you do not press any button after 20 seconds the icon and the indicator remains on Thus the eco fuzzy function is activated In order to cancel the...

Page 21: ...ol will turn off and the key lock mode will be exited Press the key lock button if you want to prevent changing of the temperature setting of the refrigerator 31 Select button Use this button to select the cabin whose temperature you want to change Switch between the cabins by pressing this button The selected cabin can be understood from the cabin icons 7 17 18 20 28 29 Whichever cabin icon is fl...

Page 22: ...g button repeatedly with short intervals the electronic circuit protection will be activated and the compressor will not start up immediately C This function is not recalled when power restores after a power failure 34 1 Joker temperature indicator Temperature set values of the joker cabin are displayed 34 2 Wine cooler compartment tempature indicator Tempature set values of the winecabin are disp...

Page 23: ...e button again Quick Fridge indicator will turn off and return to its normal settings If you do not cancel it Quick Fridge will cancel itself automatically af ter 2 hours or when the fridge compartment reaches to the requ ired temperature This function is not recalled when power restores after a power failure 3 Vacation Function Press the Quick Fridge Vacation button for 3 seconds to activa te Vac...

Page 24: ...e indicator turns on when the Quick Freeze function is on To cancel this function press Quick Freeze button again Quick Freeze in dicator will turn off and return to its normal settings If you do not cancel it Quick Freeze will cancel itself au tomatically after 4 hours or when the freezer compartment reaches to the required temperature If you want to freeze large amo unts of fresh food press the ...

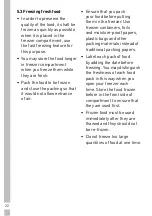
Page 25: ...re that you pack your food before putting them in the freezer Use freezer containers foils and moisture proof papers plastic bags and other packing materials instead of traditional packing papers Label each pack of food by adding the date before freezing You may distinguish the freshness of each food pack in this way when you open your freezer each time Store the food frozen before in the front si...

Page 26: ...hat the package of the food is not damaged 5 5 Deep freeze information According to IEC 62552 standards the product shall freeze at least 4 5 kg of food at 25 C ambient temperature to 18 C or lower within 24 hours for every 100 litres of freezer volume It is possible to preserve the food for a long time only at 18 C or lower temperatures You can keep the freshness of food for many months at 18 C o...

Page 27: ... the door is closed or any of the display buttons if any are pressed 5 8 Chiller compartment Chiller compartments allow you to prepare the food for freezing You can also use these compartments to store your food at a temperature a few degrees below the fridge compartment You can increase the inner volume of your refrigerator by removing any of the chiller compartments 1 Pull the compartment toward...

Page 28: ... similar material instead of plastic bags Do not place pears apricots peaches etc especially those fruits that generate large amounts of ethylene in the same crisper with other fruits and vegetables The ethylene gas emitted by these fruits cause other fruits to ripen sooner and to rot in a shorter span of time 5 11 Egg tray You can install the egg holder to the desired door or body shelf Never kee...

Page 29: ... and is not fault cause 5 14 Blue light Vitamin Care Technology May not be available in all models For the blue light Fruits and vegetables stored in the crispers that are illuminated with a blue light continue their photosynthesis by means of the wavelength effect of blue light and thus preserve their vitamin C content longer For VitaminCare Fruits and vegetables stored in crispers illuminated wi...

Page 30: ...elsius setting just like in a real cellar For white wines which are to be served between 6 and 10 think of putting your bottles in the refrigerator 1 2 hour before serving the refrigerator will be able to maintain the bottles at the preferred temperature As regards red wines they will heat up slowly at room temperature when serving 16 17 C Fine Bordeaux wines Red 15 16 C Fine Burgundy wines Red 14...

Page 31: ...ing Thick and mature red wines About 30 to 60 minutes before serving 4 How long can an open bottle be preserved Unfinished bottles of wine must be cocked properly and can be preserved in a cold and dry place during the following periods White wines Red wines 75 full bottle 3 to 5 days 4 to 7 days 50 full bottle 2 to 3 days 3 to 5 days Less than 50 1 day 2 days ...

Page 32: ...penser Allow 24 hours for the refrigerator to cool down and chill water Dispense enough water every week to maintain a fresh supply C After 5 minutes of continuous dispensing the dispenser will stop dispensing water to avoid flooding To continue dispensing press the dispenser paddle again 5 18 Dispensing Water Hold a container under the dispenser spout while pressing the dispenser pad Release the ...

Page 33: ...r dispenser before the first use and every time after you change the water filter This will remove any air trapped in the system and stop the water dispenser from leaking Checking coupler position and the straightness of water line at the back of the unit will be required if there s an obstruction in water flow C If your water dispenser is leaking just a few drops of water after you have dispensed...

Page 34: ... will break 5 20 Icematic in some models To get ice from the icematic fill the water tank in the fridge compartment with water up to the maximum level Ice cubes in the ice drawer may stick to each other and become a bulk due to hot and humid air in approximately 15 days This is normal If you cannot break the bulk apart you can empty the ice container and make ice again C It is recommended to chang...

Page 35: ...nd body shelves remove all of its contents Remove the door shelves by pulling them up After cleaning slide them from top to bottom to install Never use cleaning agents or water that contain chlorine to clean the ou ter surfaces and chromium coated parts of the product Chlorine causes corrosion on such metal surfaces 6 1 Avoiding bad odours Materials that may cause odour are not used in the product...

Page 36: ... of sudden power failure or pulling the power plug off and putting back on the gas pressure in the product s cooling system is not balanced which triggers the compressor thermic safeguard The product will restart after approximately 6 minutes If the product does not restart after this period contact the service Defrosting is active This is normal for a fully automatic defrosting product The defros...

Page 37: ... a very low degree Set the freezer compartment temperature to a higher degree and check again The food items kept in cooler compartment drawers are frozen The cooler compartment temperature is set to a very low degree Set the freezer compartment temperature to a higher degree and check again The temperature in the cooler or the freezer is too high The cooler compartment temperature is set to a ver...

Page 38: ... water and carbonated water Certain holders and packaging materials may cause odour Use holders and packaging materials without free of odour The foods were placed in unsealed holders Keep the foods in sealed holders Micro organisms may spread out of unsealed food items and cause malodour Remove any expired or spoilt foods from the product The door is not closing Food packages may be blocking the ...

Page 39: ...rener Lebensmittel 28 5 5 Angaben zur Tiefkühlung 29 5 6 Einlegen von Lebensmitteln 30 5 7 Warnton bei offener Tür 30 5 8 Beleuchtung im Innenraum 30 5 9 Kältefach 31 5 10 Gemüsefach 31 5 11 Gemüsefach mit kontrollierter Luftfeuchtigkeit 31 FreSHelf 31 5 12 Eiereinsatz 32 5 13 Beweglicher Mittelbereich 32 5 14 Kältekontrolliertes Aufbewahrungsfach 32 5 15 Blaues Licht Vitamin pflegeTechnologie 33 ...

Page 40: ...werden natürlich in der Anleitung erwähnt Die Symbole In dieser Bedienungsanleitung verwenden wir folgende Symbole C Wichtige Informationen oder nützliche Tipps zum Gebrauch A Warnung vor gefährlichen Situationen die eine Gefahr für Leben und Besitz darstellen können B Warnung vor Stromschlägen Die Verpackungsmaterialien des Gerätes wur den gemäß nationalen Umweltschutzbestimmungen aus recyclingfä...

Page 41: ...e Sicherheitshinweise Dieses Produkt darf nicht von Personen mit körperlichen sensorischen oder mentalen Einschränkungen einem Mangel an Erfahrung und Wissen oder von Kindern verwendet werden Das Gerät darf nur dann von solchen Personen benutzt werden wenn diese von einer für ihre Sicherheit verantwortlichen Person beauf sichtigt werden oder angeleitet worden Kinder dürfen nicht mit diesem Gerät s...

Page 42: ...n den Tiefkühlbereich Sie können plat zen Geben Sie Flüssigkeiten in aufrechter Position in den Kühlschrank zuvor den Deckel sicher verschließen Sprühen Sie keine entflammba ren Substanzen in die Nähe des Gerätes da sie Feuer fangen oder explodieren könnten Bewahren Sie keine entflamm baren Materialien oder Produkte mit entflammbaren Gasen Sprays etc im Kühlschrank auf Stellen Sie keine mit Flüssi...

Page 43: ... Kühlschrank auf damit diese nicht mit anderen Lebensmitteln in Berührung kom men Zwei Sterne Gefrierfächer eig nen sich zur Aufbewahrung von Tiefkühlkost zur Lagerung oder Herstellung von Speiseeis und zur Herstellung von Eiswürfeln Ein Zwei und Drei Sterne Fächer eignen sich nicht zum Einfrieren frischer Lebensmittel Falls das Kühlgerät lange Zeit leer bleibt sollten Sie es abschalten abtauen re...

Page 44: ...rinkwasser 1 2 Bestimmungsgemäßer Einsatz Dieses Gerät ist für den Einsatz im Haushalt vorgesehen Er eig net sich nicht zum kommerziellen Einsatz Das Produkt sollte ausschließlich zum Lagern von Lebensmitteln und Getränken verwendet werden Bewahren Sie keine empfindlic hen Produkte die kontrollierte Temperaturen erfordern z B Impfstoffe wärmeempfindliche Medikamente Sanitätsartikel etc im Kühlschr...

Page 45: ...tellen in Ihrer Nähe 1 5 Einhaltung von RoHS Vorgaben Dieses Gerät erfüllt die Vorgaben der EU WEEE Direktive 2011 65 EU Es enthält keine in der Direktive angegebenen gefährlichen und unzulässigen Materialien 1 6 Hinweise zur Verpackung Die Verpackungsmaterialien des Gerätes worden gemäß na tionalen Umweltschutz bestim mungen aus recyclingfähigen Materialien hergestellt Entsorgen Sie Verpackungsma...

Page 46: ...rätes zählen gelten sie für andere Modelle 1 Bedien und Anzeigefeld 2 Butter Käsefach 3 Bewegliche Türeinlage 70 mm 4 Glaszwischenboden für Kühlschrankfach 5 Glaszwischenboden für Gemüsefach 6 Getränkeeinsatz für die Tür 7 Kältefach 8 Eisbehältereinschub 9 Glaszwischenboden für Multizonenfach Kühler 10 Gefrierfacheinschübe 11 Einschub für Multizonenfach Optional 2 3 4 5 6 7 8 9 1 10 11 5 ...

Page 47: ...eferumfang Ihres Gerätes zählen gelten sie für andere Modelle 1 Bedien und Anzeigefeld 2 Butter Käsefach 3 Bewegliche Türeinlage 70 mm 4 Glaszwischenboden für Kühlschrankfach 5 Glaszwischenboden für Gemüsefach 6 Getränkeeinsatz für die Tür 7 Kältefach 8 Eisbehältereinschub 9 Glaszwischenboden für Multizonenfach Kühler 10 Gefrierfacheinschübe Optional 2 3 4 5 6 7 8 9 1 10 5 ...

Page 48: ...ersuchen Sie es seitlich durch zuschieben falls dies auch nicht funktioniert wenden Sie sich an den Kundendienst Um Schwankungen zu vermeiden stellen Sie es auf eine gerade Fläche Stellen Sie das Gerät mindestens 30 cm entfernt von Wärmequellen wie Heizkörper und Öfen und mindestens 5 cm von elektrischen Backöfen entfernt Setzen Sie das Gerät keiner direkten Sonnenbestrahlung oder Feuchtigkeit aus...

Page 49: ...l an 3 3 Einstellung der Füße Falls Ihr Gerät an seinem Platz nicht ausbalanciert steht können Sie die Vorderfüße durch das Drehen nach rechts und links einstellen Falls Ihr Gerät kein Weinflaschenfach oder keine Glastür hat ist es nicht mit verstellbaren sondern mit festen Fächern ausgestattet ...

Page 50: ...ie die Fixiermutter die sich auf der Oberseite befindet Drehen Sie die Einstellmutter um die seitliche Position der Tür anzupassen im Uhrzeigersinn gegen den Uhrzeigersinn Ziehen Sie die Fixiermutter die sich an der Oberseite befindet um die Position zu korrigieren adjusting nut fixing nut fixing nut adjusting nut Obere Scharniergruppe wird mit 3 Schrauben befestigt Die Scharnierabdeckung wird angeb...

Page 51: ...ellt werden sollte zwischen ihnen ein Abstand von 4 cm eingehalten werden Für Schäden die auf einen Betrieb des Geräts ohne Erdung oder elektrischen Anschlusses gemäß der regionalen Richtlinie zurückgeführt werden können übernimmt der Hersteller keine Verantwortung Das Elektrokabel muss nach der Aufstellung leicht zugänglich sein Zwischen dem Kühlschrank und der Wandsteckdose sollte keine Mehrfach...

Page 52: ...atz eines Wasserbehälters nicht benötigt werden Überzeugen Sie sich davon dass der folgende Artikel im Lieferumfang des Gerätes enthalten ist Externer Wasserfilter Bei Einsatz eines Wasserbehälters muss kein Wasserfilter verwendet werden 3 5 1 Vor der Installation Stellen Sie zunächst sicher dass Sie alles haben was zur ordnungsgemäßen Installation benötigt wird dazu zählen Ihr Produkt kommt mit e...

Page 53: ...tigen Sie zum Anziehen des Anschlussstückes keinerlei Werkzeug Allerdings können Sie durchaus einen Schlüssel oder eine Zange zum Anziehen einsetzen falls Wasser austreten sollte 3 7 Wasserschlauch an die Wasserversorgung anschließen Schließen Sie den Wasserschlauch an einen Wasseranschluss an Falls kein Wasserhahn vorhanden ist oder Sie sich nicht sicher sein sollten ziehen Sie bitte einen versie...

Page 54: ...e usw arbeiten entsprechend den Anforderungen um unter diesen Bedingungen minimale Energie zu verbrauchen Achten Sie darauf Ihre Lebensmittel in geschlossenen Behältern aufzubewahren Um eine größtmögliche Lebensmittelmenge im Gefrierfach Ihres Kühlschranks zu lagern muss der oberste Einschub herausgenommen und auf einen Glaseinsatz gestellt werden Der für den Kühlschrank angegebene Energieverbrauc...

Page 55: ...ssigkeiten und Gase können ebenfalls zu diesen Geräuschen beitragen wenn der Kompressor nicht eingeschaltet ist Das ist vollkommen normal C Die Vorderkanten des Kühlschranks können sich warm anfühlen Das ist normal Diese Bereiche erwärmen sich um Kondensierung zu vermeiden 4 2 Empfehlungen zum Fach für frische Lebensmittel Achten Sie darauf dass die Lebensmittel nicht mit dem Temperatursensor im F...

Page 56: ... Tasten zur Einstellung der Funktionen drücken C Die Abbildungen in dieser Bedienungsanleitung dienen zur Orientierung und können etwas vom Aussehen Ihres Gerätes abweichen Falls Teile nicht zum Lieferumfang Ihres Gerätes zählen gelten sie für andere Modelle Select Quick Freeze Quick Cool FN OK 3 3 1 2 3 4 5 6 9 1011 12 13 14 15 16 17 18 19 20 27 28 29 30 31 32 33 34 1 34 2 Select Quick Freeze Qui...

Page 57: ...Temperatur und sonstigen Fehlern am Gerät auf Während länger anhaltenden Stromausfällen wird die höchste Temperatur im Gefrierfach aufblinkend auf dem Display angezeigt Drücken Sie nach der Prüfung des Lebensmittel im Gefrierfach die Abstelltaste für die Alarmfunktion um die Warnung zu löschen Bitte lesen Sie auch den Abschnitt Für die Fehlerbehebung empfohlene Lösungen in der Bedienungsanleitung ...

Page 58: ...lls 13 Filter zurücksetzen Der Filter wird zurückgesetzt wenn die Taste der Schnellgefrierfunktion 3 Sekunden lang gedrückt wird Das Symbol Filter zurücksetzen erlischt 14 FN Taste Mit Hilfe dieser Taste können Sie zwischen den Funktionen wechseln die Sie einstellen möchten Durch das Drücken dieser Taste wird das Symbol der gewünschten Funktion aktiviert oder deaktiviert und das fängt an zu blinke...

Page 59: ...zeige in Celsius und Fahrenheit ein 22 Symbol Eismaschine aus Drücken Sie die FN Taste bis diese das Eis Symbol und die untere Linie erreicht um die Eismaschine auszuschalten Das Symbol Eismaschine aus und die Anzeige für die Eismaschinenfunktion beginnen zu blinken wenn Sie darüberfahren sodass Sie sehen können ob die Eismaschine ein oder ausgeschalten werden soll Wenn Sie die OK Taste drücken le...

Page 60: ...Die Anzeige blinkt während dieses Vorgangs weiter Drücken Sie die OK Taste um die Urlaubsfunktion abzubrechen Nun beginnen sowohl das Symbol der Urlaubsfunktion als auch die Anzeige an zu blinken und die Urlaubsfunktion wird abgebrochen 25 Symbol für Zusatzkühlfunktion Wenn Sie das Symbol für die Zusatzkühlfunktion mit Hilfe der FN Taste auswählen und die OK Taste drücken schaltet das Zusatzfach i...

Page 61: ...urwerts im Fach 27 oder der Taste zur Erhöhung des Temperaturwerts im Fach 19 ändern Wenn die ausgewählte Taste mehr als 20 Sekunden nicht drücken schaltet sich das Fachsymbol wieder aus Sie müssen diese Taste drücken um erneut ein Fach auszuwählen 32 Warnung Alarm aus Drücken Sie im Falle eines Stromausfalls erhöhte Temperatur Alarms nach der Prüfung des Lebensmittel im Gefrierfach die Abstelltas...

Page 62: ...Kompressor startet nicht sofort C Die Funktion aktiviert sich nicht erneut selbständig nach dem Ende eines Stromausfalls 34 1 Temperaturanzeige des Zusatzfachs Die für das Zusatzfach eingestellten Temperaturwerte werden angezeigt 34 2 Temperaturanzeige des Weinkühlfachs Die für das Zusatzfach eingestellte Temperatur wird angezeigt ...

Page 63: ...llkühltaste noch einmal Die Schnellkühlanzeige erlischt die normalen Einstellungen werden wiederhergestellt C Die Abbildungen in dieser Bedienungsanleitung dienen zur Orientierung und können etwas vom Aussehen Ihres Gerätes abweichen Falls Teile nicht zum Lieferumfang Ihres Gerätes zählen gelten sie für andere Modelle 1 2 3 4 5 6 7 8 9 10 11 12 13 14 15 16 17 18 19 20 Sofern Sie diese Funktion nic...

Page 64: ...Tiefkühlbereiches vor Durch mehrmaliges Drücken dieser Taste stellen Sie die Tiefkühlbereichtemperatur auf 0 2 4 6 8 10 oder 12 ein 14 Schnellgefrieranzeige Die Schnellgefrieranzeige leuchtet bei aktiver Schnellgefrierfunktion auf Zum Abbrechen die ser Funktion drücken Sie die Schnellgefriertaste noch einmal Die Schnellgefrieranzeige erlischt die normalen Einstellungen werden wiederhergestellt Sof...

Page 65: ...27 PL Der Sensorfehleralarm erklingt erst bei einem Stromversorgungsfehler Wenn Sie die Tür schließen und wieder öffnen wird der Tür offen Alarm nach weiteren 2 Minuten erneut aktiviert ...

Page 66: ...t einfachen Packpapiers Beschriften Sie alle verpackten Lebensmittel und vermerken Sie das Einfrierdatum So behalten Sie einen Überblick über Inhalt und Haltbarkeit jedes Mail wenn Sie Tür des Gefrierfachs öffnen Bewahren Sie am längsten gelagerten tiefgekühlten Lebensmittel im vorderen Teil des Fachs auf damit diese zuerst verbraucht werden Eingefrorene Lebensmittel müssen nach dem Auftauen unver...

Page 67: ...luftdichte Behälter und dann in das Gefriergerät Lebensmittel wie Bananen Tomaten Salat Sellerie gekochte Eier und Kartoffeln sind zum Einfrieren nicht geeignet Wenn diese Lebensmittel eingefroren werden beeinträchtigt das deren Nährwert und Geschmack negativ Jedoch stellt ihr Verzehr in solchen Fällen keine Gefahr für menschliche Gesundheit dar Frieren Sie nicht zu große Mengen an Lebensmitteln a...

Page 68: ...üsefach Gemüse und Obst Fach für frische Lebensmittel Feinkostprodukte Brotaufstriche Fleischprodukte für den raschen Verbrauch 5 7 Warnton bei offener Tür Diese Funktion ist optional Ein Warnton ist zu hören wenn die Tür des Geräts länger als 1 Minute offen gelassen wird Dieser Warnton verstummt wenn die Tür geschlossen oder eine der Bedienfeldtasten sofern vorhanden gedrückt wird 5 8 Beleuchtung...

Page 69: ...ntfernen Sie die Türeinsätze die sich gegenüber zum Gemüsefach finden bevor Sie dieses herausnehmen 5 11 Gemüsefach mit kontrollierter Luftfeuchtigkeit FreSHelf Diese Funktion ist optional Das Gemüsefach mit kontrol lierter Feuchtigkeit dient dazu ein Austrocknen des Obsts und Gemüses zu verhindern sodass di eses länger frisch bleibt Wir empfehlen dass Sie blattähnliche Gemüsesorten wie beispielsw...

Page 70: ...gung steht 3 Der bewegliche Mittelbereich ist geschlossen wenn die linke Tür des Kühlfachs geöffnet wird 4 Es darf nicht mit der Hand geöffnet werden Es öffnet sich durch die Führung des Kunststoffteils wenn die Tür geschlossen wird 5 14 Kältekontrolliertes Aufbewahrungsfach Das kältekontrollierte Aufbewahrungsfach Ihres Kühlschranks kann in jedem ge wünschten Modus durch die je weilige Einstellun...

Page 71: ...dunklen Zyklen die einen Tageszyklus simulieren Mit dieser Technologie können Sie Ihr Obst und Gemüse länger schmackhaft und gesund halten was Ihnen hilft die Verschwendung von Lebensmitteln zu Hause zu minimieren Wenn Sie die Tür des Kühlschranks während der Dunkelheitsphase der VitaminCare technology öffnen erkennt der Kühlschrank dies automatisch und schaltet das blaue grüne oder rote Licht ein...

Page 72: ...peratur in einem richtigen Keller Bei Weißweinen die bei 6 bis 10 serviert werden sollten denken Sie bitte daran die Flaschen vor dem Servieren 1 2 Stunde in den Kühlschrank zu geben Der Kühlschrank kann die Flaschen auf die bevorzugte Temperatur herunterkühlen Rotweine erwärmen sich bei Zimmertemperatur nur langsam beim Servieren 16 bis 17 C Feine Bordeaux Weine rot 15 bis 16 C Feine Burgunderwei...

Page 73: ...Etwa 30 bis 60 Minuten vor dem Servieren 4 Wie lang kann eine geöffnete Flasche aufbewahrt werden Geöffnete Weinflaschen mit einem Korken verschlossen und maximal die folgende Anzahl Tage an einem kühlen trockenen Ort aufbewahrt werden Weißweine Rotweine Dreiviertelvolle Flasche 3 bis 5 Tage 4 bis 7 Tage Halbvolle Flasche 2 bis 3 Tage 3 bis 5 Tage Weniger als halbvolle Flasche 1 Tag 2 Tage ...

Page 74: ... erforderlich Sobald die Luft aus dem System entwichen ist kann Wasser aus dem Wasserspender herausspritzen Warten Sie 24 Stunden bis der Kühlschrank sich und das Wasser abgekühlt hat Entnehmen Sie jede Woche genügend Wasser damit es frisch bleibt C Nach 5 Minuten kontinuierlicher Ausgabe stoppt der Wasserspender die Wasserausgabe zur Verhinderung einer Überschwemmung Sie können die Ausgabe fortse...

Page 75: ...egliche Luft aus dem System beseitigt und der Wasserspender läuft nicht aus Prüfen Sie Anschlussposition und Geradheit des Wasserschlauchs an der Rückseite des Gerätes falls der Wasserfluss blockiert wird C Es ist völlig normal wenn der Wasserspender nach der Ausgabe von etwas Wasser leicht tropft Select Quick Freeze Quick Cool FN OK 3 3 Eingebauter Wasserspender bei bestimmten Modellen Nach dem e...

Page 76: ...normal C Wenn Sie keine Eiswürfel herstellen wollen betätigen Sie das Symbol Kein Eis Damit sparen Sie Energie und verlängern die Lebensdauer Ihres Kühlschranks C Es ist normal dass nach der Entnahme von Wasser ein paar Tropfen aus dem Spender nachlaufen 5 22 Eisbereiter und Eisbehälter bei bestimmten Modellen Füllen Sie den Eisbereiter mit Wasser setzen Sie ihn in seine Halterung Ihr Eis ist nach...

Page 77: ...en Sie die Türdichtungen regelmäßig auf Sauberkeit Bei Bedarf reinigen Entnehmen Sie zum Entfernen von Tür und Hauptablagen zunächst sämtliche darin darauf abgelegten Lebensmittel Ziehen Sie die Türablagen heraus Nach der Reinigung setzen Sie die Ablage wieder von oben ein 6 1 Unangenehme Gerüche verhindern Bei der Herstellung Ihres Kühlschrank Gefrierschranks wurde darauf geachtet dass keine Mate...

Page 78: ...unststoffflächen pflegen Geben Sie keine Öle oder stark fetthaltige Speisen offen in Ihren Kühlschrank Gefrierschrank dadurch können die Kunststoffflächen angegriffen werden Sollten die Kunststoffflächen einmal mit Öl in Berührung kommen so reinigen Sie die entsprechenden Stellen umgehend mit warmem Wasser ...

Page 79: ...m versorgt verbundene Sicherung oder die Hauptsicherung ist durchgebrannt Sicherungen prüfen Kondensation an den Seitenwänden des Kühlbereiches Multizone Kühlkontrolle und FlexiZone Die Tür wird zu häufig geöffnet Darauf achten die Gerätetür nicht zu häufig zu öffnen Die Umgebungsfeuchtigkeit ist zu hoch Produkt nicht in Umgebungen mit hoher Luftfeuchtigkeit aufstellen Lebensmittel mit hohem Flüss...

Page 80: ...mgebungstemperatur ist sehr hoch Das Gerät arbeitet bei höheren Umgebungstemperaturen normalerweise länger Das Gerät wurde erst vor Kurzem angeschlossen oder mit neuen Lebensmitteln beladen Das Gerät benötigt mehr Zeit zum Erreichen der eingestellten Temperatur wenn es gerade erst angeschlossen oder mit neuen Lebensmitteln befüllt wurde Dies ist völlig normal Es wurden erst vor Kurzem große Mengen...

Page 81: ...FJDIUFNQFSBUVS JTU TFIS IPDI FJOHFTUFMMU JF àIMCFSFJDIUFNQFSBUVS CFFJOøVTTU EJF 5JFGLàIMCFSFJDIUFNQFSBUVS 8BSUFO 4JF CJT EJF FOUTQSFDIFOEFO 5FJMF EBT FSGPSEFSMJDIF 5FNQFSBUVS FSSFJDIU IBCFO JOEFN 4JF EJF 5FNQFSBUVS EFT àIM PEFS 5JFGLàIMCFSFJDIT ÊOEFSO t JF 5àSFO XVSEFO IÊVöH HFÚòOFU PEFS MÊOHFSF FJU PòFO HFMBTTFO 5àSFO OJDIU V IÊVöH ÚòOFO t JF 5àS TUFIU IBMC PòFO 5àS WPMMTUÊOEJH TDIMJF FO t BT FSÊ...

Page 82: ...t JF 5àS XVSEF IÊVöH HFÚòOFU PEFS MÊOHFSF FJU PòFO HFMBTTFO 5àS OJDIU V IÊVöH ÚòOFO 5àS OJDIU PòFO TUFIFO MBTTFO t JF 5àS TUFIU IBMC PòFO 5àS WPMMTUÊOEJH TDIMJF FO Es befindet sich Kondenswasser an der Außenseite des Produktes oder zwischen den Türen t WFOUVFMM IFSSTDIU IPIF VGUGFVDIUJHLFJU EJFT JTU KF OBDI 8FUUFSMBHF WÚMMJH OPSNBM BT POEFOTXBTTFS WFSEVOTUFU XFOO TJDI EJF VGUGFVDIUJHLFJU WFSSJOHFS...

Page 83: ...SFO EFO PCFSFO FSFJDI EFS 4DIVCMBEF FCFOTNJUUFM JO EFS 4DIVCMBEF OFV BOPSEOFO Wenn Die Produktoberfläche Heiss Ist t JF FSFJDIF XJTDIFO EFO CFJEFO 5àSFO BO EFO 4FJUFOøÊDIFO VOE IJOUFO BN SJMM LÚOOFO JN FUSJFC TFIS IFJ XFSEFO JFT JTU WÚMMJH OPSNBM VOE XFJTU OJDIU BVG FJOF FIMGVOLUJPO IJO 4FJFO 4JF TFIS WPSTJDIUJH XFOO 4JF EJFTF FSFJDIF CFSàISFO A WARNUNG Falls sich das Problem nicht durch Befolgen ...

Page 84: ...GWN21210X GQN22220X GQN21235XN Chłodziarka Instrukcja użytkowania 58 0774 0000 AC 2 2 PL PL ...

Page 85: ......

Page 86: ...alecenia dotyczące przechowywania mrożonej żywności 28 5 5 Informacje o głębokim zamrażaniu 28 5 6 Rozmieszczanie żywności 28 5 7 Alert otwarcia drzwi opcjonalny 29 5 8 Oświetlenie wnętrza 29 5 9 Komora schładzania 29 5 10 Pojemnik na świeże warzywa 29 5 11 Pojemnik na świeże warzywa z kontrolowaną wilgotnością 29 FreSHelf 29 5 12 Tacka na jaja 30 5 13 Ruchoma sekcja środkowa 30 5 14 Komora z regu...

Page 87: ...rukcję obsługi należy mieć pod ręką aby móc łatwo z niej korzystać Prosimy przeczytać wszelkie inne dokumenty dostarczane wraz z produktem Należy pamiętać że ta instrukcja obsługi może się odnosić do kilku modeli produktu W instrukcji zostały wyraźnie określone różnice między modelami Symbole i uwagi W tej instrukcji obsługi są używane następujące symbole C Ważne informacje i przydatne wskazówki A...

Page 88: ... podobnych miejscach np w kuchniach personelu sklepu biur i innych środowisk pracy gospodarstwa rolne przez klientów hoteli moteli i innych miejsc typu mieszkalnego pensjonaty catering i podobne aplikacje niehandlo 1 1 Bezpieczeństwo ogólne Produkt nie może być używany przez osoby z niepełnosprawnością fizyczną czuciową i umysłową bez wystarczającej wiedzy i doświadczenia ani przez dzieci Urządzen...

Page 89: ...niem jakichkolwiek czynności należy skontaktować się a autoryzowanym serwisem Produkt należy podłączyć do uziemionego gniazdka Uziemienie musi być wykonane przez wykwalifikowanego elektryka Jeśli produkt ma oświetlenie typu LED w celu wymiany lub usunięcia problemu należy się skontaktować z autoryzowanym serwisem Nie wolno dotykać zamrożonej żywności mokrymi rękami Może ona przymarznąć do rąk Do k...

Page 90: ...u urządzenia Dzieci w wieku od 3 do 8 lat mogą wkładać żywność do chłodziarek i wyjmować ją Aby uniknąć zanieczyszczenia żywności należy przestrzegać poniższych wskazówek Otwarcie drzwi na dłuższy czas może spowodować znaczny wzrost temperatury w komorach chłodziarki Regularnie czyścić powierzchnie które mogą mieć kontakt z żywnością i dostępnymi systemami odpływowymi Oczyścić zbiorniki wody jeśli...

Page 91: ...y w Państwa instalacji przekroczy 550 kPa 80 psi należy zastosować zawór ograniczający ciśnienie w Państwa sieci wodociągowej Jeśli nie wiedzą Państwo w jaki sposób sprawdzić ciśnienie wody prosimy poprosić o pomoc profesjonalnego hydraulika Jeśli w Państwa instalacji występuje ryzyko uderzenia wodnego należy zawsze stosować wyposażenie zapobiegające przed uderzeniem wodnym Jeśli nie mają Państwo ...

Page 92: ...surowców wtórnych z urządzeń elektrycznych i elektronicznych Zapewniając odpowiednie złomowanie tego wyrobu przyczyniamy się do zapobiegania potencjalnie szkodliwym konsekwencjom dla środowiska naturalnego oraz zdrowia ludzi które w przeciwnym razie mogłyby być spowodowane nieprawidłowym jego nieodpowiednim złomowaniem Aby uzyskać bardziej szczegółowe informacje o odzyskiwaniu surowców wtórnych z ...

Page 93: ...7 PL wyrzucać wraz z normalnymi odpadami domowymi itp Należy je dostarczyć do punktów odbioru materiałów opakowaniowych wyznaczonych przez władze lokalne ...

Page 94: ...l sterowania i wskaźników 2 Miejsce na masło i sery 3 Ruchoma półka w drzwiach 70 mm 4 Szklana półka w komorze chłodniczej 5 Pojemnik na świeże warz ywa w komorze chłodniczej 6 Półka w drzwiach galon 7 Komora schładzania 8 Szuflada z pudełkiem na kost ki lodu 9 Półka szklana do komory wie lostrefowej chłodziarka 10 Szuflady w komorze zamrażalnika 11 Szuflada w komorze wielost refowej OPCJONALNE 2 ...

Page 95: ...zęści informacje dotyczą innych modeli 1 Panel sterowania i wskaźników 2 Miejsce na masło i sery 3 Ruchoma półka w drzwiach 70 mm 4 Szklana półka w komorze chłodniczej 5 Pojemnik na świeże warz ywa w komorze chłodniczej 6 Półka w drzwiach galon 7 Komora schładzania 8 Szuflada z pudełkiem na kost ki lodu 9 Półka szklana do komory wie lostrefowej chłodziarka 10 Szuflady w komorze zamrażalnika OPCJON...

Page 96: ...rzez nieuprawnione osoby B OSTRZEŻENIE Podczas instalacji kabel zasilania produktu musi być odłączony Niespełnienie tego warunku może doprowadzić do śmierci lub poważnych obrażeń A OSTRZEŻENIE Jeśli otwór drzwiowy jest za wąski i produkt się nie mieści zdejmij drzwi i obróć produkt na bok a jeśli i to nie pomoże skontaktuj się z autoryzowanym serwisem 3 2 Podkładanie plastikowych klinów Za pomocą ...

Page 97: ...zek w pionie Poluzuj dolną nakrętkę mocującą Przykręć nakrętkę regulacyjną w prawo lewo w zależności od położenia drzwiczek Dokręć nakrętkę mocującą do końca W celu regulacji drzwiczek w poziomie Poluzuj górną nakrętkę mocującą Przykręć nakrętkę regulacyjną w prawo lewo z boku w zależności od położenia drzwiczek Dokręć górną nakrętkę mocującą do końca adjusting nut fixing nut fixing nut adjusting nu...

Page 98: ...być łatwo dostępny Między gniazdem ściennym i lodówką nie może występować rozgałęziacz z lub bez przedłużacza 3 5 Przyłączenie wody W zależności od modelu chłodziarki można ją przyłączyć albo do butli albo do sieci wodociągowej Najpierw należy przyłączyć do chłodziarki wąż zasilania wodą C Jeśli stosuje się butlę trzeba także użyć oddzielnej pompy A OSTRZEŻENIE W trakcie przyłączania chłodziarka i...

Page 99: ... zamocować go na za worze dopływu wody C Zazwyczaj nie trzeba zaciskać złączki żadnym narzędziem Jeśli jednak spod złączki cieknie woda można ją zacisnąć przy pomocy klucza do nakrętek lub szczypiec 3 7 Podłączanie linii wody do układu doprowadzania wody Podłącz linię wody do zaworu doprowadzania wody Jeśli nie ma zaworu lub masz wątpliwości skonsultuj się z wykwalifikowanym hydraulikiem ...

Page 100: ... nie będzie miały bezpośredniego dostępu do Twojego produktu kiedy drzwi będą zamknięte produkt dokona samodzielnej optymalizacji w warunkach wystarczających do ochrony Twojej żywności W takich okolicznościach funkcje i komponenty takie jak kompresor wentylator podgrzewacz rozmrażanie oświetlenie wyświetlacz itp będą działały w taki sposób aby zużywać minimalną potrzebną ilość energii Aby przechow...

Page 101: ...na to normalne zjawisko spowodowane przez sprężone płyny i gazy w układzie chłodzenia C Normalnym zjawiskiem jest nagrzewanie się przednich krawędzi lodówki Te obszary nagrzewają się celowo aby zapobiec kondensacji C W niektórych modelach panel instrumentów wyłącza się automatycznie w 5 minut po zamknięciu drzwi Panel włączy się ponownie po otwarciu drzwi i naciśnięciu dowolnego przycisku 4 3 Pier...

Page 102: ... i gazy zawarte w systemie chłodzenia także mogą powodować szumy nawet jeśli nie działa sprężarka i jest to zupełnie normalne C Przednie krawędzie lodówki mogą się nagrzewać Jest to całkiem normalne Te obszary powinny się nagrzewać co zapobiega skraplaniu się pary ...

Page 103: ...ednich części informacje dotyczą innych modeli Select Quick Freeze Quick Cool FN OK 3 3 1 2 3 4 5 6 9 1011 12 13 14 15 16 17 18 19 20 27 28 29 30 31 32 33 34 1 34 2 Select Quick Freeze Quick Cool FN OK 3 3 7 8 22 21 23 24 25 26 5 1 Panel wskaźników Panele wskaźników mogą się różnić w zależności od modelu produktu Funkcje dźwiękowe i optyczne panelu wskaźników pomagają korzystać z lodówki ...

Page 104: ...ij ten przycisk Po aktywacji tej funkcji komora zamrażalnika zostanie 1 Wskaźnik funkcji szybkiego chłodzenia Włącza się kiedy aktywna jest funkcja szybkiego chłodzenia 2 Wskaźnik temperatury w komorze chłodzenia W tym miejscu wyświetlana jest temperatura komory chłodzenia można ją ustawić jako 8 7 6 5 4 3 2 1 3 Wskaźnik skali Fahrenheita Jest to wskaźnik skali Fahrenheita Kiedy wskazanie skali Fa...

Page 105: ...ekund Należy nacisnąć ten przycisk aby zmienić ponownie funkcje 15 Wskaźnik skali Celsjusza To jest wskaźnik skali Celsjusza Kiedy wskazanie skali Celsjusza jest aktywne wartości zadane temperatury wyświetlają się w skali Celsjusza oraz zapala się właściwa ikona 16 Przycisk OK Po przejściu do funkcji przy użyciu przycisku FN kiedy funkcja zostanie anulowana przyciskiem OK właściwa ikona i wskaźnik...

Page 106: ...sku przez 20 sekund ikona i wskaźnik zgasną a maszyna do lodu zostanie ponownie włączona C Wskazuje czy kostkarka Icematic jest włączona czy wyłączona C Kiedy wybrana jest ta funkcja woda przestaje wypływać ze zbiornika Jednak lód przygotowany wcześniej można wybrać z kostkarki Icematic 23 Ikona funkcji Eco fuzzy Naciśnij przycisk FN aż dojdzie do ikony litery e i dolnego wiersza aby aktywować eco...

Page 107: ...ie zacznie migać oznacza to że właściwa kabina została wybrana 29 Ikona zmiany temperatury w kabinie Wskazuje kabinę której temperaturę należy zmienić Jeżeli ikona zmiany temperatury w kabinie zacznie migać oznacza to że właściwa kabina została wybrana 30 Blokada klawiszy Naciśnij przycisk blokady klawiszy jednocześnie na 3 sekundy Symbol blokady klawiszy zaświeci się i włączy się tryb blokady kla...

Page 108: ...dzona ma być znaczna ilość świeżej żywności zaleca się uruchomienie tej funkcji przed włożeniem żywności do chłodziarki C Jeśli nie wyłączysz szybkiego chłodzenia funkcja wyłączy się automatycznie po 8 godzinach lub gdy temperatura w komorze chłodziarki osiągnie żądaną wartość C Jeśli będziesz naciskać przycisk szybkiego chłodzenia kilkakrotnie co chwilę uruchomi się elektroniczne zabezpieczenie i...

Page 109: ...ączysz tej funkcji wyłączy się ona automatycznie po 4 godzinach lub gdy temperatura w komorze lodówki osiągnie żądaną wartość C Funkcja ta nie zostaje automatycznie ponownie włączona w momencie przywrócenia zasilania po jego awarii 3 Wybór przycisku Użyj tego przycisku do wybrania kabiny której temperatura ma być zmieniona Naciśnięcie tego przycisku powoduje przełączanie między kabinami Wybraną ka...

Page 110: ...ony zamrażalnika Joker przyciskiem FN 16 i naciśnięciu przycisku OK 17 kabina Joker zmieni się w kabinę zamrażalnika i będzie działać jako zamrażalnik 12 Awaria zasilania wysoka temperatura ostrzeżenie o błędzie Ten wskaźnik zapala się w razie awarii zasilania zbyt wysokiej temperatury lub ostrzeżeń o błędach W przypadku dłuższych przerw w zasilaniu najwyższa wartość temperatury w komorze zamrażal...

Page 111: ...owróci do normalnych ustawień 19 Ostrzeżenie o wyłączeniu alarmu W przypadku alarmu o awarii zasilania wysokiej temperaturze po sprawdzeniu produktów w komorze zamrażalnika naciśnij przycisk wyłączania alarmu aby skasować ikonę ostrzeżenia o wysokiej temperaturze 12 20 Reset filtra Filtr jest resetowany jeżeli przycisk wyłączenia alarmu 19 zostanie wciśnięty przez 3 sekundy Ikona resetowania filtr...

Page 112: ...rana jest ta funkcja woda przestaje wypływać ze zbiornika Jednak lód przygotowany wcześniej można wybrać z kostkarki Icematic 23 Ikona resetowania filtra Ta ikona zapala się kiedy konieczne jest resetowanie filtra 24 Wskaźnik skali Celsjusza To jest wskaźnik skali Celsjusza Kiedy wskazanie skali Celsjusza jest aktywne wartości zadane temperatury wyświetlają się w skali Celsjusza oraz zapala się wł...

Page 113: ... jak najszybciej zamrożona w tym celu należy użyć funkcji szybkiego zamrażania Mrożenie żywności gdy jest świeża wydłuża czas przechowywania w komorze zamrażarki Żywność należy pakować w szczelne opakowania i dokładnie zamykać Przed umieszczeniem żywności w zamrażarce należy się upewnić że jest ona zapakowana Zamiast tradycyjnego papieru pakowego należy użyć pojemników do zamrażania cynfolii i pap...

Page 114: ...jmniej 18 C Żywność do zamrożenia nie może się stykać z wcześniej zamrożoną żywnością aby uniknąć częściowego rozmrożenia Warzywa należy zagotować i odcedzić wodę aby wydłużyć czas zamrażania Umieść żywność w hermetycznych opakowaniach po odfiltrowaniu i włóż do zamrażarki Banany pomidory sałata seler gotowane jajka kartofle i podobna żywność nie powinna być mrożona Zamrażanie tej żywności po pros...

Page 115: ...do siebie aby wyjąć go z oprawy 5 10 Pojemnik na świeże warzywa Pojemnik na świeże warzywa w tej lodówce służy specjalnie do zachowania świeżości warzyw bez utraty ich wilgoci W tym celu wymusza się ogólne krążenie zimnego powietrza wokół pojemnika na świeże warzywa Zanim wyjmiesz pojemnik na świeże warzywa najpierw wyjmij półki z drzwiczek na tym samym poziomie 5 11 Pojemnik na świeże warzywa z k...

Page 116: ...ega do powierzchni ruchomej sekcji środkowej 2 Inny powód wyposażenia chłodziarki w środkową sekcje ruchomą polega na powiększeniu objętości netto komory chłodzenia Standardowe sekcje środkowe zajmują nieco miejsca niewykorzystywanego do chłodzenia 3 Ruchomą sekcję środkową zamyka się przy otwieraniu lewych drzwiczek komory chłodzenia 4 Nie można otwierać jej ręcznie Przy zamykaniu drzwiczek porus...

Page 117: ...samym dłużej zachowują witaminy W przypadku VitaminCare Owoce i warzywa przechowywane w pojemnikach oświetlonych technologią VitaminCare dłużej zachowują zawartość witaminy A i C Dzieje się tak dzięki cyklom niebieskiego zielonego czerwonego światła oraz ciemności które symulują cykl dzienny Dzięki tej technologii możesz dłużej utrzymywać smaczne i zdrowe owoce i warzywa co pomaga zminimalizować m...

Page 118: ...ać ustawienie 12 Celsjusza tak jak w prawdziwej piwnicy W przypadku białych win serwowanych w temperaturze od 6 do 10 należy włożyć butelki do lodówki pół godziny przed podaniem dzięki czemu utrzymana zostanie preferowana temperatura butelek Jeżeli chodzi o czerwone wina po podaniu będą powoli nagrzewać się do temperatury pokojowej 16 17 C Dobre wino Bordeaux czerwone 15 16 C Dobre wino burgundzki...

Page 119: ...75 pełnej butelki od 3 do 5 dni od 4 do 7 dni 50 pełnej butelki od 2 do 3 dni od 3 do 5 dni Mniej niż 50 1 dzień 2 dni 5 18 Zastosowanie wewnętrznego dozownika wody i dozownika wody przy drzwiach w niektórych modelach Po podłączeniu lodówki do źródła wody lub wymianie filtra wody należy przepłukać układ wody Należy użyć solidnego zbiornika do rozprężenia oraz przytrzymać dźwignię dozownika wody pr...

Page 120: ...nika Puścić podkładkę dozownika aby zatrzymać dozowanie C Pierwsze kilka szklanek wody z dozownika może być ciepłe i jest to normalne zjawisko C Jeżeli dozownik wody nie jest używany przez dłuższy czas należy wylać pierwsze kilka szklanek wody aby uzyskać świeżą wodę Przy pierwszym użyciu trzeba będzie poczekać około 24 godzin zanim woda się ochłodzi Zabierz szklankę chwilę po pociągnięciu za spus...

Page 121: ...rządzenia C Jeżeli z dozownika wycieknie zaledwie kilka kropli po dozowaniu niewielkiej ilości wody jest to zjawisko normalne 5 21 Kostkarka do lodu Icematic w niektórych modelach Aby uzyskać lód z kostkarki Icematic napełnij zbiornik wody znajdujący się w komorze zamrażalnika tak aby osiągnąć poziom maksymalny Kostki lodu w szufladzie na lód mogą do siebie przylgnąć i utworzyć bryłę w związku z g...

Page 122: ...kostkarki do lodu Icematic Napełnij Icematic wodą i włóż do obudowy Lód będzie gotowy za ok dwie godziny Nie wyjmuj Icematic z obudowy aby wyjąc lód Obróć pokrętło o 90o zgodnie z kierunkiem ruchu wskazówek zegara Kostki lodu w komórkach wypadną do pojemnika na lód pod nimi Teraz możesz wyjąć pojemnik na lód i podać kostki lodu Jeśli chcesz możesz trzymać kostki lodu w tym pojemniku Pojemnik na ló...

Page 123: ...ki drzwi aby je odłączyć Oczyść i wysusz półki a następnie zamocuj je z powrotem na miejscu wsuwając je od góry Do powierzchni zewnętrznej i części chromowanych produktu nie wolno używać wody chlorowej ani produktów do czyszczenia Chlor spowoduje rdzewienie powierzchni metalowych 6 1 Unikanie nieprzyjemnych zapachów Wyprodukowany produkt jest wolny od wszelkich materiałów zapachowych Jednak przech...

Page 124: ...ny jest przepalony Sprawdź bezpieczniki Kondensacja na bocznej ściance komory chłodziarki WIELOSTREFOWE CHŁODZENIE KONTROLA I STREFA ELASTYCZNA Drzwi są za często otwierane Należy pamiętać aby nie otwierać drzwi produktu za często Środowisko jest za wilgotne Produktu nie należy instalować w wilgotnych środowiskach Żywność zawierająca płyny jest przechowywana w nieszczelnych opakowaniach Żywność za...

Page 125: ...rzedni Większe produkty pracują dłużej Temperatura w pomieszczeniu może być wysoka Produkt będzie normalnie działał przed dłuższy czas przy wyższej temperaturze w pomieszczeniu Produkt mógł zostać niedawno podłączony lub do środka została włożona nowa porcja żywności Produkt będzie potrzebował więcej czasu na osiągnięcie ustawionej temperatury jeśli został niedawno podłączony lub do środka została...

Page 126: ...Zmień temperaturę komory chłodziarki lub zamrażarki i poczekaj aż odpowiednia komora osiągnie ustawiony poziom temperatury Drzwi były często otwierane lub były otwarte przez dłuższy czas Nie należy za często otwierać drzwi Drzwi mogą być uchylone Całkowicie zamknij drzwi Produkt mógł zostać niedawno podłączony lub do środka została włożona nowa porcja żywności To jest normalne Produkt będzie potrz...

Page 127: ...niknie Nieprzyjemny zapach we wnętrzu Produkt nie jest regularnie czyszczony Czyść wnętrze regularnie za pomocą gąbki ciepłej wody i wody z węglanem Niektóre pojemniki i opakowania mogą wywoływać nieprzyjemne zapachy Należy używać pojemników i opakowań z materiałów niewydzielających zapachów Żywność została umieszczona w nieszczelnych opakowaniach Żywność należy przechowywać w zamkniętych opakowan...

Page 128: ... mogą osiągać wysoką temperaturę Jest to normalne zjawisko i nie oznacza konieczności dokonywania naprawy A OSTRZEŻENIE Jeśli problem nie zniknie po wykonaniu instrukcji podanych w tym rozdziale skontaktuj się ze sprzedawcą lub autoryzowanym serwisem Nie próbuj naprawiać produktu ...

Page 129: ...Notes ...

Page 130: ...Notes ...

Reviews: