background image

6  Running the product ............................................................................. 52

6.1 Control Panel ......................................................................................................52
6.2 Symbols .............................................................................................................52
6.3. Preparation of drying machine ...........................................................................52
6.4 Program selection and consumption chart ..........................................................53
6.5 Auxiliary functions ...............................................................................................55
6.6 Warning indicators ..............................................................................................56
6.7 Starting the program ...........................................................................................56
6.8 Child Lock ..........................................................................................................56
6.9 Changing the program after it is started ..............................................................56
6.10 Cancelling the program .....................................................................................57
6.11 End of program ................................................................................................57
6.12 Odour feature ...................................................................................................57
6.13 HomeWhiz Function .........................................................................................57

7 Maintenance and cleaning .................................................................... 60

7.1 Fibre Filters (internal and external filters) / Cleaning of the Interior Surface of the 

Loading Door ...........................................................................................................60
7.2 Cleaning the sensor  ...........................................................................................61
7.3 Emptying the water tank .....................................................................................61
7.4 Cleaning the condenser ......................................................................................62

8 Troubleshooting ..................................................................................... 64

Summary of Contents for GT77823WHF12

Page 1: ...Trockner Bedienungsanleitung Dryer User Manual GT77823WHF12 DE EN 2960313065_DE 150222 1809 ...

Page 2: ... und Ihr Produkt vor möglichen Schäden schützen Bewahren Sie die Bedienungsanleitung auf Fügen Sie diese Anleitung dem Gerät bei wenn Sie sie an eine andere Person übergeben Symbole und Bemerkungen In dieser Betriebsanleitung werden folgende Symbole verwendet Gefahr die zum Tod oder zu Verletzungen führen kann Lesen Sie die Anleitung Wichtige Information bzw nützliche Hinweise zur Verwendung Warnu...

Page 3: ...2 3 Standardkonformitäts und Testinformationen UN Konformitätserklärung 12 3 Ihr Trockner 13 3 1 Technische Daten 13 3 2 Gesamterscheinung 14 3 3 Lieferumfang 14 4 Installation 15 4 1 Geeignete Aufstellungsorte 15 4 2 Entfernen der Versand Sicherheitsgruppe 16 4 3 Wasseranschluss 16 4 4 Einrichten der Stellfüße 17 4 5 Trockner bewegen 17 4 6 Warnung bezüglich des Geräusches 17 4 7 Glühlampe austau...

Page 4: ... Programms 24 6 8 Kindersicherung 24 6 9 Änderung des Programms nach seinem Start 24 6 10 Programm abbrechen 25 6 11 Programmende 25 6 12 Geruchsfunktion 25 6 13 Die HomeWhiz Funktion 25 7 Wartung und Reinigung 28 7 1 Faserfilter interne und externe Filter Reinigung der Innenfläche der Ladetür 28 7 2 Sensor reinigen 29 7 3 Wassertank entleeren 29 7 4 Kondensator reinigen 30 8 Problembehandlung 32 ...

Page 5: ...nn ein Einfrieren möglich und oder für externe Elemente anfällig ist In der Pumpe oder den Schläuchen gefrorenes Wasser kann Schäden verursachen Das Produkt kann nur zum Trocknen und Lüften von Wäsche verwendet werden die mit Wasser gewaschen und sicher getrocknet wird 1 2 Sicherheit von Kindern schutzbedürftigen Personen und Haustieren Dieses Produkt kann von Kindern ab 8 Jahre und Personen mit u...

Page 6: ...enst ausgetauscht werden um mögliche Risiken zu vermeiden Klemmen Sie das Netzkabel nicht unter das Produkt oder an die Rückseite des Produkts Stellen Sie keine schweren Gegenstände auf das Netzkabel Das Netzkabel darf nicht geknickt oder eingeklemmt werden und darf nicht mit Wärmequellen in Berührung kommen Verwenden Sie kein Verlängerungskabel keinen Mehrfachstecker oder Adapter um Ihr Produkt z...

Page 7: ...ng überprüfen Wenn es nicht für die Installation geeignet ist wenden Sie sich an einen qualifizierten Elektriker und Klempner um die erforderlichen Einrichtungen zu organisieren Diese Operationen werden vom Kunden durchgeführt Überprüfen Sie das Produkt vor der Installation auf Beschädigungen Benutzen Sie das Produkt nicht wenn dieses beschädigt ist Entfernen Sie nicht den verstellbaren Ständer St...

Page 8: ...geerdete Steckdose an die mit einer geeigneten Sicherung geschützt ist und dem angegebenen Typ und den angegebenen Stromraten entspricht Lassen Sie die Erdungsausrüstung von einem Elektrofachmann einstellen Verwenden Sie das Produkt nicht ohne eine Erdung die den regionalen nationalen Vorschriften entspricht Schließen Sie das Produkt an eine geerdete Steckdose an die den auf dem Typenschild angege...

Page 9: ...verwendet werden Gummischaum Latexschaum Duschhauben wasserfeste Textilien gummierte Materialien und Kleidung Kissen mit Gummischaumpolstern dürfen nicht in einem Trockner getrocknet werden Gegenstände mit Haarspray Haarpflegemitteln oder ähnlichen Materialien dürfen nicht in einem Trockner getrocknet werden Leeren Sie die Taschen der Kleidung und entfernen Sie Gegenstände wie Streichhölzer und Fe...

Page 10: ...organgs nicht für Modelle mit Heizung Berühren Sie nicht das Innere der Trommel wenn sie während eines laufenden Programms Wäsche hinzufügen oder entfernen Die Trommeloberfläche ist heiß Drücken Sie die Knöpfe nicht mit scharfen Gegenständen wie Gabeln Messern Nägeln usw Betreiben Sie das fehlerhafte oder beschädigte Produkt nicht Trennen Sie das Produkt vom Stromnetz oder schalten Sie die angesch...

Page 11: ...ie Beleuchtung austauschen müssen für Produkte mit Beleuchtung 1 9 Sicherheit des Dampfprogramms Anwendbar auf Produkte mit Dampfprogramm Dampfprogramme verwenden nur destilliertes oder kondensiertes Wasser im Wasserbehälter der Maschine Verwenden Sie kein Leitungswasser oder Zusatzstoffe Bei Verwendung von Kondenswasser im Wassergefäß sollte es gefiltert und von Fasern befreit werden Bevor Sie Wä...

Page 12: ... das System und die Rohre während des Betriebs und des Transports nicht beschädigt werden Halten Sie das Produkt von Wärmequellen fern da es sonst bei Beschädigung Feuer fangen kann Entsorgen Sie das Produkt nicht indem Sie es verbrennen 2 2 Informationen zur Verpackung Die Verpackung des Produkts besteht gemäß der nationalen Gesetzgebung aus recycelbaren Materialien Entsorgen Sie den Verpackungsa...

Page 13: ...n können die technischen Spezifikationen ohne vorherige Ankündigung geändert werden Die Abbildungen in dieser Anleitung sind schematisch und stimmen möglicherweise nicht genau mit dem Produkt überein Die mit dem Trockner oder den Begleitdokumenten gelieferten Werte sind Laborwerte gemäß den jeweiligen Normen Diese Werte können je nach Einsatz und Umgebungsbedingungen abweichen DE Höhe Min Max 84 6...

Page 14: ...lbare Füße 7 Trittbrett 8 Datenplatte 9 Faserfilter 10 Wassertankschublade 11 Stromkabel 3 3 Lieferumfang 1 Wasserabl aufschlauch 6 Wasser Füllbehälter 2 Ersatzfilter schwamm 7 Reines Wasser 3 Bedienung sanleitung 8 Duftstoffkap selgehäuse 4 Korb 9 Bürste 5 Bedienung sanleitung zum Korb 10 Filtertuch Optional möglicherweise nicht enthalten abhängig vom Modell ...

Page 15: ...g mit guter Belüftung Der Spalt zwischen Trockner und Boden darf nicht durch Materialien wie Teppiche Holzstücke und Bänder verringert werden Blockieren Sie nicht die Lüftungsgitter des Trockners In der Nähe der Installationsumgebung des Trockners dürfen sich keine verriegelbaren Türen Schiebetüren oder Flügeltüren befinden die die zu öffnende Ladetür blockieren könnten Sobald der Trockner install...

Page 16: ...fschlauch muss auf einer Höhe von maximal 80 cm befestigt sein Stellen Sie sicher dass der Wasserablaufschlauch zwischen dem Auslass und dem Trockner nicht geknickt kollabiert oder angedrückt wird Der Schlauch muss so angeschlossen werden dass er nicht von seiner Position getrennt wird Ausgelaufenes Wasser kann Schäden verursachen Den Wasserablaufschlauch nicht verlängern Überprüfen Sie ob das Was...

Page 17: ...erät zu hören 4 7 Glühlampe austauschen Wenn Ihr Trockner über eine Trommellichtlampe verfügt Wenden Sie sich an den autorisierten Kundendienst um die Lampe LED auszutauschen die zur Beleuchtung Ihrer Trockenmaschine verwendet wird Die Glühbirne in diesem Produkt ist nicht für die Beleuchtung zu Hause geeignet Mit dieser Lampe soll sichergestellt werden dass die Wäsche sicher in den Trockner gelad...

Page 18: ...Sie daher alle Wäsche die in das Produkt geladen wird Trocknen Sie die Wäsche mit Metallzubehör wie Reißverschlüssen indem Sie sie umdrehen Schließen Sie die Reißverschlüsse Haken und Verschlüsse knöpfen Sie die Knöpfe der Abdeckungen zu binden Sie Textilgürtel und Schürzengürtel 5 4 Was tun um Energie zu sparen Verwenden Sie beim Waschen der Wäsche die höchstmögliche Schleuderoption Dadurch könne...

Page 19: ...die Wäsche im Produkt die maximale Ladekapazität überschreitet funktioniert sie möglicherweise nicht wie vorgesehen und kann Materialschäden verursachen oder das Produkt beschädigen Befolgen Sie für jedes Programm die maximale Tragfähigkeit Die folgenden Gewichte sind als Beispiele angegeben Wäsche Ca Gewicht g Wäsche Ca Gewicht g Baumwollbettwäsche doppelte Größe 1500 Baumwollkleid 500 Bettwäsche...

Page 20: ... Wählen Sie das gewünschte Programm mit der Ein Aus Programmwahltaste das Gerät schaltet sich ein Die Auswahl des Programms mit der Taste Ein Aus Programmauswahl bedeutet nicht dass das Programm gestartet wurde Drücken Sie die Start Stand by Taste um das Programm zu starten Filterreinigung Tank voll Reinigung der Filterschublade Wärmetauscher Starten Pausieren abzubre Eisentrocken Trocknen Buzzer ...

Page 21: ...n einem Stück trocknen In diesem Programm können Sie Doppelsteppdecken Kissen und Mäntel als einzelnes Wäschestück trocknen Trocknen Sie Ihre Kleidung wie Jacken usw indem Sie sie umstülpen 800 165 Zeitprogramme Hier können Sie aus Zeitprogrammen zwischen 10 und 160 Minuten Dauer wählen um den gewünschten Trocknungsgrad bei niedriger Temperatur zu erreichen In diesem Programm läuft der Trockner fü...

Page 22: ...e U min Ungefähre Restfeuchte Energieverbrauch in kWh Express Trocknen kWh Koch Buntwäsche Eco 8 1000 60 1 98 2 55 Koch Buntwäsche Bügeltrocken 8 1000 60 1 55 2 20 Pflegeleicht Schranktrocken 4 800 40 0 70 1 05 Das Programm Koch Buntwäsche Eco das bei Voll und Teilbeladung verwendet wird ist das Standard Trocknungsprogramm auf das sich die Information auf dem Etikett und dem Datenblatt bezieht das...

Page 23: ...zt sich diese Dauer auf 2 30 6 5 Hilfsfunktionen Trockenheitsstufe Die Taste für die Trockenheitsstufe wird zur Einstellung der gewünschten Trockenheit verwendet Die Programmdauer kann je nach gewählter Einstellung variieren Sie können diese Funktion nur vor dem Programmstart aktivieren Prävention von Falten Sie können die Faltenpräventions funktion ein und ausschalten indem Sie die Auswahltaste f...

Page 24: ...amm zu wählen um statt Bügeltrockenheit das Extra Trocken Programm zu wählen Drücken Sie den Start Pause Taste um das neue Programm zu starten Hinzufügen und Entfernen von Kleidung während des Bereitschaftsdienstes Wenn Sie Wäsche hinzufügen oder entfernen möchten nachdem das Trocknungsprogramm startet 6 6 Warnanzeigen Die Warnanzeigen können je nach Modell Ihres Trockenautomaten variieren Filterr...

Page 25: ...Ein Aus Programmwahltaste das Programm wird beendet Das Innere des Trockners muss extrem heiß sein wenn Sie das Programm während des Maschinenbetriebs abbrechen lassen Sie also das Auffrischungsprogramm laufen damit es abkühlen kann 6 11 Programmende Wenn das Programm endet leuchten die LED s der End Faltenverhinderung und der Faserfilter Reinigungswarnung auf der Programm Folgeanzeige auf Die Bel...

Page 26: ...rden indem Sie die Homewhiz Anwendung aufrufen während die Fernbedienung aktiv ist Die detaillierten Informationen zur Homewhiz Anwendung finden Sie unter https www homewhiz com Produkt aus dem Netzwerk löschen Wenn die Zeitverzögerung und die WLAN Tasten 5 Sekunden lang gedrückt werden während das Produkt eingeschaltet ist zählt sie von 5 auf dem Bildschirm herunter und wenn der Piepton zu hören ...

Page 27: ...27 Trockner Bedienungsanleitung Apple App Store für Geräte mit IOS Betriebssystem Google Play Store für Geräte mit Android Betriebssystem ...

Page 28: ...nfläche der Ladetür Die Haare und Fasern die während des Trocknungsprozesses von der Wäsche getrennt werden werden vom Faserfilter gesammelt Reinigen Sie nach jedem Trocknungszyklus den Faserfilter und die Innenfläche der Ladetür HINWEIS Ihr Trockner verfügt über 2 Faserfilter die ineinander angeordnet sind Betreiben Sie das Produkt nicht ohne Faserfilter So reinigen Sie den Faserfilter Öffnen Sie...

Page 29: ...ß ist warten Sie bis sie abgekühlt ist Reinigen Sie die Metalloberflächen des Sensors mit einem weichen mit Essig angefeuchteten Tuch und trocknen Sie sie anschließend ab Reinigen Sie die Metalloberflächen des Sensors viermal im Jahr Verwenden Sie keine Metallwerkzeuge um die Metalloberflächen der Sensoren zu reinigen Verwenden Sie aus Brand und Explosionsgefahr keine Lösungen Reinigungsmittel ode...

Page 30: ...ertank zurück Wenn die Direktentleerungsoption verwendet wird muss der Wassertank nicht entleert werden 7 4 Kondensator reinigen Das Haar und die Faser die nicht vom Faserfilter gesammelt werden sammeln sich auf der Metalloberfläche des Kondensators hinter dem Luftleitblech Diese Fasern sind regelmäßig zu reinigen Wenn das Symbol für die Kondensatorreinigung blinkt überprüfen Sie die Metalloberflä...

Page 31: ...igungsvorgangs die Luftleitblechabdeckung an ihren Platz bewegen Sie die Riegel um sie zu schließen und schließen Sie das Bordbrett Sie können von der Hand reinigen sofern Sie Schutzhandschuhe tragen Versuchen Sie nicht mit bloßen Händen zu reinigen Die Kondensatorlamellen können Ihre Hände beschädigen Die Reinigung von links nach rechts kann die Kondensatorlamellen beschädigen Dies kann zu Trockn...

Page 32: ...ators Möglicherweise wird zu viel Wäsche geladen Laden Sie den Trockner nicht übermäßig Die Wäsche wurde möglicherweise nicht ausreichend ausgewrungen Führen Sie ein Wringen mit höherer Geschwindigkeit an der Waschmaschine durch Der Trockner lässt sich nicht einschalten oder das Programm kann nicht gestartet werden Der Trockner läuft nach der Konfiguration nicht Möglicherweise ist der Netzstecker ...

Page 33: ...ffteil und setzen Sie ihn auf das Filtergehäuse Der umweltfreundliche Filter wurde möglicherweise trotz der Warnung nicht ersetzt Symbol leuchtet Ersetzen Sie Ihren Filter Von der Maschine ist eine akustische Warnung zu hören Faserfilter dürfen nicht eingesetzt werden Setzen Sie die Innen und Außenfilter an ihren Stellen ein Filter des Geräts wurden möglicherweise nicht installiert Installieren Si...

Page 34: ...lteten Zustandes beim Standardbaumwollprogramm bei vollständiger Beladung PO W Durchschnittskondensationseffizienz des Standardbaumwollprogrammes bei partieller Beladung Cdry1 2 Gewichtete Kondensationseffizienz des Standardbaumwollprogrammes bei vollständiger und partieller Beladung C t 5 Gewichteter Durchschnittswert L WA ausgedrückt in dB A re 1 pW 1 Skale von A höchste Effizienz bis D geringst...

Page 35: ... Garantie sind die Schäden oder Mängel die aus folgenden Ursachen ent stehen a unsachgemäße Installation z B Nichtbeachtung der VDE Vorschriften unsachgemäße Aufstel lung z B Nichtbeachtung der Einbau oder Installationsvorschriften äußere Einwirkung z B Transportschäden Beschädigung durch Stoß oder Schlag Schäden durch Witterungseinflüsse b unsachgemäße Bedienung oder Beanspruchung z B Nichtbeacht...

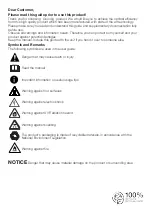
Page 36: ...f and your product against potential damages Keep the manual Include this guide with the unit if you hand it over to someone else Symbols and Remarks The following symbols are used in the user guide Danger that may cause death or injury Read the manual Important information or useful usage tips Warning against hot surfaces BWarning against electric shock Warning against UV Radiation hazard Warning...

Page 37: ...test information EU declaration of conformity 45 3 Your drying machine 46 3 1 Technical specifications 46 3 2 General appearance 47 3 3 Scope of delivery 47 4 Installation 48 4 1 Right place for installation 48 4 2 Removing the shipping safety group 48 4 3 Water connection 49 4 4 Adjusting the stands 49 4 5 Moving the drying machine 49 4 6 Warning regarding the noise 49 4 7 Replacing the lighting ...

Page 38: ...ogram 56 6 8 Child Lock 56 6 9 Changing the program after it is started 56 6 10 Cancelling the program 57 6 11 End of program 57 6 12 Odour feature 57 6 13 HomeWhiz Function 57 7 Maintenance and cleaning 60 7 1 Fibre Filters internal and external filters Cleaning of the Interior Surface of the Loading Door 60 7 2 Cleaning the sensor 61 7 3 Emptying the water tank 61 7 4 Cleaning the condenser 62 8...

Page 39: ...amages Product can only be used to dry and ventilate laundry which are washed with water and drying machine safe 1 2 Safety of children vulnerable persons and pets This product may be used by children aged 8 years and older and persons with underdeveloped physical sensory or mental capabilities or lack of experience and knowledge if they have been given supervision or instruction concerning use of...

Page 40: ... via an external switch such as a timer or shall not be connected to a circuit that is regularly opened and closed with a tool The plug shall be easily accessible If this is not possible a mechanism that meets the electrical legislation and that disconnects all terminals from the mains fuse switch main switch etc shall be available on the electrical installation Do not touch the plug with wet hand...

Page 41: ...n operation The product shall not be installed against a door sliding door where the product loading door cannot be completely opened or behind a hinged door where the product hinge is faced against the door s hinges Install the product where periodic maintenance and cleaning can be done with ease Place the product with its back surface to the wall for heater models After placing the product ensur...

Page 42: ...Drying Machine Connection Kit Type Depth Measurement DM Drying Machine WM Washing Machine Plastic 54 60 cm with without arch DM WM DM WM max 10 cm Plastic 46cm with without arch DM WM DM WM max 10 cm With Shelves 60 cm DM WM With Shelves 54cm DM WM 1 6 Usage safety The maximum weight of dry laundry prior to washing is specified in Technical Specifications section Do not place the unwashed items in...

Page 43: ...els with flue Do not operate the product together with heaters such as gas heater and a chimney It may cause the flue to catch fire for models with flue Do not lean or sit on the loading door when it is open the product may tip over Do not get on the product Do not place a source of flame candles cigarettes etc on the product or in the vicinity of it Do not keep flammable explosive materials Do no...

Page 44: ...osion hazard do not use solutions cleaning materials steel wool or similar materials and tools to clean sensors Clean the flue for models with flue Do not drink the condensed water 1 8 Lighting safety Contact an authorized service when you need to replace the LED bulb using for lighting for products with lighting 1 9 Steam program safety Applicable to products with steam program Steam programs onl...

Page 45: ...e ensure that the system and pipes are not damaged during operation and transportation Keep the product from heat sources otherwise it may catch fire if damaged Do not dispose of the product by throwing it into fire 2 2 Packaging information The product s packaging is made of recyclable materials in accordance with the National Legislation Do not dispose the packaging waste with the household wast...

Page 46: ...hine s quality the technical specifications may be changed without prior notice Figures in this manual are schematic and may not exactly match the product The values provided with the drying machine or its accompanying documents are laboratory readings in accordance with the respective standards These values may differ depending on the use and ambient conditions EN Height Min Max 84 6 cm 86 6 cm W...

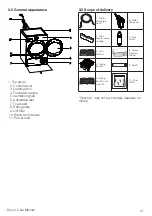
Page 47: ... 6 Adjustable feet 7 Toe board 8 Rating plate 9 Lint filter 10 Water tank drawer 11 Power cord 3 3 Scope of delivery 1 Water discharge hose 6 Water filling cap 2 Filter drawer spare sponge 7 Pure Water 3 User Manual 8 Odour Capsule Group 4 Drying basket 9 Brush 5 Drying basket user manual 10 Filter cloth Optional may not be included depends on model ...

Page 48: ... the drying machine and the floor shall not be reduced via materials such as rugs pieces of wood and bands Do not block the ventilation grilles of the drying machine There shall not be doors that can be locked sliding doors or hinged doors near the installation environment of the drying machine that may block the loading door to be opened Once the drying machine is installed the connections must s...

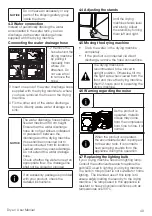
Page 49: ...d or clogged If an accessory package is provided with your product check the detailed instructions 4 4 Adjusting the stands Until the drying machine stands level and sturdy adjust the stands by turning them left and right 4 5 Moving the drying machine Drain the water in the drying machine completely If the product is connected via direct discharge remove the hose connections The drying machine is ...

Page 50: ...ssories such as zippers by turning them inside out Close the zippers hooks and clasps button up the covers buttons tie textile belts and apron belts 5 4 What to do for energy saving Use the highest possible wringing option as you wash the laundry Therefore you can reduce the drying period and reduce energy consumption Sort the laundry based on their types and thickness Dry same types of laundry to...

Page 51: ...may cause material damage or damage the product For each program follow the maximum load capacity The weights below are provided as examples Laundry Approx weight g Laundry Approx weight g Cotton bedding double size 1500 Cotton dress 500 Bedding single size 1000 Dress 350 Bed sheet double size 500 Denim 700 Bed sheet single size 350 Handkerchief 10 pcs 100 Large table cloth 700 T Shirt 125 Small t...

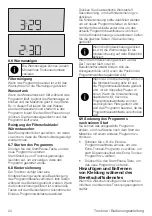
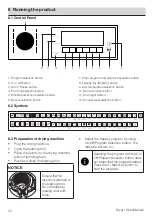
Page 52: ...ith force Select the desired program by using On Off Program Selection button the machine will turn on Selecting the program with the On Off Program Selection button does not mean that the program started Press Start Stand by button to start the program Filter cleaning Tank full Filter drawer Heat exchanger cleaning Start pause cancel Iron Dry Drying Buzzer Cupboard Dry Cupboard Dry Extra dry End ...

Page 53: ...ned inside out 800 165 Time Programmes You may select from time programmes between 10 and 160 minutes to achieve the desired drying level at low temperature In this programme tumble drier s operation lasts for the set time independently from the dryness of laundry Hygienic Refresh You can use this programme for your dry clothes and laundry that you want to provide with hygiene without washing them...

Page 54: ...5 2 20 Synthetics cupboard dry 4 800 40 0 70 1 05 Cottons Eco programme used at full and partial load is the standard drying programme to which the information in the label and the fiche relates that this programme is suitable for drying normal wet Cottons laundry and that it is the most efficient programme in terms of energy consumption for Cottons If you regularly dry the 8 Kg maximum load of Co...

Page 55: ...ng to desired dryness Program time may change depending on the selection You can activate this function only prior to start of program Wrinkle prevention You can turn on and off the wrinkle prevention function by pressing the wrinkle prevention selection button If you will not take the laundry out immediately after the program has completed you may use Wrinkle prevention function to prevent wrinkl...

Page 56: ...ng door while in Stand by state and close the door after you remove or add laundry Press the Start Stand by button to start the program 6 6 Warning indicators Warning indicators may vary depending on the model of your drying machine Filter cleaning When the program is completed the warning indicator for filter cleaning turns on Water tank If the water tank fills up while the program continues the ...

Page 57: ...ndicator turn on Loading door can be opened and drying machine is ready for another operation Turn the On Off Program Selection button to On Off position in order to turn off the drying machine If the Wrinkle Prevention mode is active and the laundry is not removed after the program is completed the wrinkle prevention function activates for 2 hours to prevent the laundry inside the machine to get ...

Page 58: ...www homewhiz com Deleting the product from network When the time delay and Wifi buttons are pressed for 5 seconds while the product is on it counts down from 5 on the screen and when the beep is heard the product is deleted from network and the Wifi is turned off The remote control is cancelled when the door is opened The remote control is cancelled when the program button is turned If the Wifi ic...

Page 59: ...an get the Homewhiz application from the application stores of your device You can use the below QR codes to access the applications faster Apple App Store for the devices with IOS operating system Google Play Store for the devices with Android operating system ...

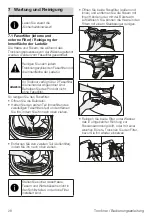
Page 60: ... Interior Surface of the Loading Door The hair and fibres that are separated from the laundry during drying process is collected by the Fibre Filter After each drying cycle clean the fibre filter and the inner surface of the loading door NOTICE Your drying machine has 2 fibre filters with one placed inside the other Do not operate the product without the fibre filters To clean the fibre filter Ope...

Page 61: ...t use metal tools to clean the sensors metal surfaces Due to fire and explosion hazard do not use solutions cleaning materials or similar tools to clean sensors 7 3 Emptying the water tank During drying the moisture is removed from the laundry and condensed then the water is accumulated in the water tank Empty the water tank after each drying session Condensed water is not potable water Do not rem...

Page 62: ... the toe board by pulling its button Move the latches to open the air deflector lid Pull the brush to the left to remove it You can use the cleaning brush to clean filter condensing metal surface and accumulated fibre on the door The cleaning brush is inside the documentation bag Get your brush from the documentation bag and insert it to its place on the air deflector to store it Clean the fibre o...

Page 63: ... The condenser fins may damage your hands Cleaning from left to right may damage the condenser fins This may lead to drying issues When the air deflector cover is removed it is normal to have water at the plastic section in front of the condenser If you see fibre accumulation on the fan cover and the toe board remove with a cloth Do not have weight on the toe board when it is open NOTICE Do not us...

Page 64: ...program cannot be started Drying machine does not run after it is configured Power plug might be unplugged Make sure the power cord is plugged in Loading door might be open Ensure that the loading door is properly closed A program might not be set or Start Pause button might not be pressed Check that the program is set and it is not in Pause position Child lock may be activated Turn off the child ...

Page 65: ...side of the condenser Fibre filters may not be inserted Insert the interior and exterior filters to their places The lighting inside the drying machine turns on In models with lamp If the drying machine is plugged to the power outlet the On Off button is pressed and the door is open the light turns on Unplug the drying machine or bring the On Off button to Off position Wifi icon flashes continuous...

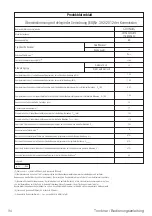
Page 66: ...rogramme at full load kWh Energy consumption of the standard cotton programme at partial load kWh Power consumption of the off mode for the standart cotton programme at full load PO W Power consumption of the left on mode for the standart cotton programme at full load PL W The duration of the left on mode min Standard cotton programme 3 Programme time of the standard cotton programme at full load ...

Page 67: ......

Page 68: ......

Reviews: