background image

32 / 60  EN

Dryer / User Manual

1

    Important instructions for safety and environment

This section contains safety instructions that 
will help protect from risk of personal injury 
or property damage. Failure to follow these 
instructions shall void any warranty.

1.1 General safety


ƒ

This product can be used by the children 
at the age of 8 and over and the persons 
with physical, sensory or mental disorders 
or unlearned or inexperienced people as 
long as they are attended by a person 
who will be responsible for their safety or 
who will instruct them accordingly about 
use of the product. Children should not 
tamper with the machine. Cleaning and 
user maintenance works should not be 
carried out by the children unless they are 
attended by someone.


ƒ

Never place the product on a carpet-
covered floor; otherwise, lack of airflow 
beneath the machine will cause electrical 
parts to overheat. This will cause 
problems with your product.


ƒ

Always have the installation and 
repairing procedures carried out by 
the 

Authorized Service Agent

Manufacturer shall not be held liable for 
damages that may arise from procedures 
carried out by unauthorized persons.

1.1.1 electrical safety


ƒ

If the product is faulty, it must not be 
operated unless it is repaired by an 
authorized service agent! There is the risk 
of electric shock!


ƒ

This product is designed to resume 
operating in the event of a power 
recovery following a power cut. If you 
want to cancel an ongoing program, 
look at the section titled “Canceling a 
Program”.


ƒ

Connect the product to an earthed outlet 
protected by a 16 ampere fuse. Have the 
grounding installation performed by a 
qualified electrician. Our company shall 

not be liable for any damages that will 
arise when the product is used without 
grounding in accordance with the local 
regulations.


ƒ

Unplug the product when it is not in use.


ƒ

Never wash the product by spreading or 
pouring water onto it! There is the risk of 
electric shock!


ƒ

Never touch the plug with wet hands! 
Never unplug by pulling on the cable, 
always pull out by grabbing the plug.


ƒ

Unplug the machine from the mains 
during installation, maintenance, cleaning 
and repair works.


ƒ

If the power cord of the machine is 
damaged, in order to avoid the danger, it 
should be replaced by the manufacturer, 
an after sales service agent or an equally 
qualified personnel (preferably an 
electrician) or a person to be designated 
by the importer.


ƒ

Do not use extension cords, multi-plugs or 
adaptors to connect the dryer to power 
supply in order to decrease the risk of fire 
and electric shock.


ƒ

Power cable plug must be within easy 
reach after installation.

1.1.2 Product safety


ƒ

Do not connect the air exit of the product 
to the chimney holes which are used 
for the exhaust fumes of the devices 
operating with gas or other types of fuel.


ƒ

You must provide enough ventilation 
in order to prevent gases exiting from 
devices operating with other types of 
fuels including the naked flame from 
accumulating in the room due to the back 
fire effect.


ƒ

Items cleaned or washed with gasoline/
diesel, dry-laundry solvents and other 
combustible or explosive materials as 
well as the items that are contaminated 
or spotted with such materials should not 

Summary of Contents for GTN 17110

Page 1: ...GTN 17110 Trockner BEDIENUNGSANLEITUNG dryer user manual DE Dokument Nummer 2960310862_DE 150414 1437 EN ...

Page 2: ...ungsanleitung für unterschiedliche Modelle geschrieben wurde Unterschiede zwischen den verschiedenen Modellen werden natürlich in der Anleitung erwähnt Die Symbole In der Bedienungsanleitung verwenden wir folgende Symbole C Wichtige Informationen oder nützliche Tipps zum Gebrauch A Warnung vor gefährlichen Situationen die eine Gefahr für Leben und Besitz darstellen können B Warnung vor Stromschläg...

Page 3: ...xtilien 13 4 2 Textilien zum Trocknen vorbereiten 13 4 3 Hinweise zum Energiesparen 13 4 4 Erste Inbetriebnahme 14 4 5 Die richtige Wäschemenge 14 4 6 Wäsche in die Maschine geben 15 5 Programm auswählen und mit dem Gerät arbeiten 16 5 1 Bedienfeld 16 5 2 Symbole und Informationen im Display 16 5 3 Maschine vorbereiten 17 5 4 Programmauswahl 17 5 5 Hauptprogramme 17 5 6 Zusatzprogramme 17 5 7 Zusa...

Page 4: ...n nicht autorisierter Personen verursacht werden 1 1 1 Elektrische Sicherheit Bei Fehlfunktionen darf das Gerät erst dann wieder in Betrieb genommen werden nachdem es durch den autorisierten Kundendienst repariert wurde Es besteht Stromschlaggefahr Nach einem Stromausfall setzt das Gerät den Betrieb wieder automatisch fort Zum Abbrechen eines Programmes bitte den Abschnitt Programme abbrechen beac...

Page 5: ...reiten damit sich die Hitze schnell verflüchtigt Den Fusselfilter vor oder nach jedem Einsatz reinigen Den Trockner niemals ohne eingesetzten Fusselfilter benutzen Das Innere und den Abluftschlauch des Gerätes regelmäßig reinigen Darauf achten dass sich keine Fasern kein Staub und keine sonstigen Verschmutzungen am Luftauslass oder in der Nähe ansammeln Keine ungewaschenen Textilien im Wäschetrock...

Page 6: ...sicheren Ort und außerhalb der Reichweite von Kindern aufbewahren Elektrogeräte können eine Gefahr für Kinder darstellen Kinder im Betrieb daher unbedingt vom Gerät fernhalten Kinder nicht mit dem Gerät spielen lassen Kindersicherung nutzen damit Kinder das Gerät nicht manipulieren können Bei Verlassen des Raumes nicht vergessen die Tür des Gerätes zu schließen 1 4 Erfüllung von WEEE Vorgaben zur ...

Page 7: ...itung 2 Trockner 2 1 Übersicht 1 8 7 6 11 4 9 2 3 10 5 1 Deckplatte 2 Bedienfeld 3 Tür 4 Frontblende Freigabetaste 5 Belüftungsgitter 6 Einstellbare Füße 7 Frontblende 8 Typenschild 9 Fusselfilter 10 Wassertankschublade 11 Netzkabel ...

Page 8: ...8 60 DE Trockner Bedienungsanleitung Trockner 2 2 Lieferumfang 1 2 3 1 Wasserablaufschlauch 2 Filterschubladenschwamm 3 Bedienungsanleitung Wird je nach Gerätemodell mit dem Produkt geliefert ...

Page 9: ...rät übereinstimmen C Die an der Maschine oder in der Dokumentation angegebenen Werte wurden unter Laborbedingungen in Übereinstimmung mit den zutreffenden Normen ermittelt Je nach Einsatz und Umweltbedingungen können diese Werte variieren DE Höhe verstellbar 84 6 cm Breite 59 5 cm Tiefe 53 cm Füllmenge max 7 kg Nettogewicht mit Kunststoff Fronttür 36 kg Nettogewicht mit Glas Fronttür 38 5 kg Spann...

Page 10: ...Der Trockner ist schwer Nicht versuchen das Gerät alleine zu transportieren Das Gerät an einem gut belüfteten staubfreien Ort benutzen Ventilationsöffnungen an der Vorderseite und unter dem Gerät nicht blockieren z B durch langflorige Teppiche oder Holzeinfassungen Das Gerät nicht hinter verschlossenen Türen Schiebetüren und nicht hinter Türen aufstellen die sich gegen das Gerät öffnen und dagegen...

Page 11: ...r bei Untertisch Installation nicht ohne Untertisch Installationsbauteil in Betrieb nehmen Trocknertiefe 60 cm 54 cm Artikelnummer Untertisch Installationsbauteil 2979700200 2973600200 Mindestens 3 cm Platz zwischen Seitenwänden Rückwand des Gerätes und angrenzenden Gegenständen freilassen wenn das Gerät unter einer Arbeitsplatte oder in einem Schrank installiert wird 3 4 Aufstellung auf der Wasch...

Page 12: ...n dabei an der Tabelle mit technischen Daten orientieren Wir haften nicht für jegliche Schäden die durch mangelhafte nicht den örtlichen Vorschriften entsprechende Erdung entstehen Der Anschluss muss gemäß lokal gültiger Vorschriften erfolgen Das Netzkabel muss nach der Aufstellung frei zugänglich bleiben Hinweise zu Betriebsspannung und erforderlichen Sicherungen stehen im Abschnitt Technische Da...

Page 13: ...icht im Trockner trocknen Nicht trocknen Nicht chemisch reinigen 4 Vorbereitung 4 2 Trockner ungeeignete Textilien Nicht Trockner geeignete Textilien und Artikel Wäsche mit Metallteilen z B Büstenhalter Gürtelschnallen und Metallknöpfe Woll und Seidenwäsche Nylonstrümpfe empfindliche Stoffe mit Stickereien Schlafsäcke Empfindliche und sehr feine Wäschestücke Gardinen Textilien mit eingeschlossenen...

Page 14: ... unbedingt geöffnet werden muss darauf achten dass die Tür nicht lange geöffnet bleibt Während des Trocknens keine weitere feuchte Wäsche hinzugeben Beim Trocknen lösen sich Fusseln und einzelne Fasern von der Wäsche Diese Rückstände sammeln sich im Fusselfilter Fusselfilter vor oder nach jedem Einsatz reinigen Filterschublade regelmäßig reinigen Entweder dann wenn das Filterschublade reinigen Hin...

Page 15: ... 350 Große Tischtücher 700 Kleine Tischtücher 250 Servietten 100 Badehandtücher 700 Handtücher 350 Oberbekleidung Ungefähres Gewicht Gramm Blusen 150 Baumwollhemden 300 Hemden 200 Baumwollkleider 500 Kleider 350 Jeans 700 Taschentücher 10 Stück 100 T Shirts 125 4 7 Wäsche in die Maschine geben 1 Gerätetür öffnen 2 Wäsche locker in die Maschine geben 3 Tür zum Schließen zudrücken A VORSICHT Sichers...

Page 16: ...ung 5 Programm auswählen und mit der Maschine arbeiten 5 1 Bedienfeld 1 Taste Ein Aus Abbrechen 2 Programmknopf 3 Programmnummernanzeige 4 Tonsignallautstärketaste Kindersicherung 5 Zeitverzögerungstaste 6 Start Pause Taste 2 1 3 4 5 6 ...

Page 17: ...t dass kein Bügeln mehr nötig ist bevor Sie die Wäsche in den Schrank geben Schranktrocken Plus Normale Wäsche z B Tischtücher Unterwäsche werden so getrocknet dass kein Bügeln mehr nötig ist bevor die Wäsche in den Schrank gegeben wird Sie werden jedoch intensiver getrocknet als bei der Schranktrocken Option Bügeltrocken Normale Wäsche z B Hemden Kleider wird bügelfertig getrocknet C Weitere Deta...

Page 18: ... feine Unterwäsche etc und Wäsche die nur mit der Hand gewaschen werden sollte bei niedrigen Temperaturen trocknen C Wir empfehlen empfindliche Wäsche und Textilien in einen Kleiderbeutel zu geben damit diese nicht zerknittert oder beschädigt werden Nach dem Abschluss des Programms nehmen Sie die Wäsche sofort aus dem Trockner und hängen sie auf damit sich keine Falten bilden Auffrischen Hierbei w...

Page 19: ... Sportbekleidung 4 1000 60 92 Synthetik B Schranktrocken 4 800 40 45 B Bügeltrocken 4 800 40 35 Energieverbrauchswerte Programme Kapazität kg Schleudergeschwindigkeit Waschmaschine U min Ungefähre Restfeuchte Energieverbrauch in kWh Schranktrocken Baumwolle 7 1000 60 4 17 Bügeltrocken Baumwolle 7 1000 60 3 25 Schranktrocken Synthetik 3 5 800 40 1 42 Programmauswahl und Verbrauchstabelle Energiebew...

Page 20: ...chte Verzögerungszeit mit der Zeitverzögerung Taste ein Das entsprechende Zeitverzögerungssymbol erscheint in der Anzeige Wenn die Taste gehalten wird schreitet die Zeitverzögerungseinstellung ununterbrochen voran 4 Drücken Sie die Start Pause Taste Die Verzögerungszeit wird stetig heruntergezählt C Während die Zeitverzögerung läuft können Sie weitere Wäsche hinzugeben oder Wäsche herausnehmen Wen...

Page 21: ...xtratrocken Programm statt des Bügeltrocken Programms verwenden Dazu beenden Sie das laufende Programm indem Sie die Start Pause Taste 1 Sekunde lang gedrückt halten 2 Wählen Sie das Extratrocken Programm mit dem Programmauswahlknopf 3 Zur Fortsetzung des Programms drücken Sie die Start Pause Taste Wäsche bei angehaltenem Programm hinzugeben oder herausnehmen So geben Sie nach Programmstart weiter...

Page 22: ...einigen und Wassertank Hinweissymbole in der Programmfolgeanzeige auf Die Gerätetür lässt sich nun öffnen ein neues Programm kann gestartet werden Zum Abschalten der Maschine betätigen Sie die Taste Ein Aus Abbrechen C Eine zweistündige Knitterschutz Funktion die Ihre Wäsche vor dem Zerknittern schützt wenn Sie die Textilien nach dem Abschluss des Programms nicht gleich herausnehmen Bei diesem Pro...

Page 23: ...tstehen übrigens beim Tragen und beim Waschen der Wäsche A VORSICHT Fusselfilter und die Innenseite der Gerätetür nach jedem Trocknen reinigen C Das Fusselfiltergehäuse kann mit einem Staubsauger gereinigt werden Fusselfilter reinigen 1 Gerätetür öffnen 2 Fusselfilter nach oben herausziehen Fusselfilter öffnen 3 Fusseln Fasern und sonstige Rückstände mit den Fingern oder einem weichen Lappen entfe...

Page 24: ... A VORSICHT Niemals Lösungsmittel chemische Reinigungsmittel oder ähnliche Substanzen zur Reinigung benutzen es besteht Brand und Explosionsgefahr 7 3 Wassertank leeren Die der Wäsche entzogene Feuchtigkeit kondensiert und sammelt sich im Wassertank Wassertank nach jedem Trocknen leeren A VORSICHT Das Konsenswasser ist kein Trinkwasser A VORSICHT Wassertank niemals im laufenden Programm herausnehm...

Page 25: ...e den Kondensator alle 30 Trocknungszyklen oder einmal pro Monat So reinigen Sie den Kondensator 1 Falls die Maschine gerade in Betrieb war öffnen Sie die Tür und warten bis die Maschine abgekühlt ist 2 Öffnen Sie die Frontblende und lösen Sie die beiden Kondensatorsperren 3 Ziehen Sie den Kondensator heraus 4 Reinigen Sie den Kondensator unter einem kräftigen Wasserstrahl z B mit dem Duschkopf la...

Page 26: ... warmem Wasser auswaschen Der Kondensator ist verstopft Kondensator reinigen Zuviel Wäsche geladen Trockner nicht überladen Die Wäsche wurde nicht ausreichend geschleudert Wäsche mit höherer Geschwindigkeit schleudern Der Trockner lässt sich nicht einschalten oder das Programm startet nicht Der Trockner läuft nach der Programmauswahl nicht an Der Trockner ist vielleicht nicht angeschlossen Kontrol...

Page 27: ...r Kondensator ist verstopft Kondensator reinigen Wasser läuft durch die Gerätetür aus An der Innenseite der Gerätetür und an der Türdichtung haben sich Fusseln angesammelt Innenseite der Gerätetür und die Türdichtung reinigen Die Gerätetür öffnet sich plötzlich Die Tür ist nicht richtig geschlossen Gerätetür bis zum hörbaren Einrasten zudrücken Das Wassertank Hinweissymbol leuchtet oder blinkt Der...

Page 28: ......

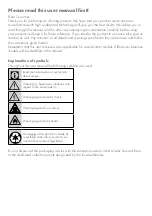
Page 29: ...structions given therein Remember that this user manual is also applicable for several other models Differences between models will be identified in the manual Explanation of symbols Throughout this user manual the following symbols are used C Important information or useful hints about usage A Warning for hazardous situations with regard to life and property B Warning against electric shock Warni...

Page 30: ...y suitable for drying in the machine 41 4 2 Preparing clothes to be dried 41 4 3 Things to be done for energy saving 41 4 4 First use 42 4 5 Correct load capacity 42 4 6 Loading the laundry 43 5 Selecting a program and operating your machine 44 5 1 Control panel 44 5 2 Display Symbols 44 5 3 Preparing the machine 45 5 4 Programme selection 45 5 5Main programmes 45 5 6 Additional programmes 45 5 7 ...

Page 31: ...a Program Connect the product to an earthed outlet protected by a 16 ampere fuse Have the grounding installation performed by a qualified electrician Our company shall not be liable for any damages that will arise when the product is used without grounding in accordance with the local regulations Unplug the product when it is not in use Never wash the product by spreading or pouring water onto it ...

Page 32: ... bonnets water resistant textiles materials with rubber reinforcement and rubber foam pads should not be dried in the dryer Do not use fabric softeners and anti static products unless they are recommended by the manufacturers of the relevant product Use softeners anti static products etc in accordance with the instructions of their manufacturers Do not install the product behind a door with a lock...

Page 33: ...ve 2012 19 EU This product bears a classification symbol for waste electrical and electronic equipment WEEE This product has been manufactured with high quality parts and materials which can be reused and are suitable for recycling Do not dispose of the waste product with normal domestic and other wastes at the end of its service life Take it to the collection center for the recycling of electrica...

Page 34: ...Your Dryer 2 1 Overview 1 8 7 6 11 4 9 2 3 10 5 1 Top panel 2 Control panel 3 Loading door 4 Kick plate opening button 5 Ventilation grids 6 Adjustable feet 7 Kick plate 8 Type label 9 Lint filter 10 Water tank drawer 11 Power cord ...

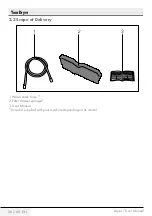
Page 35: ...36 60 EN Dryer User Manual Your Dryer 2 2 Scope of Delivery 1 2 3 1 Water drain hose 2 Filter drawer sponge 3 User Manual It can be supplied with your machine depending on its model ...

Page 36: ...d on the machine labels or in the documentation accompanying it are obtained in laboratory in accordance with the relevant standards Depending on operational and environmental conditions of the appliance values may vary EN Height adjustable 84 6 cm Width 59 5 cm Depth 53 cm Capacity max 7 kg Net weight plastic front door usage 36 kg Net weight glass front door usage 38 5 kg Voltage See type label ...

Page 37: ...t move it by yourself Operate your product in a well ventilated dust free environment Do not block the air ducts in front of and under the product with materials such as long pile rugs wooden blocks and bands Do not install the product behind a door with a lock sliding door or a hinged door which can strike the product Once the product is installed it should stay at the same place where its connec...

Page 38: ...ectly to the wastewater drain or to the washbasin 3 3 Under counter installation This product can be installed under a counter if the height of the counter is sufficient A CAUTION While using the under counter dryer never operate the dryer without under counter installation part Dryer Depth 60 cm 54 cm Stock number of under bench installation part 2979700200 2973600200 Leave at least 3 cm of space...

Page 39: ...nical specifications table Our company shall not be liable for any damages that will arise when the product is used without grounding in accordance with the local regulations Connection must comply with national regulations Power cable plug must be within easy reach after installation The voltage and allowed fuse or breaker protection are specified in the Technical specifications section If the cu...

Page 40: ...aundry unsuitable for drying in the machine Laundry and items stated below are not suitable for drying in a dryer Laundry items with metal attachments such as metal buttons metal reinforcements or belt buckles Woolen or silk garments nylon stockings delicate embroidered fabrics and sleeping bags Garments made of delicate and valuable fabrics Tulle curtains Items made of hermetic fibres such as pil...

Page 41: ...nless necessary If you must certainly open the loading door do not to keep it open for a long time Do not add new wet laundry during drying Lint and fiber released from the laundry to the air during the drying cycle are collected in the Lint Filter Clean the lint filter before or after each drying cycle Clean the filter drawer regularly either when the Filter Drawer Cleaning warning symbol appears...

Page 42: ...tablecloths 700 Small tablecloths 250 Tea napkins 100 Bath towels 700 Hand towels 350 Garments Approximate weights g Blouses 150 Cotton shirts 300 Shirts 200 Cotton dresses 500 Dresses 350 Jeans 700 Handkerchiefs 10 pieces 100 T Shirts 125 4 7 Loading the laundry 1 Open the loading door 2 Place the laundry in the machine without compressing 3 Push the loading door to close A CAUTION Ensure that no...

Page 43: ...ting a program and operating your machine 5 1 Control panel 1 On Off Cancel button 2 Program knob 3 Program number indicator 4 Audio warning level button child proof lock 5 Time delaying selection button 6 Start Pause button 2 1 3 4 5 6 ...

Page 44: ... not require ironing before placing in the wardrobe However they are dried more when compared to the Wardrobe Dry option Iron Dry Normal laundry shirts dresses and etc are dried ready to be ironed C For further programme details see Programme selection and consumption table 5 4 Main programmes Depending on the fabric type the following main programmes are available Cottons Dry durable laundry with...

Page 45: ... cloth bag to avoid certain delicate garments and laundry from getting creased or damaged Take your laundry immediately out of the dryer and hang them after the programme ends in order to prevent them being creased Refresh Only ventilation is performed for 10 minutes without blowing hot air You can air the clothes that have been kept at closed environments for a long time and deodorize unpleasant ...

Page 46: ...d dry 4 800 40 45 B Iron dry 4 800 40 35 Energy consumption values Programs Capacity kg Spin speed in washing machine rpm Approximate amount of remaining humidity Energy consumption value kWh Cottons linen Ready to wear 7 1000 60 4 17 Cottons Ready to iron 7 1000 60 3 25 Synthetics Ready to wear 3 5 800 40 1 42 Programme selection and consumption table Energy Label standard programme EN 61121 2012...

Page 47: ...The relevant time delay indicator will light up on the display When the button is pressed on time delay proceeds continuously 4 Press Start Pause button The Time Delay starts to count down C Additional laundry may be loaded taken out during the Time Delay period At the end of the Time Delay countdown process Delay Time warning symbol disappears and drying process starts Changing the Delay Time If ...

Page 48: ...undry after the drying programme has started 1 Press Start Pause button to switch the machine to Pause mode Drying process will pause 2 While in Pause mode open the loading door add or take out laundry and close the loading door 3 Press the Start Pause button to resume the program C Any laundry added after the drying process has started may cause the clothes that are already dried in the machine i...

Page 49: ...s ready for a second cycle Press On Off Cancel button to switch off the machine C A 2 hour anti creasing function to prevent laundry from creasing will be activated if you do not take the laundry out after the program has come to an end This programme rotates the laundry in 10 minute intervals to prevent creasing C Clean the lint filter after each drying See Lint Filter and Loading Door Inner Surf...

Page 50: ...program Start symbol will light up to indicate that the programme has started and symbol in the middle of the remaining time will keep flashing 6 5 Canceling the programme If you want to stop drying and cancel the programme for any reason after the machine has started to run press and hold the On Off Cancel button for 3 seconds 6 6 End of programme Lint Filter Cleaning and Water Tank warning symbo...

Page 51: ...ding door 2 Remove the lint filter by pulling it up and open the lint filter 3 Clean lint fiber and cotton raveling by hand or with a soft piece of cloth 4 Close the lint filter and place it back into its housing C A layer can build up on the filter pores that can cause clogging of the filter after using the machine for a while Wash the lint filter with warm water to remove the layer that builds u...

Page 52: ...he program is running If you forget to drain the water tank the machine will stop during the subsequent drying cycles when the water tank is full and the Water Tank warning symbol will flash If this is the case drain the water tank and press Start Pause button to resume the drying cycle To drain the water tank 1 Pull the drawer and remove the water tank carefully 2 Drain the water in the tank 3 If...

Page 53: ...and wait until it cools down 2 Unlock the 2 condenser locks after opening the kick plate 3 Pull out the condenser 4 Clean the condenser by applying pressurized water with a shower armature and wait until the water drains 5 Place the condenser in its housing Fasten the 2 locks and make sure that they are seated securely 6 Close the kick plate cover ...

Page 54: ...he timer programmes additionally Pores of the lint filter are clogged Wash the lint filter with warm water Condenser may be clogged Clean the Condenser Excessive laundry might have been loaded in Do not load the dryer in excess Laundry might not be spun sufficiently Spin your laundry at a higher speed in your washing machine Dryer does not switch on or the programme does not start Dryer does not s...

Page 55: ...oor Lint has accumulated on the inner surfaces of the loading door and on the surfaces of the loading door gasket Clean the inner surfaces of the loading door and the surfaces of the loading door gasket Loading door opens spontaneously The loading door might not be closed securely Push the loading door to close until you hear a locking sound Water Tank warning symbol is on flashing Water tank may ...

Page 56: ......

Page 57: ......

Page 58: ...die Schäden oder Mängel die aus folgenden Ursachen ent stehen a unsachgemäße Installation z B Nichtbeachtung der VDE Vorschriften unsachgemäße Aufstel lung z B Nichtbeachtung der Einbau oder Installationsvorschriften äußere Einwirkung z B Transportschäden Beschädigung durch Stoß oder Schlag Schäden durch Witterungseinflüsse b unsachgemäße Bedienung oder Beanspruchung z B Nichtbeachtung der Gebrauc...

Page 59: ......

Reviews: